A Plethora Of Power Delivery Potential

Here at the Hackaday we’ve been enjoying a peculiar side effect of the single-port USB-C world; the increasing availability of programmable DC power supplies in the form of ubiquitous laptop charging bricks. Once the sole domain of barrel jacks or strange rectangular plugs (we’re looking at you Lenovo) it’s become quite common to provide charging via the lingua franca of USB-C Power Delivery. But harnessing those delectable 100W power supplies is all to often the domain of the custom PCBA and firmware hack. What of the power-hungry hacker who wants to integrate Power Delivery in her project? For that we turn to an excellent video by [Brian Lough] describing four common controller ICs and why you might choose one for your next project.

A superb illustration from the TS100 Flex-C-Friend documentation

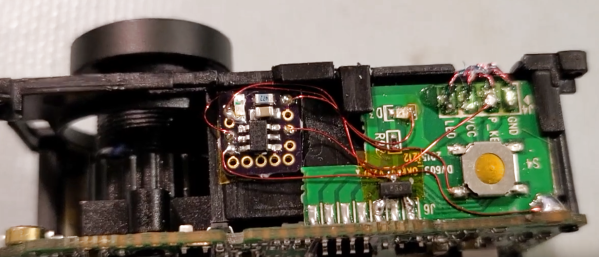
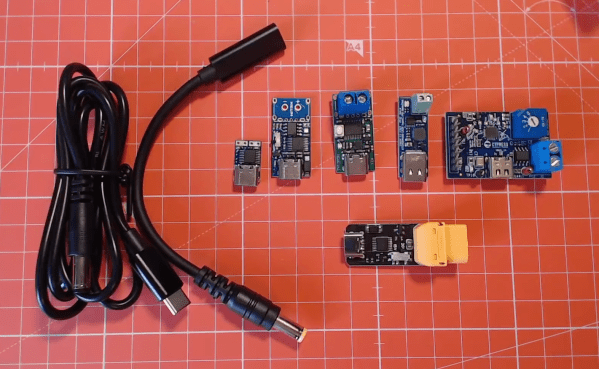
[Brian] starts off with a sorely-needed explainer of what the heck Power Delivery is; a topic with an unfortunate amount of depth. But the main goal of the video is to dive into the inscrutable hoard of “USB C trigger boards.” Typically these take USB on one side and provide a terminal block on the other, possibly with a button or LED as user interface to select voltage and current. We’ve seen these before as laptop barrel jack replacements and TS100 power supplies but it’s hard to tell which of the seemingly-identical selection is most suitable for a project.

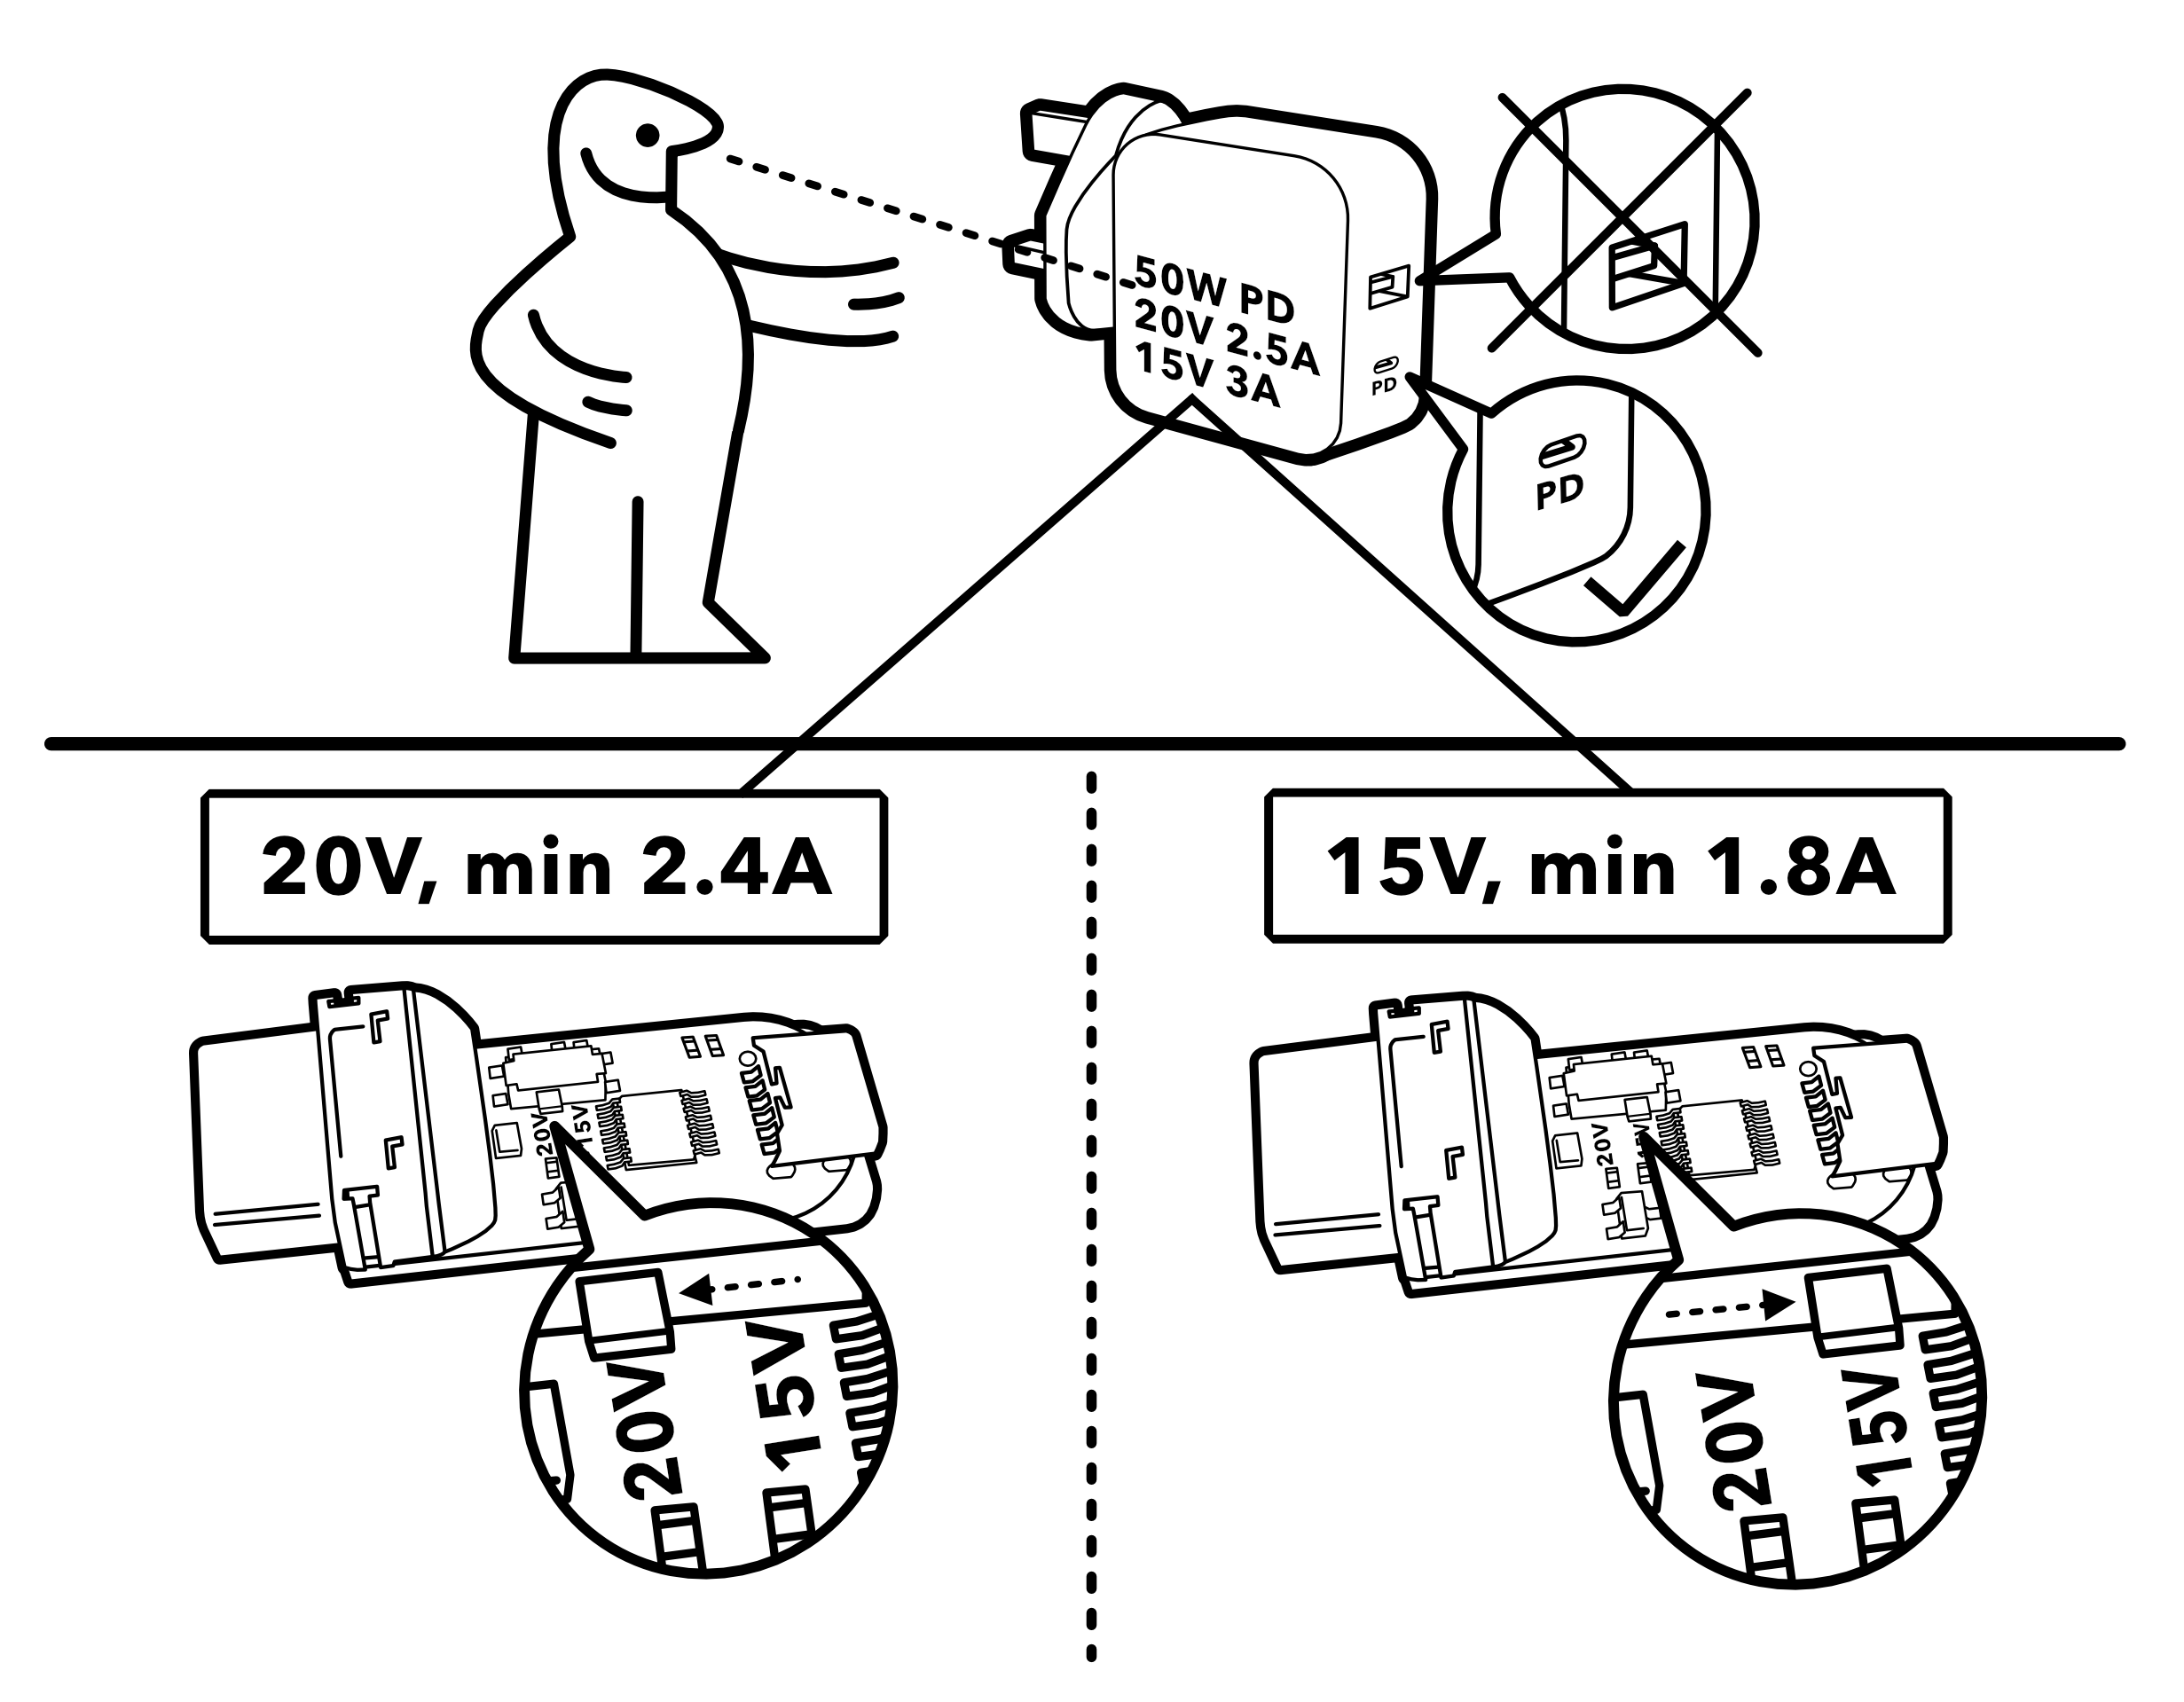
The main body of the video is [Brian’s] detailed walkthrough of four types of trigger boards, based on the IP2721, FUSB302, STUSB4500, and Cypress EZ-PD BCR. For each he describes the behaviors of it’s particular IC and how to configure it. His focus is on building a board to power a TS100 (which parallels his TS100 Flex-C-Friend) but the content is generally applicable. Of course we also appreciate his overview of the products on Tindie for each described module.

For another angle on Power Delivery, check out this series of posts by [jason cerudolo], a perennial favorite. And don’t miss his classic project, the USB Easy Bake Oven.

Hacking A Cheap Action Cam Into A Dashcam With A Microcontroller

Repurposing commodity electronics is one of the true forms of hacking, and it’s always the simple little hacks that lead to big ones. [Everett] wanted to use a $20 GoPro clone as a dash cam, so he wired a microcontroller into it to automate some actions and make it practical.

The camera turns on automatically when connected to external power like a car charger, but starting and stopping a recording and power down all had to be done manually. [Everett] wanted to automate these functions, so he opened up the camera and started probing with an oscilloscope. He found the power button, record button, 3.3 V and external 5 V traces conveniently next to each other in the top of the camera.

To automate the required functions, he wired in a PIC10 on a small breakout board, powered by the 3.3 V line. It detects if 5 V is connected to the charging port on start-up via an N-channel FET, then automatically starts a recording. When the 5 V power is switched off with the car, it waits 10 seconds before stopping the recording and switching off the camera. If no external 5 V is not detected on start-up the microcontroller does nothing, which allows the camera to be used as a normal handheld. [Everett] mounted the camera to his rearview mirror with a magnetic bracket made using a combination of a 3D printer and 3D pen.

This is a simple and practical little hack, and the firmware is available on Github. Cheap dashcams are available for similar prices, but you won’t get any hacking satisfaction that way.

The very nature of actions cameras inspire hacking. You can simply add an external battery with the help of a 3D printer, or go all out and build a gimballed helmet cam from scratch

Modular Camera Remote Is Highly Capable

Many cameras these days have optional remotes that allow the shutter release to be triggered wirelessly. Despite this, [Foaly] desired more range, and more options for dealing with several cameras at once. As you’d expect, hacking ensued.

[Foaly] uses Silver modules to photograph rocket launches safely.
The system goes by the name of Silver, and is modular in nature. Each Silver module packs a transmitter and receiver, and can send and receive trigger orders to any other module in range. This allows a module to be used to trigger a camera, or be used as a remote to control other modules. There’s even a PC interface program that controls modules over USB.

Modules are also capable of sharing configuration changes with other modules in the field, making it easy to control a large battery of cameras without having to manually run around changing settings on each one. Oh, and it can run as a basic intervalometer too.

LoRa is used for wireless communications between modules, giving them excellent range. [Foaly] successfully used the remotes at ranges over 500 meters without any dropouts, capturing some great model rocket takeoffs in the process.

Silver is a highly robust project that should do everything the average photographer could ever possibly need, and probably a good deal more. Firmware and board files are available for those eager to make their own.

We’ve seen several very impressive camera augmentations entered into the 2019 Hackaday Prize, from ultra high-speed LED flash modules to highly flexible automatic trigger systems.

Laser Triggered Camera Flash

High Speed Laser Based Camera Flash Trigger For Only $2

[Matt Kane] works at a really cool company in the UK where he recently finished working on the Triggertrap Ada — the highest-performance, most feature packed camera trigger out there. So just for fun, he decided to challenge himself again — could he make a super basic, super fast, bare-bones camera trigger for $2 instead?

At the most basic level this is just a laser pointer and a light sensor. When the object your photographing breaks the light path, the flash triggers. Typically this is done with an IR laser, but since he’s going for a low-cost system, he’ll use a basic 1mw red laser pointer — the only downfall is you might see it in the picture.

Next up is the sensor. Ideally we’d use a photodiode which is very fast, but also expensive. A photoresistor is cheap, but not fast enough. A nice medium between the two is a phototransistor, which is relatively fast, and cheap. Finally, we need a minimum trigger period to offset the flash. [Matt] thought about using a 555 timer but instead decided to just generate a pulse with an Attiny45.  Continue reading “High Speed Laser Based Camera Flash Trigger For Only $2”

Long-range Canon DSLR Remote Video Trigger

canon_60D_remote_video_trigger

Instructables user [Justin] generally enjoyed shooting video with his Canon 60D DSLR, though there was one small problem. The only way that the camera could be remotely triggered to shoot video was via a small IR remote with a paltry 10 foot range. Even worse, the remote had to be pointed directly at the front of the camera to work at all. To remedy the situation, he decided to rig up his own long-range trigger mechanism.

He cobbled together an Arduino with components he had sitting around, mounting it in a project box on top of the camera. A commercially available RF remote shutter release is also mounted on the top of the camera, and wired to the Arduino using a small 2.5mm plug. When he activates the RF remote, it sends a pulse to the Arduino, which in turn sends the appropriate signal to his camera via a small IR LED.

While he readily admits that he could have likely used a much simpler configuration, the Arduino does its job, and he’s quite happy with his solution. We agree with him about the Arduino, but it’s hard to argue with saving money by using components you already have on-hand.

Automatic Trigger For Lightning Photography

lightning_trigger

[Vicktor] has always been fascinated by photographs of lightning and decided to try his hand at capturing a few strikes on his camera. Every time he attempted it however, he didn’t have much success. Instead of trying to operate his camera manually to take the images, he decided to build a lightning trigger that would do it for him.

His circuit uses a large photodiode to sense when lightning strikes, triggering the camera via a hacked shutter release cable. A PIC micro controller is used to adjust the sensitivity of the device, as well as to send the actual trigger signal to the camera. His circuit is connected to the camera via a pair of opto couplers to ensure that his circuit cannot cause any harm to the camera.

When the box is powered on, it enters a calibration mode where the user can adjust the circuit to compensate for whatever amount of ambient light is present. Once armed, the box waits for a sudden change in ambient lighting, sending the exposure release signal to the camera.

A schematic is available on his site, and he will send you the code he use on request. There is currently no video of the trigger in action, but hopefully we’ll see one soon.

If you’re interested in seeing some other remote camera triggers, check out this one made from air freshener parts, and this one which uses lasers.

Arduino Camera Laser Trigger

pict0005

[Adam] made a remote camera trigger that uses a laser. He had to install CHDK on his camera, which we’ve featured in a how-to, in order for it to work. CHDK allowed for a remote shutter trigger through the USB port. The laser bounces off a mirror and onto the photoresisitor hooked up to an Arduino. When the beam is broken, the Arduino sets off the trigger. He also plans to use the trigger to tweet over ethernet. Embedded is a video demonstrating its functionality.

Continue reading “Arduino Camera Laser Trigger”