Robotic Skin Sees When (and How) You’re Touching It

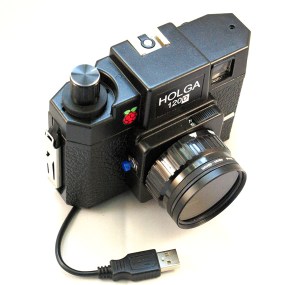
Cameras are getting less and less conspicuous. Now they’re hiding under the skin of robots.

A team of researchers from ETH Zurich in Switzerland have recently created a multi-camera optical tactile sensor that is able to monitor the space around it based on contact force distribution. The sensor uses a stack up involving a camera, LEDs, and three layers of silicone to optically detect any disturbance of the skin.

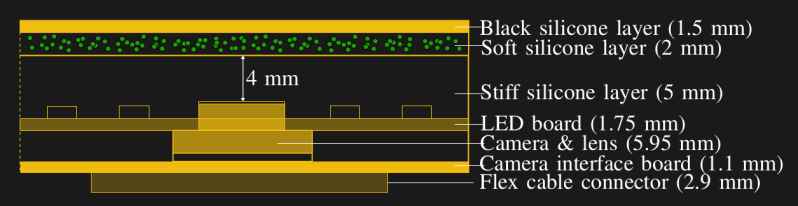
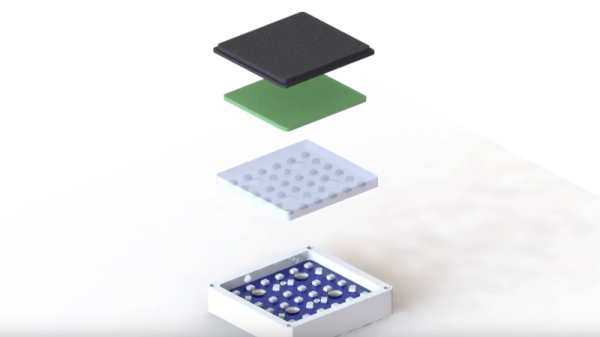
The scheme is modular and in this example uses four cameras but can be scaled up from there. During manufacture, the camera and LED circuit boards are placed and a layer of firm silicone is poured to about 5 mm in thickness. Next a 2 mm layer doped with spherical particles is poured before the final 1.5 mm layer of black silicone is poured. The cameras track the particles as they move and use the information to infer the deformation of the material and the force applied to it. The sensor is also able to reconstruct the forces causing the deformation and create a contact force distribution. The demo uses fairly inexpensive cameras — Raspberry Pi cameras monitored by an NVIDIA Jetson Nano Developer Kit — that in total provide about 65,000 pixels of resolution.

Apart from just providing more information about the forces applied to a surface, the sensor also has a larger contact surface and is thinner than other camera-based systems since it doesn’t require the use of reflective components. It regularly recalibrates itself based on a convolutional neural network pre-trained with data from three cameras and updated with data from all four cameras. Possible future applications include soft robotics, improving touch-based sensing with the aid of computer vision algorithms.

While self-aware robotic skins may not be on the market quite so soon, this certainly opens the possibility for robots that can detect when too much force is being applied to their structures — the machine equivalent sensation to pain.

Continue reading “Robotic Skin Sees When (and How) You’re Touching It”

Hacklet 97 – Camera Projects

We last covered camera projects way back in Hacklet #11. A ton of camera projects have been added to Hackaday.io since then. While the rest of the world is taking selfies, hackers, makers, and engineers have been coming up with new ways to hack their image capture devices. This week on the Hacklet, we’re taking a look at some of the best camera projects on Hackaday.io!

pixelzFirst up is [aleksey.grishchenko] with PiXel camera. PiXel is a camera and a live video display all in one, We wouldn’t exactly call it high-definition though! A Raspberry Pi uses its camera module to capture images of the world. [Aleksey] then processes those images and displays them on a 32 x 32 RGB LED matrix. This matrix is the same kind of tile used in large outdoor LED signs. The result is a surreal low resolution view of the world. Since the Pi, batteries, and camera all hide behind the LED matrix, there is an unobstructed view of the world around you. [Aleksey] used  [Henner Zeller’s] matrix library to make this hack happen.

imagerNext up is [Esben Rossel] with Linear CCD module. [Esben] is building a Raman spectrometer, much like 2014 Hackaday Prize finalist [fl@C@] with his own ramanPi. The heart of a spectrometer is the linear image capture device. Both of these projects use the same TCD1304 linear CCD. Linear Charge Coupled Devices (CCDs) are the same type of device used in flatbed document scanners. The output of the CCD is analog, so an ADC must be used to capture the data. [Esben] is using an STM32F401RE on a Nucleo board as the control logic. The ST’s internal ADC converts the analog signal to digital. From there, it’s time to process all the spectra.

wiimote-cam[Chiprobot] brings the classic Wii remote camera to the internet of things with
ESP8266 meets Wii Mote Camera. The Wii remote uses a camera which doesn’t output images, instead it plots the location of up to four IR LEDs. Normally these LEDs are located in the poorly named sensor bar that is sold with the Wii. Hackers have been using these cameras in projects for years now. [Chiprobot] paired his camera with the modern classic ESP8266 WiFi module. The ‘8266 is programmed to read data from the camera’s I2C bus. It then sends the data as an SVG request to the W3C website. W3C returns a formatted image based on those coordinates. The resulting image is a picture of the IR LEDs seen by the camera. Kind of like sending your negatives out to be developed.

photoboothFinally, we have [GuyisIT] with Raspberry Pi Photobooth. Photo booths are all the rage these days. First it was weddings, but now it seems like every kids party has one. [GuyisIT] didn’t rent a booth for his daughter’s birthday, he built one using his Raspberry Pi and Pi camera. The project is written in python, based upon [John Croucher’s] code. When the kids press a button, the Pi Snaps a series of pictures. The tiny Linux computer then joins and rotates the images while adding in some superhero themed graphics. Finally the Pi prints the image on to a photo printer. The biggest problem with this hack is re-triggering. The kids loved it so much, they kept pressing the big red button!

If you want to see more camera projects, check out our updated camera projects list! If I missed your project, don’t be shy! Just drop me a message on Hackaday.io. That’s it for this week’s Hacklet. As always, see you next week. Same hack time, same hack channel, bringing you the best of Hackaday.io!

Thumbnail that say The Hacklet

Hacklet #11- Cameras

11

We preempt this week’s Hacklet to bring you an important announcement.

Hackaday.io got some major upgrades this week. Have you checked out The Feed lately? The Feed has been tweaked, tuned, and optimized, to show you activity on your projects, and from the hackers and projects you follow.

We’ve also rolled out Lists! Lists give you quick links to some of .io’s most exciting projects. The lists are curated by Hackaday staff. We’re just getting started on this feature, so there are only a few categories so far. Expect to see more in the coming days.

Have a suggestion for a list category? Want to see a new feature?  Let us know!

Now back to your regularly scheduled Hacklet

There are plenty of cameras on Hackaday.io, from complex machine vision systems to pinhole cameras. We’re concentrating on the cameras whose primary mission is to create an image. It might be for art, for social documentation, or just a snapshot with friends.

pinstax[theschlem] starts us off with Pinstax, a 3D Printed Instant Pinhole Camera. [theschlem] is using a commercial instant film camera back (the back for a cheap Diana F+) and 3D printing his own pinhole and shutter. He’s run into some trouble as Fuji’s instant film is fast, like ISO 800 fast. 3 stops of neutral density have come to the rescue in the form of an ND8 filter. Pinstax’s pinhole is currently 0.30mm in diameter. That translates to just about f/167. Nice!

largeformat

Next up is [Jimmy C Alzen] and his Large Format Camera. Like many large format professional cameras, [Jimmy’s] camera is designed around a mechanically scanned linear sensor. In this case, a TAOS TSL1412S. An Arduino Due runs the show, converting the analog output from the sensor to digital values, stepping the motor, and displaying images in progress on an LCD. Similar to other mechanically scanned cameras, this is no speed demon. Images in full sunlight take 2 minutes. Low light images can take up to an hour to acquire.

democracy[Jason’s] Democracycam aims to use open source hardware to document protests – even if the camera is confiscated. A Raspberry Pi, Pi Cam module, and a 2.8″ LCD touchscreen make up the brunt of the hardware of the camera. Snapping an image saves it to the SD card, and uses forban to upload the images to any local peers. The code is in python, and easy to work with. [Jason] hopes to add a “panic mode” which causes the camera to constantly take and upload images – just in case the owner can’t.

digiholgaThe venerable Raspberry Pi also helps out in [Kimondo’s] Digital Holga 120d. [Kimondo’s] fit a Raspberry Pi model A, and a Pi camera, into a Holga 120D case. He used the Slice of pi prototype board to add a GPIO for the shutter release button, a 4 position mode switch, and an optocoupler for a remote release. [Kimondo] even added a filter ring so he can replicate all those instagram-terrific filters in hardware. All he needs is to add a LiPo battery cell or two, a voltage regulator, and a micro USB socket for a fully portable solution.

openreflex

Finally, we have [LeoM’s] OpenReflex rework. OpenReflex is an open source 3D printed Single Lens Reflex (SLR) 35mm film camera. Ok, not every part is 3D printed. You still need a lens, a ground glass screen, and some other assorted parts. OpenReflex avoids the use of a pentaprism by utilizing a top screen, similar to many classic twin lens reflex cameras. OpenReflex is pretty good now, but [Leo] is working to make it easier to build and use. We may just have to break out those rolls of Kodachrome we’ve been saving for a sunny day.

That’s it for this week’s Hacklet! Until next week keep that film rolling and those solid state image sensors acquiring. We’ll keep bringing you the best of Hackaday.io!

Build Cheap Panning Camera Mounts For Time Lapse Photography

diy_ikea_panning_camera_mount

Panning time lapse photographs always look pretty cool, but there’s that whole “making a panning time lapse” rig that gets in the way of all the fun. [Getawaymoments] put together a tutorial quite a while ago showing how to use Ikea egg timers as cheap and dispensable panning units, and has updated his instructions with a pair of refreshed designs.

He stumbled upon two new egg timers at Ikea, the Stam and Ordning, which sell for $1.99 and $5.99 respectively. The Stam is a small plastic model that can be fitted with a set screw, to which most cameras can be mounted. A small bushing can also be installed in the timer’s plastic base, allowing it to be mounted on any standard tripod.

The Ordning is a beefier unit capable of withstanding more abuse than its plastic brethren, hence the larger price tag. A few minutes on the drill press makes room for a metal bushing, allowing the Ordning to be installed on any tripod as well.

The hack isn’t high tech, but we’re impressed with the results he was able to get with these simple kitchen timers. For the cost and time required to build them, they are sure to give most other panning rigs a run for the money.

Continue reading to see a short instructional video demonstrating how to build one of your own.

[via Make]

Continue reading “Build Cheap Panning Camera Mounts For Time Lapse Photography”