Be A Fire Bender With The Power Of Magnets

More often than you think, scientific progress starts with a simple statement: “Huh, that’s funny…” That’s the sign that someone has noticed something peculiar, and that’s the raw fuel of science because it often takes the scientist down interesting rabbit holes that sometimes lead to insights into the way the world works.

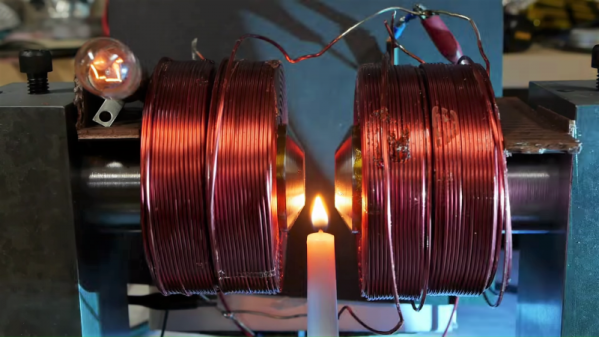
[Ben Krasnow] ended up falling down one of those rabbit holes recently with his experiments with magnets and flames. It started with his look at the Zeeman effect, which is the observation that magnetic fields can influence the spectral lines of light emitted by certain sources. In a previous video, [Ben] showed that light from a sodium lamp could be dimmed by a powerful electromagnet. Some of his viewers took exception to his setup, which used an oxy-acetylene flame doped with sodium passing through the poles of the magnet; they thought the effect observed was a simple magnetohydrodynamic effect, and not the Zeeman effect he was supposed to be testing. That led to the experiments in the video below, which started with a candle flame being strongly deflected by the magnet. [Ben] methodically worked through the problem, eliminating variables by going so far as to blow soap bubbles of various gasses within the magnet’s poles to rule out the diamagnetism of oxygen as a cause of the phenomenon. He finally showed that even hot air by itself is deflected, using a simple light bulb and a FLIR camera. It’s good stuff, and well worth a watch.

Spoiler alert: [Ben] is still scratching his head about what’s going on, and we’re looking forward to his conclusions. This isn’t his first rabbit hole expedition, of course; his experiments with creating plasma with high-pressure water were fascinating, as were his DIY superconducting ceramics. Continue reading “Be A Fire Bender With The Power Of Magnets”

When Stirling Engines Meet 3D Printers

Let’s face it, everybody wants to build a Stirling engine. They’re refined, and generally awesome. They’re also a rather involved fabrication project which is why you don’t see a lot of them around.

This doesn’t remove all of the complexity, but by following this example 3D printing a Sterling engine is just about half possible. This one uses 3D printing for the frame, mounting brackets, and flywheel. That wheel gets most of its mass from a set of metal nuts placed around the wheel. This simple proof-of-concept using a candle is shown off in the video after the break, where it also gets an upgrade to an integrated butane flame.

Stirling engines operate on heat, making printed plastic parts a no-go for some aspects of the build. But the non-printed parts in this design are some of the simplest we’ve seen, comprising a glass syringe, a glass cylinder, and silicone tubing to connect them both. The push-pull of the cylinder and syringe are alternating movements caused by heat of air from a candle flame, and natural cooling of the air as it moves away via the tubing.

We’d say this one falls just above mid-way on the excellence scale of these engines (and that’s great considering how approachable it is). On the elite side of things, here’s a 16-cylinder work of art. The other end of the scale may not look as beautiful, but there’s nothing that puts a bigger smile on our faces than clever builds using nothing but junk.

Continue reading “When Stirling Engines Meet 3D Printers”

Soda Can Lamp Pinpoints Your Interests

We’ve said it a million times before: 3D printing will expand your horizons. The more you print, the more you think about things you could print and new ways to use printing in the process of building projects. [AHNT] knows all about this phenomenon, because he thought of a way to use soda cans as canvases for customizable pixel art lamp shades.

[AHNT] designed a printable sleeve that fits perfectly over 250mL cans. It provides a sturdy grid for poking tiny holes with a medical needle, and can be reused indefinitely with any pattern imaginable. He created two different printable bases to illuminate the lamp: one is sized to hold a votive candle, and the other is made for an LED strip circuit with a rocker switch and 12 VDC barrel jack. We suppose it wouldn’t take much to use an RGB LED instead—a Trinket or a Gemma would surely fit in the base.

In the video after the break, [AHNT] talks about prepping the can by cleanly removing the lid, which he does by filing the top edge until the layers separate. He also discusses a few methods for removing the paint, and notes that sandblasting worked the best.

Don’t need another lamp? There’s a million things you can do with that empty soda can. You could make a theremin, or a battery, or even a treasure box. Cut it open and make a solder stencil. Or do something else entirely, and send us a tip.

Continue reading “Soda Can Lamp Pinpoints Your Interests”

Review: LinkSprite Mini CNC

It’s a great time to be a hobbyist. No matter how you feel about the Arduino/Raspberry Pi effect, the influx of general enthusiasm and demand it has created translates to better availability of components, a broader community, and loads of freely available knowledge. When people have access to knowledge and ideas, great things can happen. Tools that were once restricted to industrial use become open source, and the price of entry-level versions goes into a nosedive.

As we’ve seen over the last several years, the price of cheap 3D printers keeps falling while the bar of quality keeps rising. It’s happening with laser cutters and carving tools, too. Strolling through Microcenter a few weeks ago, I spotted a new toy on the back wall next to the 3D printers. It was LinkSprite’s desktop mini CNC. They didn’t have one out on display, but there were two of them in boxes on the shelf. And boy, those boxes were small. Laughably small. I wondered, could this adorable machine really be any good? To some, the $200 price tag suggests otherwise. To me, the price tag made it justifiable, especially considering that the next price point for a hobby CNC mill is at least twice as much. I took my phone out and stood there frantically looking for reviews, documentation, anything that was available. It seemed that the general, if sparse consensus is that this thing isn’t a total waste of money. Oh, and there’s a wiki.

According to LinkSprite’s wiki, this little machine will engrave wood, plastic, acrylic, PVC, and PCBs. It will specifically not engrave metal (PCB copper notwithstanding). I’m a bit leery of the chemicals used in the PCB etching process, so the idea of engraving them instead was especially tempting. I pulled the trigger.

Continue reading “Review: LinkSprite Mini CNC”

An Enchanted Rose For A Beauty

Being a maker opens up so many doors in terms of ways to romance one’s partner through passion projects. If their passion is Disney films, then you may handily make them the enchanted rose from Beauty and the Beast for their birthday. Easy-peasy.

In addition to the love and care that went into this build, redditor [Vonblackhawk2811] has included a set of LEDs, salvaged from cheap flashlights and electronic candles, which are controlled by four toggle switches and offer multiple lighting selections — candlelight, soft white, colour cycling, and bright white — to appropriately set the mood. As if that wasn’t enough to romance his sweetheart, he’s also included an aux cord input and a pair of speakers so they may be serenaded by a tune or two as they dance the night away.

Liberal use of hot glue and duct tape are keeping the electronics secured, preventing any shorts. After all — what would it say if this gift went up in flames? An inspired stencil design — hand drawn and cut out — was used to apply a spray-on frosted glass finish to the cloche, and a romantic phrase was burned into the base, completing this heartfelt gift. The only quibble we have is that now we all have to step up our game in the courtship department.

That is, unless one is sporting the Romance Pants.

[via /r/DIY]

Candle with flicker led that you blow out

Blowing Out A Candle Flicker LED: The Death Of Flame

One day there will be no more need for flames. [slider2732] has put yet another nail in the coffin of this most ancient of all technology by making a candle that uses a flicker LED that you blow out. A little more miniaturization and we’ll have them fully integrated into the size of birthday cake candles (Hint hint, hackers!).

You may have seen these candle flicker LEDs.  They have a small chip inside them that modulates the LED’s light to flicker like a candle. We’ve even reported on what [Cpldcpu] found when he reverse engineered them first here and then here.

What [slider2732] did was to buy an electronic candle that used one of the LEDs actually shaped like a flame, and to drill a hole near the ‘flame’. He them embedded a microphone behind the hole. That goes to an LM386 amplifier circuit and from there to an Arduino Pro Mini all powered by a LiPo. As you’d expect, the Arduino code is very simple, just watch the pin from the amplifier and based on an internal variable, turn the LED on or off. We really like how none of the electronics is visible and how you actually have to lean over and blow into the top of the candle to blow it out. You can see this demonstrated in the video below.

Continue reading “Blowing Out A Candle Flicker LED: The Death Of Flame”

AVR Vs PIC, Round 223: Fight!

Get ready to rumble! [Thierry] made the exact same Hello-World-esque project with two microcontrollers (that are now technically produced by the same firm!) to see how the experience went.

It’s not just an LED-blinker, though. He added in a light-detection function so that it only switches on at night. It uses the Forest Mims trick of reverse-biasing the LED and waiting for it to discharge its internal capacitance. The point is, however, that it gives the chip something to do instead of simply sleeping.

Although he’s an AVR user by habit, [Thierry] finds in favor of the PIC because it’s got a lower power draw both when idling and when awake and doing some computation. This is largely because the PIC has an onboard low-power oscillator that lets it limp along at 32 kHz, but also because the chip has a lower power consumption in general. In the end, it’s probably a 10% advantage to the PIC on power.

If you’re competent with one of the two chips, but not the other, his two versions of the same code would be a great way to start familiarizing yourself with the other. We really like his isDarkerThan() function which makes extensive use of sleep modes on both chips during the LED’s discharge period. And honestly, at this level the code for the two is more similar than different.

(Oh, and did you notice [Thierry]’s use of a paper clip as a coin-cell holder? It’s a hack!)

Surprisingly, we’ve managed to avoid taking a stray bullet from the crossfire that occasionally breaks out between the PIC and AVR fans. We have covered a “shootout” before, and PIC won that round too, although it was similarly close. Will the Microchip purchase of Atmel calm the flames? Let’s find out in the comment section. We have our popcorn ready!