No Doorknobs Needed For This Nitrogen Laser Build

Sometimes the decision to tackle a project or not can boil down to sourcing parts. Not everything is as close as a Digi-Key or Mouser order, and relying on the availability of surplus parts from eBay or other such markets can be difficult. Knowing if and when a substitute will work for an exotic part can sometimes be a project all on its own.

Building lasers is a great example of this, and [Les Wright] recently looked at substitutes for hard-to-find “doorknob” capacitors for his transversely excited atmospheric lasers. We took at his homebrew TEA lasers recently, which rely on a high voltage supply and very rapid switching to get nitrogen gas to lase. His design uses surplus doorknob caps, big chunky parts rated for very high voltages but also with very low parasitic inductance, which makes them perfect for the triggering circuit.

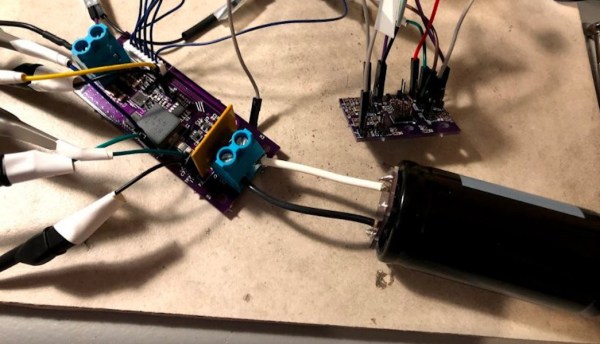
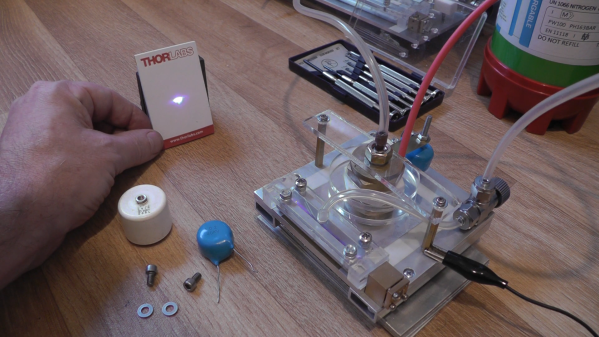
[Les] tried to substitute cheaper and easier-to-find ceramic power caps with radial wire leads rather than threaded lugs. With a nominal 40-kV rating, one would expect these chunky blue caps to tolerate the 17-kV power supply, but as he suspected, the distance between the leads was short enough to result in flashover arcing. Turning down the pressure in the spark gap chamber helped reduce the flashover and prove that these caps won’t spoil the carefully engineered inductive properties of the trigger. Check out the video below for more details.

Thanks to [Les] for following up on this and making sure everyone can replicate his designs. That’s one of the things we love about this community — true hackers always try to find a way around problems, even when it’s just finding alternates for unobtanium parts.

Continue reading “No Doorknobs Needed For This Nitrogen Laser Build”

Save Your Original Xbox From A Corrosive Death

Fans of retro computers from the 8-bit and 16-bit eras will be well aware of the green death that eats these machines from the inside out. A common cause is leaking electrolytic capacitors, with RTC batteries being an even more vicious scourge when it comes to corrosion that destroys motherboards. Of course, time rolls on, and new generations of machines are now prone to this risk. [MattKC] has explored the issue on Microsoft’s original Xbox, built from 2001 to 2009.

Despite looking okay from above, the capacitor inside the Xbox had already started leaking underneath. Leaving this in the console would inevitably cause major damage.

The original Xbox does include a real-time clock, however, it doesn’t rely on a battery. Due to the RTC hardware being included in the bigger NVIDA MCPX X3 sound chip, the current draw on standby was too high to use a standard coin cell as a backup battery. Instead, a fancy high-value capacitor was used, allowing the clock to be maintained for a few hours away from AC power. The problem is that these capacitors were made during the Capacitor Plague in the early 2000s. Over time they leak and deposit corrosive material on the motherboard, which can easily kill the Xbox.

The solution? Removing the capacitor and cleaning off any goop that may have already been left on the board. The fastidious can replace the part, though the Xbox will work just fine without the capacitor in place; you’ll just have to reset the clock every time you unplug the console. [MattKC] also points out that this is a good time to inspect other caps on the board for harmful leakage.

We’ve seen [MattKC] dive into consoles before, burning his own PS1 modchip from sourcecode found online. Video after the break.

Edit: As noted by [Doge Microsystems], this scourage only effects pre-1.6 Xboxes; later models don’t suffer the same problem, and shouldn’t be modified in this way.

Continue reading “Save Your Original Xbox From A Corrosive Death”

Bodge Wire Saves A Vintage Mac SE/30 From The Heap

Anyone who pokes around old electronics knows that age is not kind to capacitors. If you’ve got a gadget with a few decades on the clock, there’s an excellent chance that some of its capacitors are either on the verge of failure or have already given up the ghost. Preemptively swapping them out is common in retrocomputing circles, but what do you do if your precious computer has already fallen victim to a troublesome electrolytic?

That’s the situation that [Ronan Gaillard] recently found himself in when he booted up his Mac SE/30 and was greeted with a zebra-like pattern on the screen. The collected wisdom of the Internet told him that some bad caps were almost certainly to blame, though a visual inspection failed to turn up anything too suspicious. Knowing the clock was ticking either way, he replaced all the capacitors on the Mac’s board and gave the whole thing a good cleaning.

Unfortunately, nothing changed. This caught [Ronan] a bit by surprise, and he took another trip down the rabbit hole to try and find more information. Armed with schematics for the machine, he started manually checking the continuity of all the traces between the ROM and CPU. But again, he came up empty handed. He continued the process for the RAM and Glue Chip, and eventually discovered that trace A24 wasn’t connected. Following the course it took across the board, he realized it ran right under the C11 axial capacitor he’d replaced earlier.

Suddenly, it all made sense. The capacitor must have leaked, corroded the trace underneath in a nearly imperceptible way, and cut off a vital link between the computer’s components. To confirm his suspicions, [Ronan] used a bodge wire to connect both ends of A24, which brought the 30+ year old computer roaring back to life. Well, not so much a roar since it turns out the floppy drive was also shot…but that’s a fix for another day.

It seems like every hardware hacker has a bad capacitor story. From vintage portable typewriters to the lowly home router, these little devils and the damage they can do should always be one of the first things you check if a piece of hardware is acting up.

Clacker Hacker: Popping A Cap In A Brother EP43 Thermal Typewriter

A few months ago, I fell down the internet rabbit hole known as Ted Munk’s typewriter site. I don’t remember if I just saw this Brother EP43 typewriter for sale and searched for information about them, or went looking for one after reading about them. Either way, the result is the same — I gained a typewriter.

Now I’m not really a typewriter collector or anything, and this is my first word processor typewriter. When it arrived from Goodwill, I anxiously popped four ‘C’ cells in and hoped for the best. It made a print head noise, so that was a good sign. But almost immediately after that, there was a BANG! and then a puff of smoke wafted out from the innards. My tiny typewriter was toast. Continue reading “Clacker Hacker: Popping A Cap In A Brother EP43 Thermal Typewriter”

Check Your Pockets For Components

The ideal component tester is like a tricorder for electronics — it can measure whatever it is that you need it to, all the time. Maybe you have a few devices like an ohmmeter and maybe a transistor socket on our multimeter. But what do you do when you need to see if that thyristor is faulty? [Akshay Baweja] wants an everything-tester at the ready, so he’s building a comprehensive device that fits in a pocket. It will identify the type and size of: Continue reading “Check Your Pockets For Components”

Rapid Charging Supercapacitors

Battery technology is the talk of the town right now, as it’s the main bottleneck holding up progress on many facets of renewable energy. There are other technologies available for energy storage, though, and while they might seem like drop-in replacements for batteries they can have some peculiar behaviors. Supercapacitors, for example, have a completely different set of requirements for charging compared to batteries, and behave in peculiar ways compared to batteries.

This project from [sciencedude1990] shows off some of the quirks of supercapacitors by showing one method of rapidly charging one. One of the most critical differences between batteries and supercapacitors is that supercapacitors’ charge state can be easily related to voltage, and they will discharge effectively all the way to zero volts without damage. This behavior has to be accounted for in the charging circuit. The charging circuit here uses an ATtiny13A and a MP18021 half-bridge gate driver to charge the capacitor, and also is programmed in a way that allows for three steps for charging the capacitor. This helps mitigate the its peculiar behavior compared to a battery, and also allows the 450 farad capacitor to charge from 0.7V to 2.8V in about three minutes.

If you haven’t used a supercapacitor like this in place of a lithium battery, it’s definitely worth trying out in some situations. Capacitors tolerate temperature extremes better than batteries, and provided you have good DC regulation can often provide power more reliably than batteries in some situations. You can also combine supercapacitors with batteries to get the benefits of both types of energy storage devices.

Game Boy Plays Forever

For those of us old enough to experience it first hand, the original Game Boy was pretty incredible, but did have one major downside: battery consumption. In the 90s rechargeable batteries weren’t common, which led to most of us playing our handhelds beside power outlets. Some modern takes on the classic Game Boy address these concerns with modern hardware, but this group from the Delft University of Technology and Northwestern has created a Game Boy clone that doesn’t need any batteries at all, even though it can play games indefinitely.

This build was a proof-of-concept for something called “intermittent computing” which allows a computer to remain in a state of processing limbo until it gets enough energy to perform the next computation. The Game Boy clone, fully compatible with the original Game Boy hardware, is equipped with many tiny solar panels which can harvest energy and is able to halt itself and store its state in nonvolatile memory if it detects that there isn’t enough energy available to continue. This means that Super Mario Land isn’t exactly playable, but other games that aren’t as action-packed can be enjoyed with very little impact in gameplay.

The researchers note that it’ll be a long time before their energy-aware platform becomes commonplace in devices and replaces batteries, but they do think that internet-connected devices that don’t need to be constantly running or powered up would be a good start. There are already some low-powered options available that can keep their displays active when everything else is off, so hopefully we will see even more energy-efficient options in the near future.

Thanks to [Sascho] for the tip!

Continue reading “Game Boy Plays Forever”