Robot Arm Adds Freedom To 3D Printer

3D printers are an excellent tool to have on hand, largely because they can print other tools and parts rapidly without needing to have them machined or custom-ordered. 3D printers have dropped in price as well, so it’s possible to have a fairly capable machine in your own home for only a few hundred dollars. With that being said, there are some limitations to their function but some of them can be mitigated by placing the printer head on a robot arm rather than on a traditional fixed frame.

The experimental 3D printer at the University of Nottingham adds a six-axis robotic arm to their printer head, which allows for a few interesting enhancements. Since the printer head can print in any direction, it allows material to be laid down in ways which enhance the strength of the material by ensuring the printed surface is always correctly positioned with respect to new material from the printer head. Compared to traditional 3D printers which can only print on a single plane, this method also allows for carbon fiber-reinforced prints since the printer head can follow non-planar paths.

Of course, the control of this printer is much more complicated than a traditional three-axis printer, but it is still within the realm of possibility with readily-available robotics and microcontrollers. And this is a hot topic right now: we’ve seen five-axis 3D printers, four-axis 3D printers, and even some clever slicer hacks that do much the same thing. Things are finally heating up in non-planar 3D printing!

Thanks to [Feinfinger] for the tip!

Continue reading “Robot Arm Adds Freedom To 3D Printer”

Techniques For Making Complex Carbon Fibre Tube Parts

Many a hacker spent their high school years picking up a few new skills in workshop classes. Whether it be woodworking, welding, or the patient, delicate skill of technical drawing, they’ve been a mainstay of secondary education for decades. However, composites are new enough that they aren’t a major feature of the curriculum. For those wishing to fill in a few gaps, [Easy Composites] have some great videos on carbon fibre techniques.

The video in question concerns the manufacture of a complex cross-section tube part, but these techniques can also apply to more complex hollow sections, like a bike frame, for example. Starting with a mold, the first step is to cut a rough template. This is then used to lay down the first layer of pre-preg carbon fibre material, and a more accurate template is made. The rest of the steps involve the production of a secure lap joint between subsequent layers, and how to properly use vacuum bag techniques on hollow parts.

It’s a useful primer on the basics of producing hollow carbon fibre parts with prepreg material. We’ve featured composites before, with this bulletproof armor a particularly good example. Video after the break.

Continue reading “Techniques For Making Complex Carbon Fibre Tube Parts”

Flywheel Stores Energy To Power An Airplane – Eventually

Question: Can a flywheel store enough energy to power an airplane? Answer: Yes it can, for certain values of “flywheel” and “airplane.”

About the only person we can think of who would even attempt to build a flywheel-powered airplane is [Tom Stanton]. He’s a great one for off-the-wall ideas that often pay off, like his Coandă effect hovercraft, as well as for ideas that never got far off the ground, or suddenly met it again. For most of the video below, it seems like his flywheel-powered plane is destined to stay firmly in the last category, and indeed, the idea of a massive flywheel taking flight seems counterintuitive. But [Tom] reminds us that since the kinetic energy stored by a flywheel increases as the square of angular velocity, how fast it’s turning is more important than how massive it is. The composite carbon fiber and aluminum flywheel is geared to the propeller of a minimal airplane through 3D-printed bevel gears, and is spun up with an external BLDC motor.

Sadly, the plane never made it very far, no matter how much weight was trimmed. But [Tom] was able to snatch victory from the jaws of defeat by making the propeller the flywheel – he printed a ring connecting the blades of the prop and devised a freewheel clutch to couple it to the motor. The flywheel prop stored enough energy to complete a few respectable flights, as well as suffer a few satisfyingly spectacular disintegrations.

As always, hats off to [Tom] for not being bashful about sharing his failures so we can all learn, and for the persistence to make his ideas take flight.

Continue reading “Flywheel Stores Energy To Power An Airplane – Eventually”

Stronger 3D Prints — Glue Or Carbon Fiber?

[CNCKitchen], like many others, is looking to make strong 3D prints. Using a high tech PLA bio copolyester compound, he printed a bunch of hooks in two different orientations. He used several different types of glue including epoxy and superglue. You can see the video of his results, below.

In addition to the glue, he used epoxy and bulk carbon fiber, again, in two different orientations. After several days of curing, he was ready to test.

Continue reading “Stronger 3D Prints — Glue Or Carbon Fiber?”

Open Sourced Carbon Fiber Rod Ends

Modellers and makers who have been around the block for a few decades generally have their preferred materials. Balsa wood, sheet metal, brass tube… these were all staples of the hobbyist workshop. Composites are very much the new kid on the block and are starting to gain more of a foothold in the hobby marketplace. [Anthony] has been experimenting in this area, and has created some useful attachments for carbon fiber tubing.

The fittings are designed to be lasercut from aluminium or 3D printed. The rod ends are a simple two-piece design that slots together, before insertion into the carbon fiber rod. [Anthony] shows off a series of rods being used as linkages with a stepper motor, before performing pull-out tests on the links. Installed with cyanoacrylate glue, the link holds up to a pull load in excess of 180 lbs. The strength is impressive, and [Anthony] also talks about how to install the appropriate bearings to use the links for motion projects.

Overall, these links will likely prove useful to anyone using carbon fiber rods in a build, and helpfully, the required files are all available on GitHub. The source material is now cheap and readily available online, and is strong and resilient when used properly. We’ve seen carbon fiber popping up in a lot more projects recently, too. Video after the break.

Continue reading “Open Sourced Carbon Fiber Rod Ends”

An Arduino Carbon Fiber Wrapping Machine

Many of the projects we feature on Hackaday are motivated by pure greed. Not on the part of the hacker, mind you; but rather the company that’s charging such an outrageous price for a mass produced item that somebody decides they can do the same thing cheaper as a one-off project. Which is precisely how [Bryan Kevan] ended up building his own carbon fiber tube wrapping machine. Not only do the finished tubes look fantastic, but they cost him a fraction of what even the “cheap” commercial ones cost.

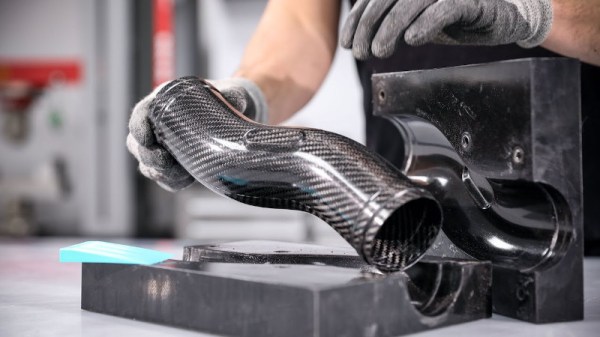
The principle behind producing the tubes is really pretty simple: carbon fiber ribbon (or “tow”, in the official parlance) gets wrapped around a rotating mandrel, ideally in interesting patterns, and epoxy is added to bind it all together. When it’s hardened up, you slide the new carbon fiber tube off the mandrel and away you go building a bike frame or whatever it is you needed light and strong tubes for. You could even do it by hand, if you had enough patience.

[Bryan] had done it by hand before, but was looking for a way to not only automate the process but make the final product a bit more uniform-looking. His idea was to rotate a horizontal PVC pipe as his mandrel, and move a “car” carrying the carbon fiber ribbon back and forth along its length. The PVC pipe just needs to rotate along its axis so he figured that would be easy enough; and using a GT2 belt and some pulleys, getting the carbon-laying car moving back and forth didn’t seem like much of a challenge either.

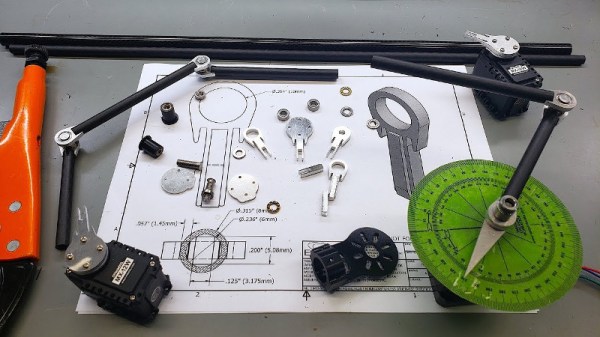
The frame of the winder is built from the hacker’s favorite: 20/20 aluminum extrusion. Add to that an Arduino Uno, two stepper motors with their appropriate drivers, and the usual assortment of 3D printed odds and ends. [Bryan] says getting the math figured out for generating interesting wrap patterns was a bit tricky and took a fair amount of trial and error, but wasn’t a showstopper. Though we’d suggest following his example and using party ribbon during testing rather than the carbon stuff, as producing a few bird nests at the onset seems almost a guarantee.

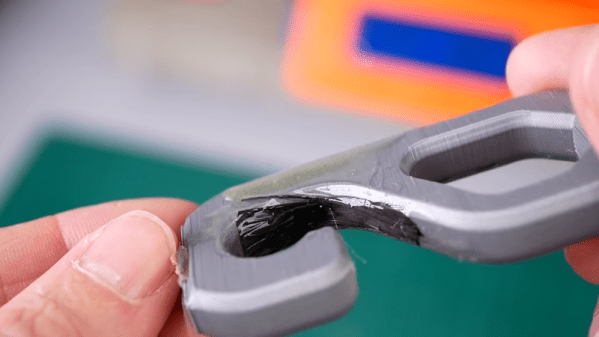
One of the trickiest parts of the project ended up being removing the carbon fiber tubes from the PVC mandrel once they were done. [Bryan] eventually settled on a process which involved spraying the PVC with WD-40, wrapping it in parchment paper, and then using a strip of 3M blue painter’s tape to keep the parchment paper from moving. If you can toss the whole mandrel in the freezer after wrapping to shrink it down a bit, even better.

So was all this work worth it in the end? [Bryan] says he was originally looking at spending up to $70 USD per foot for the carbon fiber tubes he needed for his bike frame, but by buying the raw materials and winding them himself, he ended up producing his tubes for closer to $3 per foot. Some might question the strength and consistency of these DIY tubes, but for a ~95% price reduction, we’d be willing to give it a shot.

Years ago we covered a Kickstarter campaign for a very similar carbon winder. Probably due to the relatively limited uses of such a gadget, the winder didn’t hit the funding goal. But just like the current wave of very impressive homebrew laser cutters, the best results might come from just building the thing yourself.

Cortex 2 Is One Serious 3D Printed Experimental Rocket

Rocketry is wild, and [Foaly] is sharing build and design details of the Cortex 2 mini rocket which is entirely 3D printed. Don’t let that fool you into thinking it is in any way a gimmick; the Cortex 2 is a serious piece of engineering with some fascinating development.

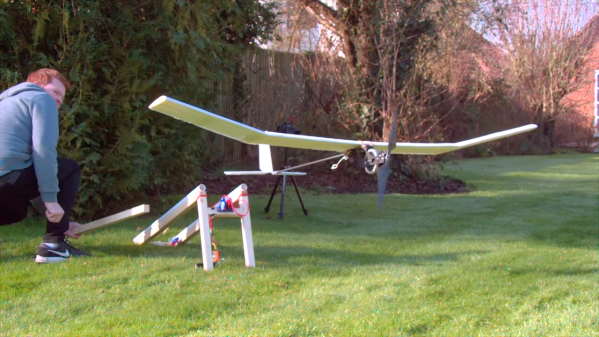
Cortex 1 was launched as part of C’Space, an event allowing students to launch experimental rockets. Stuffed with sensors and entirely 3D printed, Cortex 1 flew well, but the parachute failed to deploy mainly due to an imperfectly bonded assembly. The hatch was recovered, but the rocket was lost. Lessons were learned, and Cortex 2 was drafted up before the end of the event.

Some of the changes included tweaking the shape and reducing weight, and the refinements also led to reducing the number of fins from four to three. The fins for Cortex 2 are also reinforced with carbon fiber inserts and are bolted on to the main body.

Here’s an interesting details: apparently keeping the original fins would result in a rocket that was “overstable”. We didn’t really realize that was a thing. The results of overstabilizing are similar to a PID loop where gain is too high, and overcorrection results in oscillations instead of a nice stable trajectory.

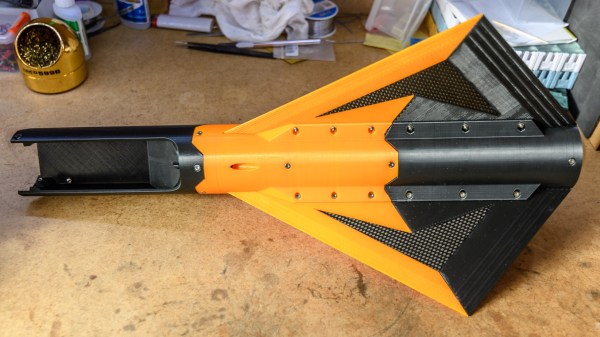
Cortex 2 uses a different rocket motor from its predecessor, which led to another interesting design issue. The new motor is similar to hobby solid rocket motors where a small explosive charge at the top of the motor blows some time after the fuel is gone. This charge is meant to eject a parachute, but the Cortex 2 is not designed to use this method, and so the gasses must be vented. [Foaly] was understandably not enthusiastic about venting hot gasses through the mostly-PLA rocket body. Instead, a cylindrical cartridge was designed that both encases the motor and redirects any gasses from the explosive charge out the rear of the rocket. That cartridge was SLA printed out of what looks to us like Formlabs’ High Tempurature Resin.

Finally, to address the reasons Cortex 1 crashed, the hatch and parachute were redesigned for better reliability. A servo takes care of activating the system, and a couple of reverse-polarity magnets assist in ensuring the hatch blows clear. There’s even a small servo that takes care of retracting the launch guide.

The rocket is only half built so far, but looks absolutely fantastic and we can’t wait to see more. It’s clear [Foaly] has a lot of experience and knowledge. After all, [Foaly] did convert a Makerbot printer into a CNC circuitboard engraver.