Cheap Strain Relief By Casting Hot Glue In A 3D Print

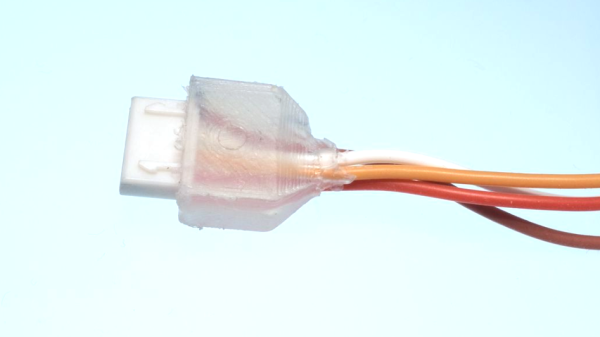
[Daniel Roibert] found a way to add cheap strain relief to JST-XH connectors, better known to hobby aircraft folks as the charging and balance connectors on lithium-polymer battery packs. His solution is to cast them in hot glue, with the help of 3D printed molds. His project provides molds fitted for connectors with anywhere from two to eight conductors, so just pick the appropriate one and get printing. [Daniel] says to print the mold pieces in PETG, so that they can hold up to the temperature of melted glue.

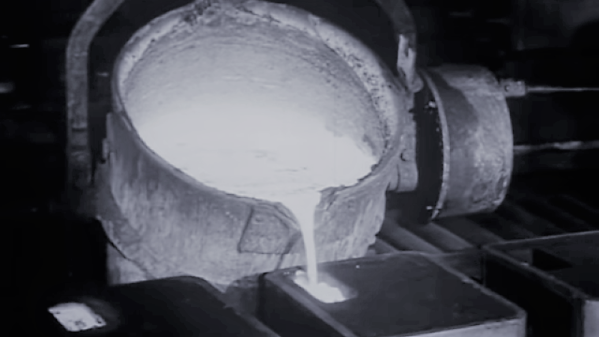
The 3D models aren’t particularly intuitive to look at, but an instructional video makes everything clear. First coat the inside surfaces of the mold with a release agent (something like silicone oil should do the trick) and then a small amount of hot glue goes in the bottom. Next the connector is laid down on top of the glue, more glue is applied, and the top of the mold is pressed in. The small hole in the top isn’t for filling with glue, it’s to let excess escape as the mold is closed. After things cool completely, just pop apart the mold (little cutouts for a screwdriver tip make this easy) and trim any excess. That’s all there is to it.

One last thing: among the downloads you may notice one additional model. That one is provided in split parts, so that one can make a mold of an arbitrary width just by stretching the middle parts as needed, then merging them together. After all, sometimes the STL file is just not quite right and if sharing CAD files is not an option for whatever reason, providing STLs that can be more easily tweaked is a welcome courtesy. You can watch a short video showing how the whole thing works, below.

Continue reading “Cheap Strain Relief By Casting Hot Glue In A 3D Print”

Acrylic Mold Makes For Professional-Looking Silicone Keyboards

The border between consumer electronics and DIY projects is getting harder and harder to define. First it was PCBs, which quickly went from homemade to professional with quick-turn services. Then low-cost CAD/CAM packages and high-end fabrication services gave us access to enclosures that were more than black plastic boxes with aluminum covers. Where will it end?

That’s a question [arturo182] begins to answer with this custom-molded silicone keyboard for a handheld device. There’s no formal writeup, but the Twitter thread goes into some detail about the process he used to make the tiny qwerty keypad. The build started by milling a two-part mold from acrylic. Silicone rubber was tinted and degassed before injecting into the mold with a baster. The keys are connected by a thin membrane of silicone, and each has a small nub on the back for actuating a switch.

There’s clearly room for improvement in this proof of concept – tool marks from the milling process mar the finish of the keys slightly, for instance. There may be tips to be had from this article on silicone keyboard refurbishment to improve the process, but overall, we’d say [arturo182] is well on his way here.

Creating A Custom Engagement Ring With 3D-Printing

Even if you’re pretty sure what the answer will be, a marriage proposal is attended by a great deal of stress to make the event as memorable and romantic as possible. You’ve got a lot of details to look after, not least of which is the ring. So why not take some of the pressure off and just 3D-print the thing?

No, a cheesy PLA ring is probably not going to cut it with even the most understanding of fiancees, and that’s not at all what [Justin Lam] did with this DIY engagement ring. He took an engineer’s approach to the problem – gathering specs, making iterative design changes in Fusion 360, and having a prototype ring SLA printed by a friend. That allowed him to tweak the design before sending it off to Shapeways for production. We were surprised to learn that jewelry printing is a big deal, and Shapeways uses a lost-wax process for it. First a high-resolution wax SLA printer is used to make a detailed positive, which is then used to make a plaster mold. The mold is fired to melt the wax, and molten gold is poured in to make the rough casting, which is cleaned and polished before shipping.

Once he had the ring, [Justin] watched a few jewelry-making videos to learn how to set the family heirloom stone into the bezel setting; we admit we cringed a bit when he said he used the blade shaft of a screwdriver to crimp the edge of the bezel to the stone. But it came out great, even if it needed a bit of resizing. The details of the proposal are left to the romantically inclined, but TL;DR – she said yes.

Congratulations to the happy couple, and to [Justin] for pulling off a beautiful build. Most of our jewelry hacks are of the blinkenlight variety rather than fine jewelry, although we have featured a machinist’s take on the subject before.

Watch A Sand-Cast Slingshot Made, From Start To Finish

Sand-casting metal parts is a technique that has been around for a very long time, but it can be educational to see the process from start to finish. That’s exactly what [Frederico] shows us with his sand-cast slingshot of his own design, and it’s not bad for what he says is a first try!

First, [Frederico] makes a two-part green sand mold of the slingshot body. Green sand is a sand and clay mix, and is only green in the sense that it is wet or “raw” and not further processed. After the mold is made, it’s time to melt aluminum in the propane-powered furnace, and the molten aluminum is then poured into the mold.

After cooling, [Frederico] breaks up the sand to reveal the rough cast object. There is post-processing to do in the form of sprues to cut and some flashing around the seams to remove, but overall it looks to have turned out well. You can watch the whole process in the video, embedded below.

Continue reading “Watch A Sand-Cast Slingshot Made, From Start To Finish”

Retrotechtacular: The Art Of The Foundry

Mention the term “heavy industry” and the first thing to come to mind might well be the metal foundry. With immense machines and cauldrons of molten metal being shuttled about by crane and rail, the image of the foundry is like a scene from Dante’s Inferno, with fumes filling a vast impersonal factory, and sparks flying through the air. It looks like a dangerous place, as much to the soul as to the body, as workers file in each day to suffer mindlessly at the hearths and ladles, consumed in dirty, exhausting work even as it consumes them.

Things are not always as they appear, of course. While there’s no doubting the risks associated with working in a foundry such as the sprawling Renfrew works of Babcock and Wilcox Ltd. in the middle of the previous century, as the video below shows the work there was anything but mindless, and the products churned out by the millions from this factory and places like it throughout the world were critical to today’s technology.

Continue reading “Retrotechtacular: The Art Of The Foundry”

Casting Gears At Home

Automatic doors and gates are great, except when they fail, which seems to be about every three days in our experience. [MAD WHEEL] had just such a failure, with a plastic gear being the culprit. Rather than buy a new drive unit, they set about casting a replacement in metal.

The video is light on instructions and heavy on progressive rock, and may be a little difficult to follow for beginners. The process begins by gluing the original plastic part back together, and filling in the gaps with epoxy putty. A mould is then created by setting the gear in a gelatine/glycerine mixture. This mould is then filled with wax to create a wax copy of the original part. The wax gear is fitted with cylindrical stems to act as runners for molten metal, and then a plaster mould is made around the wax positive. Two plaster moulds are made, which are placed in an oven to melt out the wax.

The aim was to cast a replacement part in aluminium. The first attempt failed, with the aluminium cooling too rapidly. This meant fine details like the gear teeth simply didn’t cast properly, creating a useless metal blob. On the second attempt, the plaster mould was heated first, and this kept things hot enough to allow the aluminium to fill in the finer details. With that done, it was a simple matter of some post-processing to remove the runners, clean up the gear teeth and refine the shape of the gear on the lathe.

The resulting part does its job well, meshing properly with the other gears in the drivetrain and moving the gate effectively. Many in the comments have stated that the original gear being plastic was likely as a safety measure, to strip out in the event the gate is jammed. While this may be true, it’s a far more robust design practice to instead use a breakable plastic key rather than breaking an entire gear in the event of a problem.

Casting is quite accessible to the dedicated home maker. It’s a great way to make custom metal parts once you’ve learned the fundamentals! Video after the break.

Continue reading “Casting Gears At Home”

Scrapyard Milling Machine Gets Work Done On A Budget

Which to buy first, a lathe or a mill? It’s a tough question for the aspiring home machinist with limited funds to spend on machine tools, but of course the correct answer is a lathe. With a lathe, we are told, all other machine tools can be built, including a milling machine. Granted that might be a slight  exaggeration, but [Maximum DIY] was still able to use his budget-blowing lathe to make a decent milling machine mostly from scrap.

Details are a bit sparse in the forum post, but there’s enough there and in the video after the break to be mightily impressed with the build. Unlike many DIY mills that are basically modified drill presses, [Maximum DIY] started with things like a scrapped bench grinder pedestal and surplus steel tubing. The spindle motor is from a paint sprayer and the Z-axis power feed is a treadmill incline motor. The compound table was a little too hard to make, so the purchased table was fitted with windshield wiper motor power feeds.

Therein lies perhaps the most clever hack in this build: the use of a plain old deep 19mm socket as a clutch for the power feeds. The 12-point socket slides on the square shaft of the wiper motor to engage the drive screw for the compound table – simple and bulletproof.

To be sure, the finished mill is far from perfect. It looks like it needs more mass to quell vibration, and those open drive pulleys are a little nerve wracking. But it seems to work well, and really, any mill is better than no mill. Of course, if you’re flush with cash and want to buy a mill instead of making one, this buyer’s guide should help.

Continue reading “Scrapyard Milling Machine Gets Work Done On A Budget”