DIY Furnace Smelts Magnetite Sand Into An Impressive Chef’s Knife

Some people order their raw materials from a factory, missing out on 99% of the fun… or suffering, we’re not sure which. To make that call, you need to look in on the process [IllyriaD] used to collect magnetite sand and turn it into a wicked-looking chef’s knife.

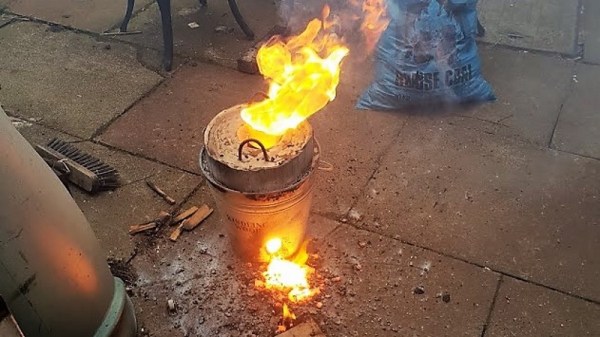
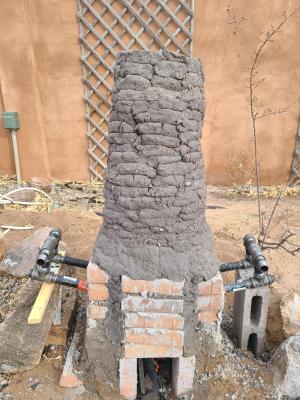
This began by collecting 150 pounds (!) of magnetic dirt from dry lake beds while hiking using a magnet pickup tool with release lever that he got from Harbor Freight. Several repeated magnetic refining passes separated the black ore from non-metallic sands ready for the furnace that he built. That is used to fire up the raw materials using 150 pounds of charcoal, changing the chemical composition by adding carbon and resulting in a gnarly lump of iron known as a bloom.

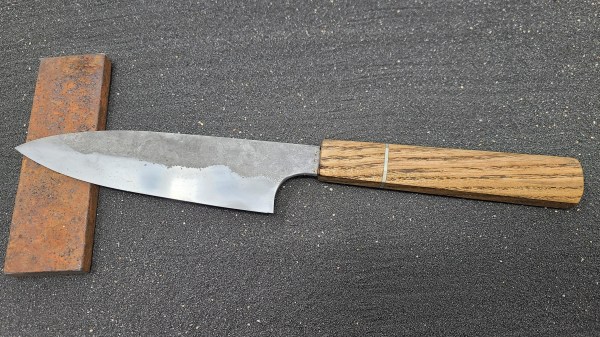
From there, it’s just a matter of beating the iron bloom into submission over at the anvil. [IllyriaD] details the process of flattening it out to a bar shape, then folding it over. Seven total folds are made for 128 layers, and in the gallery there’s a fantastic image that captures the striation when viewed on end. After being sharpened and polished, you can see where the bevel descends through those layers.

It’s delightful to see people working through the old ways and proving you don’t need a factory, as long as your true goal is to explore the process itself. Does this leave you wanting even more? [IllyriaD] left some insight about the process in the comments of the reddit thread. You probably also want to check out the tile-roofed hut built by [PrimitiveTechnology] without any modern tools.

Fail Of The Week: When Good Foundries Go Bad

Like many of us, [Tony] was entranced by the idea of casting metal, and set about building the tools he’d need to melt aluminum for lost-PLA casting. Little did he know that he was about to exceed the limits of his system and melt a hole in his patio.

[Tony]’s tale of woe begins innocently enough, and where it usually begins for wannabe metal casters: with [The King of Random]’s homemade foundry-in-a-bucket. It’s just a steel pail with a homebrew refractory lining poured in place, with a hole near the bottom to act as a nozzle for forced air, or tuyère. [Tony]’s build followed the plans pretty faithfully, but lacking the spent fire extinguisher [The King] used for a crucible in the original build, he improvised and used the bottom of an old propane cylinder. A test firing with barbecue charcoal sort of worked, but it was clear that more heat was needed. So [Tony] got hold of some fine Welsh anthracite coal, which is where the fun began. With the extra heat, the foundry became a mini-blast furnace that melted the thin steel crucible, dumping the molten aluminum into the raging coal fire. The video below shows the near catastrophe, and we hope that once [Tony] changed his pants, he hustled off to buy a cheap graphite or ceramic crucible for the next firing.

All kidding aside, this is a vivid reminder of the stakes when something unexpected (or entirely predictable) goes wrong, and the need to be prepared to deal with it. A bucket of dry sand to smother a fire might be a good idea, and protective clothing is a must. And it pays to manage your work area to minimize potential collateral damage, too — we doubt that patio will ever be the same again.

Continue reading “Fail Of The Week: When Good Foundries Go Bad”

Kill The Exhaust, Not Your Lungs With The Fume Coffin

As if slinging around 40 watts of potentially tattoo-removing or retina-singeing laser beams wasn’t anxiety-inducing enough, now comes a new, scary acronym – LCAGs, or “laser-generated airborne contaminants.” With something that scary floating around your shop, it might be a good idea to build a souped-up laser cutter exhaust fan to save your lungs.

We jest, but taking care of yourself is the responsible way to have a long and fruitful hacking career, and while [patternmusic]’s “Fume Coffin” might seem like overkill, can you go too far to protect your lungs? Plywood and acrylic, the most common materials that come across a laser cutter’s bed, both release quite a witch’s brew of toxins when vaporized by a laser beam. The Fume Coffin clears the air in your shop by venting it to the outdoors after giving it a good scrubbing through an activated charcoal pre-filter and a HEPA polishing element. Both filters are commercially available so replacements won’t be an issue, and the entire thing is housed in a wooden box that gives the device its name.

Since it’s ejecting 200 cubic feet per minute, you’ll have to provide at least that much make-up air, but other than that the Fume Coffin should be a welcome addition to the shop. We’ve seen a few other attempts to handle LCAGs effectively before, including a DIY charcoal and automotive air filter design.

See A Cheap Smoker Get An Automation Power Up

[Jason] learned a lot by successfully automating this meat smoker. This is just the first step in [Jason’s] smoker project. He decided to begin by hacking a cheaper charcoal-fed unit first, before setting his sights on building his own automatic pellet-fed smoker. With a charcoal smoker it’s all about managing the airflow to that hot bed of coals.

automated-meat-smoker-air-valve
Custom mount for servo was actually one of the more challenging things to get just right.

[Jason] started by making sure the bottom was sealed off from stray airflow, then he cut a hole into the charcoal pan and attached a length of steel pipe. The opposite end of the pipe has a fan. Inside the pipe there is a baffle separating the fan from the charcoal pan. The servo motor shown here controls that valve.

The pipe is how air is introduced into the smoker, with the fan and valve to control the flow rate. The more air, the higher the temperature. The hunk of pipe was left uncut and works fine but is much longer than needed; [Jason says] the pipe is perfectly cool to the touch only a foot and a half away from the smoker.

With the actuators in place he needed a feedback loop. A thermocouple installed into the lid of the smoker is monitored by an Arduino running a PID control loop. This predicts the temperature change and adjusts the baffle and fan to avoid overshooting the target temp. The last piece of hardware is a temperature probe inside the meat itself. With the regulation of the smoker’s temperature taken care of and the meat’s internal temperature being monitored, the learning (and cooking) process is well underway.

There are many, many smoker automation projects out there. Some smokers are home-made electric ones using flower pots, and some focus more on modifying off the shelf units. In a way, every PID controlled smoker is the same, yet they end up with different problems to solve during their creation. There is no better way to learn PID than putting it into practice, and this way to you get a tasty treat for your efforts.

Hacking Your Grill For Performance And Features

Summer is winding down, which means that sales will be beginning on grills at stores all over the place. For those that enjoy the outdoor cooking experience, a nice new grill is always tempting. If you’re anything like me though, it can be hard to justify the expense. All you need is some fire right? Well, not if you want to smoke foods, or do long controlled jobs, basically anything but quickly searing something.

[Joe Brown] over at Gizmodo found himself wanting to upgrade from simple coals/wood to something fancier, but really didn’t want to shell out the $2,000 that he found would be necessary to get the mic features he wanted. So, he set out to find a good platform to mod and added the features he wanted separately. The end result was a nicely performing out door cooking appliance that only cost him $540.

This hack is on the simpler side, but his modification really did add some great features. Many of you could build the addons from scratch, which makes me wonder, how would you improve a grill, dear Hackaday Reader?