Pokémon Center Charging Station

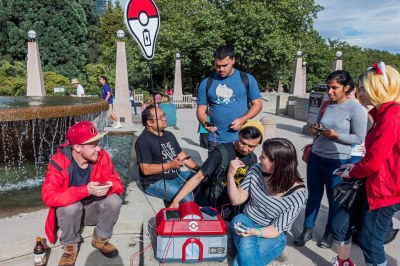
If you watch Pokémon Go enthusiasts, you may have noticed something of a community spirit among gamers congregating at busy in-game locations. [Spencer Kern] wanted to encourage this, so produced what he describes as a water cooler for Pokémon Go players, a Pokémon-styled charging station with multiple USB ports.

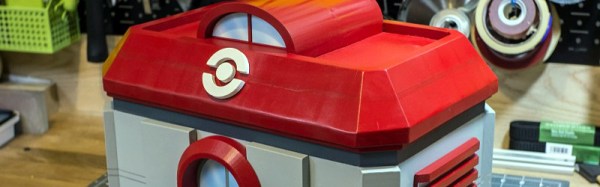
His build centres on a Yeti 400 solar power pack and a large multi-port USB hub, for which he has built a detailed wooden housing in the style of a Pokémon Center from the earlier Nintendo games. The idea is that gamers will congregate and plug in their phones to charge, thus bringing together a real-world social aspect to the game. We can see the attraction to gamers, however we suspect most Hackaday readers would join us in not trusting a strange USB socket and using only a USB cable not equipped with data conductors.

pokemon-center-usersStill, the housing has seen some careful design and attention to detail in its construction. He started with a 3D CAD model from which he created a set of 2D templates to print on paper and from which to cut the wood. As many of his dimensions as possible were taken from common wood stock to save machining time, and the structure was assembled using wood glue before being sanded and filled. Finally, the intricate parts such as the Pokémon logo were 3D printed, and spray painted. The result is a pretty good real-world replica of the Pokémon Center that you’d recognise if you were a player of the original games, and he reports it was a hit with gamers in his local park.

We’ve covered quite a few Pokémon Go hacks recently, but many of them have had a less physical and more virtual basis. We did see a real-world Pokémon-catching Pokéball though, and of course there was also the automated Pokémon egg incubator.

Thanks [Genki] for the tip.

Smartphone Hack For Adding Magnet Power Dock

Here’s a neat hack for making a magnetic charging mount for a cell phone. We know what you’re thinking, but this is definitely not a traditional contactless charging system. Those use magnets but in a different way. This hack involves putting a couple of magnets onto the case of the cell phone, and a couple more on a charging base. You then wire these magnets into the power inputs of the USB port, and a USB cable onto the base, so putting the phone on the base magnets completes the circuit. The magnets themselves become the charging contacts.

It’s a neat idea, but makes us wonder what this will do to the compass sensor in your phone or your credit cards if they are nearby. With these caveats, it is a neat hack, and could be easily adapted. Want to make a vertical cell phone mount, or a way to attach (and charge) your cell phone to the fridge? This can be easily adapted for that.

Continue reading “Smartphone Hack For Adding Magnet Power Dock”

Ode To The TL431, And A LiFePO4 Battery Charger

Nerd Ralph loves cheap and dirty hacks, and for that we applaud him. His latest endeavor is a LiFePO4 battery charger that he made out of parts he had on hand for under $0.50 US. (Although we think he really made it for the fun of making it.)

The circuit is centered around a TL431 programmable shunt regulator, which is an awesome and underrated chip in its own right. If you don’t know the TL431 (aka LM431), you owe it to yourself to fetch the datasheet and pick up a couple with your next electronics part order. In fact, it’s such a great chip, we can’t resist telling you about it for a minute.

Continue reading “Ode To The TL431, And A LiFePO4 Battery Charger”

Thorough Macbook Charger Teardown Reveals Some Complex Circuitry

Apple has a reputation in the tech world as being overpriced, and nowhere is that perception more common than in the Hackaday comments. The standard argument, of course, is that for a device with equivalent specs, Apple charges a lot more than its competitors. That argument is not without its flaws, especially when you consider factors other than simple specs like RAM and processor speed, and take into account materials used and build quality. But, as this teardown by [Ken Shirriff] shows, Apple’s attention to detail extends beyond simply machining Macbook bodies out of aluminum.

In his teardown, [Ken Shirriff] thoroughly investigates and describes all of the components and circuitry that go into the ubiquitous Macbook charger. Why does it cost $79? Other than the MagSafe connector, what makes it any better than the charger that came with your Toshiba Satellite in the ’90s? Isn’t it just a transformer to convert AC power to DC?

components1

[Ken Shirriff] answers all of this and more, and you may be surprised by what he found. As it turns out, the Macbook charger isn’t just a transformer in a plastic case with a fancy magnetic connector. There is a lot of high-quality circuitry involved to make the power output as clean and stable as possible, and to avoid potential damage to your Macbook that could be caused by dirty power or voltage spikes. Does it justify the costs, even with so many reported failures? That’s for you to decide, but there is no questioning that Apple put more thought into their chargers than simply converting AC to DC.

diy usb charger

DIY Phone Charger Born From Cyclone Disaster

As convenient as cell phones are, sometimes these power-hungry devices let us down right at the worst time. We’re talking about battery life and how short it is in modern cell phones. Sure that’s totally inconvenient sometimes but it could be way worse. For example: during a natural disaster. A cyclone hit [Ganesh’s] home city and the entire area had lost power for 10 days. He couldn’t plug in his phone to charge it even if he wanted to. After realizing how dependent we are on the electrical grid, he did something about and built a phone charger out of parts he had kicking around.

The charger is quite simple. The user cranks on a DC motor and the output power goes into a LM2596-based step-down voltage regulator. The output of the regulator is then connected to a female USB connector so that any USB cord can be plugged in. As long as the motor is cranked fast enough to put out at least 8vdc, a steady stream of 5v will be available at the USB connector. Max current output of the system has been measured at 550mA.

[Ganesh] admits this isn’t a practical every-day charger but in a pinch it will certainly do the trick. It is even possible to build a makeshift charger out of a cordless drill.

Continue reading “DIY Phone Charger Born From Cyclone Disaster”

PeriUSBoost: A USB Battery Charger

PeriUSBoost: A DIY USB Battery Pack

If you travel often, use your mobile devices a lot, or run questionable ROMs on your phone, you likely have an external USB battery pack. These handy devices let you give a phone, tablet, or USB powered air humidifier (yes, those exist) some extra juice.

[Pedro]’s PeriUSBoost is a DIY phone charging solution. It’s a switching regulator that can boost battery voltages up to the 5 volt USB standard. This is accomplished using the LTC3426, a DC/DC converter with a built in switching element. The IC is a tiny SOT-23 package, and requires a few external passives work.

One interesting detail of USB charging is the resistor configuration on the USB data lines. These tell the device how much current can be drawn from the charger. For this device, the resistors are chosen to set the charge current to 0.5 A.

While a 0.5 A charge current isn’t exactly fast, it does allow for charging off AA batteries. [Pedro]’s testing resulted in a fully charged phone off of two AA batteries, but they did get a bit toasty while powering the device. It might not be the best device to stick in your pocket, but it gets the job done.

Arduino Lithium Charger Shield

Programmable Lithium Charger Shield For Arduino

Surely you need yet another way to charge your lithium batteries—perhaps you can sate your desperation with this programmable multi (or single) cell lithium charger shield for the Arduino?! Okay, so you’re not hurting for another method of juicing up your batteries. If you’re a regular around these parts of the interwebs, you’ll recall the lithium charging guide and that rather incredible, near-encyclopedic rundown of both batteries and chargers, which likely kept your charging needs under control.

That said, this shield by Electro-Labs might be the perfect transition for the die-hard-‘duino fanatic looking to migrate to tougher projects. The build features an LCD and four-button interface to fiddle with settings, and is based around an LT1510 constant current/constant voltage charger IC. You can find the schematic, bill of materials, code, and PCB design on the Electro-Labs webpage, as well as a brief rundown explaining how the circuit works. Still want to add on the design? Throw in one of these Li-ion holders for quick battery swapping action.

[via Embedded Lab]