Conjuring Capacitive Touch Sensors From Paper And Aluminum Foil

Stumbling around YouTube, we found what has to be the lowest-tech method of producing a touchpad to make a capacitive touch keyboard, and we just had to share it with you. If you’re afraid of spoilers, skip down to the video below the break now.

[James Eckert] got his hands on a Freescale MPR121 capacitive touch sensor. The chip in question speaks I2C and senses up to twelve simultaneous capacitive sense electrodes; break-out boards are available in all of the usual places. It’s a sweet little part.

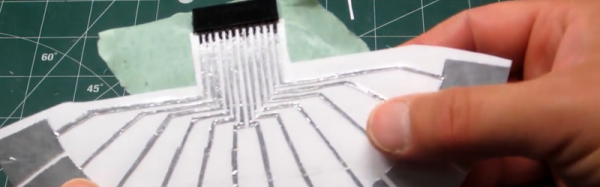
So [James] had to make a twelve-key capacitive keyboard on the quick. He printed out a key template on paper — something that he does often in his woodwork — and spray-glued aluminum foil on the back side. The video doesn’t say how many hours he spent with the razor blade tracing it all out, but the result is a paper, foil, and packing tape keyboard that seems to work just fine.

A pin-header was affixed to the foil with conductive paint and more tape. If you’ve ever tried soldering directly to aluminum foil, you’d know why. (And if you’ve got any other good tips for connecting electrically to aluminum foil, we’d love to hear them.)

Continue reading “Conjuring Capacitive Touch Sensors From Paper And Aluminum Foil”

Want A Low-cost ARM Platform? Grab A Prepaid Android Phone!

What would you pay for a 1.2Ghz dual-core ARM computer with 1GB RAM, 4GB onboard flash, 800×600 display, and 5 megapixel camera? Did we mention it also has WiFi, Bluetooth, and is a low power design, including a lithium battery which will run it for hours? Does $15 sound low enough? That’s what you can pay these days for an Android cell phone. The relentless march of economies of scale has finally given us cheap phones with great specs. These are prepaid “burner” phones, sold by carriers as a loss leader. Costs are recouped in the cellular plan, but that only happens if the buyer activates said plan. Unlike regular cell phones, you aren’t bound by a contract to activate the phone. That means you get all those features for $15-$20, depending on where you buy it.

android-logo-transparent-backgroundThe specs I’m quoting come from the LG Optimus Exceed 2, which is currently available from Amazon in the USA for $20. The same package has been available for as little as $10 from retail stores in recent weeks. The Exceed 2 is just one of several low-cost Android prepaid phones on the market now, and undoubtedly the list will change. How to keep up with the current deals? We found an unlikely place. Perk farmers. Perk is one of those “We pay you to watch advertisements” companies. We’re sure some people actually watch the ads, but most set up “farms” of drone phones which churn through the videos. The drones earn the farmer points which can be converted to cash. How does this all help us? In order to handle streaming video, Perk farmers want the most powerful phones they can get for the lowest investment. Subreddits like /r/perktv have weekly “best deals” posts covering prepaid phones. There are also tutorials on rooting and debloating current popular phones like the Whirl 2 and the Exceed 2.

Continue reading “Want A Low-cost ARM Platform? Grab A Prepaid Android Phone!”

A low cost power supply unit with displays

A Low Cost Bench Supply

Everyone needs a power supply on their bench, but a standard lab supply isn’t cheap. [ludzinc]’s PSU Console is a cheap alternative, which provides the basic features you’d expect in a lab supply.

The basis of this PSU is a DC/DC module based on the LM2596 step down switching regulator. These modules cost less than a single LM2596, but have all the required components for a buck DC/DC converter. Sure, they might not last forever, and they’re not the most efficient regulators, but the price is right.

The front panel has four displays for voltage and current, which are just low cost voltmeter displays. The potentiometers are used for adjusting the voltage of the DC/DC, and controlling the current limiter. This limiter monitors current through a shunt, and shuts off a MOSFET when the limit is exceeded.

The final product looks like something that’s ready for daily use, and was much cheaper than most supplies with these features. These low cost DC/DC modules are worth a look if you’re considering a similar build.

Adjustable Desk

An Adjustable Sit/Stand Desk For Under $100

[Cornel Masson] is a 46-year-old computer programmer. He’s been working on his computer for the last 30 years. Computer work can be good for the wallet but it can be bad for our health, particularly the neck and back. You can purchase adjustable desks to allow you to change positions from sitting to standing, but unfortunately these desks are often expensive. [Cornel] took matters into his own hands and build his own adjustable riser for under $100.

To start, [Cornel] used a typical computer desk. He didn’t want to build the entire thing from scratch. Instead he focused on building a riser that sits on top of the desk, allowing him to change the height of both the monitor and keyboard. His design used mostly wood, aluminum stock, threaded rods, and drawer slides.

The main component is the monitor stand and riser. The riser is able to slide up and down thanks to four drawer slides mounted vertically. [Cornel] wanted his monitor to move up and down with ease, which meant he needed some kind of counter weight. He ended up using a gas strut from the trunk of a Nissan, which acts as a sort of spring. The way in which it is mounted makes for a very close approximation of his monitor’s weight. The result is a monitor that can be raised or lowered very easily. The stand also includes a locking mechanism to keep it secured in the top position.

The keyboard stand is also mounted to drawer slides, only these are in the horizontal position. When the monitor is lowered for sitting, the keyboard tray is removed from the keyboard stand. The stand can then be pushed backwards, overlapping the monitor stand and taking up much less space. The keyboard stand has small rollers underneath to help with the sliding. The video below contains a slideshow of images that do a great job explaining how it all works.

Of course if replacing the entire desk is an option go nuts.

Continue reading “An Adjustable Sit/Stand Desk For Under $100”

Wifi Antenna

Simple Directional WiFi Antenna

Back in 2007, [Stathack] rented an apartment in Thailand. This particular apartment didn’t include any Internet access. It turned out that getting a good connection would cost upwards of $100 per month, and also required a Thai identification card. Not wanting to be locked into a 12-month contract, [Stathack] decided to build himself a directional WiFi antenna to get free WiFi from a shop down the street.

The three main components of this build are a USB WiFi dongle, a baby bottle, and a parabolic Asian mesh wire spoon. The spoon is used as a reflector. The parabolic shape means that it will reflect radio signals to a specific focal point. The goal is to get the USB dongle as close to the focal point as possible. [Stathack] did a little bit of math and used a Cartesian equation to figure out the optimal location.

Once the location was determined, [Stathack] cut a hole in the mesh just big enough for the nipple of the small baby bottle. The USB dongle is housed inside of the bottle for weatherproofing. A hole is cut in the nipple for a USB cable. Everything is held together with electrical tape as needed.

[Stathack] leaves this antenna on his balcony aiming down the street. He was glad to find that he is easily able to pick up the WiFi signal from the shop down the street. He was also surprised to see that he can pick up signals from a high-rise building over 1km away. Not bad for an antenna made from a spoon and a baby bottle; plus it looks less threatening than some of the cantenna builds we’ve seen.

Dirt Cheap Dirty Boards Offers Dirt Cheap PCB Fab

When your project is ready to build, it’s time to find a PCB manufacturer. There are tons of them out there, but for prototype purposes cheaper is usually better. [Ian] at Dangerous Prototypes has just announced Dirt Cheap Dirty Boards, a PCB fabrication service for times where quality doesn’t matter too much. [Ian] also discussed the service on the Dangerous Prototypes forum.

The boards are definitely cheap. $12 USD gets you ten 5 cm by 5 cm boards with 100% e-test and free worldwide shipping. You can even choose from a number of solder mask colors for no additional cost. [Ian] does warn the boards aren’t of the best quality, as you can tell in the Bus Pirate picture above. The silkscreen alignment has some issues, but for $1.2 a board, it’s hard to complain. After all, the site’s motto is “No bull, just crappy PCBs.”

The main downside of this service will be shipping time. While the Chinese fab house cranks out boards in two to four days, Hong Kong Post can take up to 30 days to deliver your boards. This isn’t ideal, but the price is right.

L.I.O.S.: The Ten-ish Dollar Robot.

We love cheap stuff here. Who doesn’t? [Oscar Rodriguez Parra] does too, and wrote in to show us his super cheapey robot L.I.O.S. The build was for the AFRON design challenge, which involves building a 10 dollar robot to teach students robotics. The winners of the challenge were neat and all, but they all look too fancy flaunting their molded plastics and electronics breadboards.

[Oscar’s] design is super simple, LDRs as eyes, a PIC12F683 to do the brainin, LEDs for indicators and a couple modded servos to drive the wheels. An extraordinarily complex cardboard flap roller helps the cart turn, but probably isn’t going to see much aside from smooth flooring. The electronics are mounted using one of our favorite techniques, the paper perf board (very similar to the substrate free technique).

Check out the video after the jump to see LIOS in action. This is an excellent introduction to robotics for any classroom. Thanks [Oscar]!

Continue reading “L.I.O.S.: The Ten-ish Dollar Robot.”