Four Years Of Learning ESP8266 Development Went Into This Guide

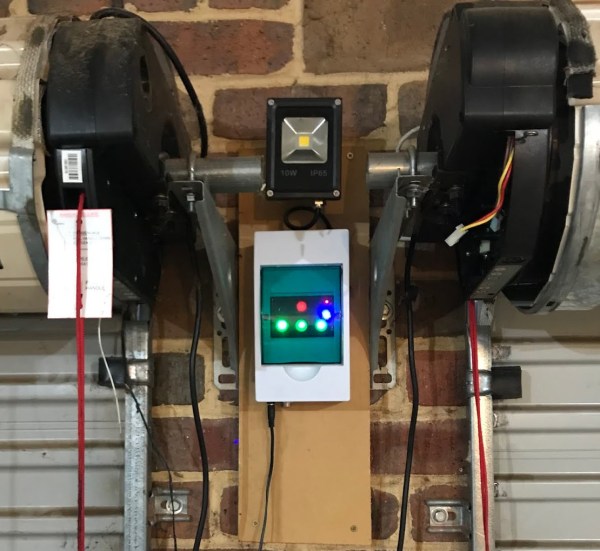
The ESP8266 is a great processor for a lot of projects needing a small microcontroller and Wi-Fi, all for a reasonable price and in some pretty small form factors. [Simon] used one to build a garage door opener. This project isn’t really about his garage door opener based on a cheap WiFi-enabled chip, though. It’s about the four year process he went through to learn how to develop on these chips, and luckily he wrote a guide that anyone can use so that we don’t make the same mistakes he did.

The guide starts by suggesting which specific products are the easiest to use, and then moves on to some “best practices” for using these devices (with which we can’t argue much), before going through some example code. The most valuable parts of this guide especially for anyone starting out with these chips are the section which details how to get the web server up and running, and the best practices for developing HTML code for the tiny device (hint: develop somewhere else).

[Simon] also makes extensive use of the Chrome developers tools when building the HTML for the ESP. This is a handy trick even outside of ESP8266 development which might be useful for other tasks as well. Even though most of the guide won’t be new to anyone with experience with these boards, there are a few gems within it like this one that might help in other unrelated projects. It’s a good read and goes into a lot of detail about more than just the ESP chips. If you just want to open your garage door, though, you have lots of options.

Hyperlinking Comes To GitHub Via Extension

If you are browsing GitHub it is very tempting to open up the source code to some project and peek at how it works. The code view is easy to read, but the viewer lacks one important feature: the ability to click on an included file and find it. The Octolinker extension fixes that oversight.

If you want to try it without installing the extension, there is a mock-up demo available. Even though the demo wants you to click on specific things, if you don’t play by the rules it will still do the right thing and take you to either the code on GitHub or an appropriate page. You can even substitute the demo URL for github.com and try it out on any GitHub page without the extension.

Continue reading “Hyperlinking Comes To GitHub Via Extension”

A Chrome Extension For Configuring RGB LEDs

Like pretty much all of us, [Andy Schwarz] loves RGB LEDs. Specifically he likes to put them on RC vehicles, such as navigation lights on airplanes or flashers and headlights on cars. He found himself often rewriting very similar Arduino code for each one of these installations, and eventually decided he could save himself (and all the other hackers in the world) some time by creating a customizable Arduino firmware specifically for driving RGB LEDs.

The software side of this project, which he’s calling BitsyLED, actually comes in two parts. The first is the firmware itself, which is designed to control common RGB LEDs such as the WS2812 or members of the NeoPixel family. It can run on an Arduino Pro Mini with no problems, but [Andy] has also designed his own open hardware control board based on the ATtiny84 that you can build yourself. Currently you need a USBASP to program it, but he’s working on a second version which will add USB support.

With your controller of choice running the BitsyLED firmware, you need something to configure it. For that, [Andy] has developed a Chrome extension which offers a very slick user interface for setting up colors and patterns. The tool even allows you to create a visual representation of your LEDs so you can get an idea of what it’s going to look like when all the hardware is powered up.

RGB LEDs such as the WS2812 are some of the most common components we see in projects today, mainly because they’re so easy to physically interface with a microcontroller. But even though it only takes a couple of wires to control a large number of LEDs, you still need to write the code for it all. BitsyLED takes a lot of the hassle out of that last part, and we’re very interested to see what the hacker community makes of it.

Continue reading “A Chrome Extension For Configuring RGB LEDs”

Mechanical Build Lets You Jump Cacti In Real Life

Simple to learn, hard to master, a lifetime to kick the habit. This applies to a lot of computer games, but the T-rex Runner game for Chrome and its various online versions are particularly insidious. So much so that the game drove one couple to build a real-world version of the digital game.

For those not familiar with the game, it’s a simple side-scroller where the goal is to jump and duck a running dinosaur over and under obstacles — think Flappy Birds, but faster paced. When deciding on a weekend hackathon project, [Uri] thought a real-life version of the game would be a natural fit, since he was already a fan of the digital version. With his girlfriend [Ariella] on the team, [Uri] was able to come up with a minimally playable version of the game, with a stepper motor providing the dino jumps and a simple straight conveyor moving the obstacles. People enjoyed it enough that version 2.0 was planned for the Chrome Developer Summit. This version was much more playable, with an oval track for the obstacles and better scorekeeping. [Uri] and [Ariella] had to expand their skills to complete the build — PCB design, E-Paper displays, laser cutting, and even metal casting were all required. The video below shows the final version — but where are the pterosaurs to duck?

Real-world jumping dinos aren’t the first physical manifestation of a digital game. As in the cyber world, Pong was first — either as an arcade version or a supersized outdoor game.

Continue reading “Mechanical Build Lets You Jump Cacti In Real Life”

A Chrome Extension For Being A Jerk

What do you do to someone you want to make suffer, slowly? Specifically, at around 70% speed. To [Stephen], the answer is clear, you hit them where it really hurts: YouTube.

Creatively named “Chrome Engine,” [Stephen]’s diabolical Chrome extension has one purpose: be annoying. Every day, it lowers playback rate by 1% on YouTube. It’s a linear progression: 100% the first day, 99% the second day, 98% the third day, etc. It only stops 30 days later, once it hits its target rate of 70% the original speed. This progression is designed to be slow enough not to be noticed. Its icon is nothing more than the standard Chrome icon as [Stephen] firmly believes in the tactic of hiding in plain sight.

But that’s not all, it’s the minute details that drive the ball home. For instance, rather than using local storage to keep track of playback speed, the Chrome sync storage is used. This ensures that, as long as the extension is installed, playback rate will be synchronized between all of your friend’s(if you can even call them that) devices. It even targets casual YouTube users: [Stephen] has specifically designed their extension so that it won’t drop playback by more than 1% at a time. If the victim goes on vacation, the playback speed won’t drop when they’re away and will resume as soon as they’re back.

The last feature, the one [Stephen] is the proudest of, is that the extension manages to keep the YouTube speed controls working as intended. If the victim tries to play at half speed, their videos will be at half speed … of the slower playback rate set by the extension. And it gets even better! You may not know this if you don’t dally around with playback rates, but the audio tends to stop playing when videos are reduced below 50% of their original speed. Fear not! [Stephen] has accounted for this idiosyncrasy! If the victim selects a speed at or above 0.5x, a minimum cap is added so that the actual playback rate will be equal to or above 0.5x. If they select slower than this, they don’t expect sound anyway, so all bets are off.

Check it out here, may your friends (frenemies?) beware. We’re adding it to our April Fools arsenal, even if it is a bit early.

Hackaday Links: April 17, 2016

There have been really cool happenings in the CNC world for the past few years. There is a recent trend of portable, handheld CNC machines. Yes, you read that correctly. This SIGGRAPH paper demonstrated a handheld router with a camera and a few motors that would make slight corrections to the position of the router. Load in a .DXF or other vector file, and you become the largest CNC machine on the planet. We saw it at one of the Maker Faires, and about a year ago the team soft launched. Apparently, the Shaper router is gearing up for production and [Ben Krasnow] got the first look with a full 17-minute demonstration of [Ben] fabricating parts out of aluminum. It looks like a great tool, and we can’t wait to see this thing in production.

Octoprint is the best way to give a 3D printer a web interface. The dev for Octoprint, [Gina Häußge] used to have a sponsor for developing Octoprint. They’re gone now, which means it’s time for [Gina] to start a Patreon. If you use Octoprint, you know it’s worth more than a dollar a month.

Really bad USB power supplies are nothing new around these parts. There are cheap USB supplies that don’t have any fuses, don’t have any circuit protection, and are noisy as hell. This is the worst USB power supply the Internet has to offer. It’s from one of the relatively new designs of USB power supplies that steps down mains voltage to five USB A ports. [bigclive]’s teardown revealed this was passing half wave mains voltage to the USB ports. It can light up a light bulb. It can kill your phone. The fault? A pinhole in the insulation between the windings of the transformer.

Electronic conference badges are getting excessive, but they can be so much cooler. Here’s Atmel’s take on a high-end conference badge. It has a display, sensors, WiFi, Bluetooth, runs Android, and has 512MB of RAM, 4GB of Flash. It’s a freakin’ mini tablet meant to last for three days.

Speaking of Atmel, they’re having a few growing pains in the merger with Microchip. Employees coming to Microchip from Atmel are getting their severance benefits cut in half. Apparently, the severance benefits given to Atmel employees were not communicated to Microchip before the merger.

Raspberry Pi Zeros are back in production. There’s also going to be a mysterious new feature. Is it WiFi? No, it’s confirmed not to be WiFi. How about Ethernet? Bluetooth? an RTC? Full size HDMI port? Actual pin headers? Audio port? Improved CPU / RAM? No, children. It’s none of these.

C.H.I.P., the nine dollar computer that made some waves last summer, has on-board Flash storage. That means you don’t need to put an image on an SD card. The folks behind C.H.I.P. have recently improved the method for flashing a new OS onto their tiny board: a Chrome plugin. Yes, this sounds completely bizarre, but Chrome plugins are becoming increasingly popular for USB gadget wizardry. You can program an Arduino with Chrome and log USB power profiles with a USB tester and Chrome. You will ride eternal, shiny and chrome.

Mooltipass Installation Process Is Now Dead Simple

In a few weeks the Hackaday community offline password keeper will reach a crowdfunding platform. This is a necessary step as only a high production volume will allow our $80 early bird perk target. We’ll therefore need you to spread the word.

Thanks to the Chromium development team, a few days ago the Mooltipass installation process became as simple as installing our app & extension. As you may remember, our device is enumerated as composite HID proprietary / HID standard keyboard. This makes it completely driverless for all operating systems and enables standalone operation as the Mooltipass can type logins and passwords selected through its user interface. Management communications are therefore done through the Mooltipass HID proprietary interface, which Chrome 38 now natively supports through its chrome.hid API. The simpler our installation process is, the more likely the final users will appreciate the fruit of our hard labor.

As our last post mentioned there’s still plenty of space for future contributors to implement new functionalities. Our future crowdfunding campaign will allow us to find javascript developers for the remaining app & extensions tasks and also implement other browsers support. Want to stay tuned of the Mooltipass launch date? Subscribe to our official Google Group!