Peltier Mini Fridge For Class By Class

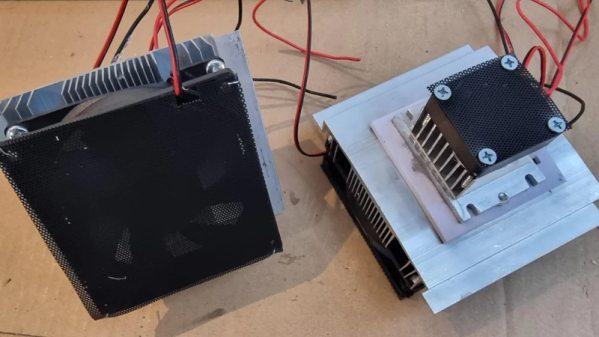
How do you keep a few sodas in your classroom cool? Well, if you are teacher [Ethan Hunt], you have your students design and build a solid-state mini refrigerator that can beat his prototype fridge. The prototype uses a Peltier effect module to get three cans down to 11 C (52 F), with a final goal of reaching 5 C (41 F). It’s not all fun and games either — [Ethan] provides a suggested lesson plan with a total of thirteen modules made to fit in an hour each.

Peltier effect modules, also known as solid-state heat pumps, used to be exotic tech but are now quite common. They are actually the reverse of the Kelvin effect. Thermocouples exploit the Kelvin effect by measuring current flowing due to temperature differences.

Solid-state heat pumps use current flowing to create a comparable temperature difference. However, that’s also the catch. One side of the heat pump gets cold, but the other side gets equally hot. That heat has to go somewhere. The same is true, of course, of a “real” refrigerator or an air conditioner.

The lessons would be perfect to adapt for a class, a kid’s club, or even homeschooling. We’d love to see what your students build. You probably won’t be making liquid nitrogen with this setup. But we have seen more than one mini-fridge.

Solving The Final Part Of The IClicker Puzzle

The regular Hackaday reader might remember the iClicker from our previous coverage of the classroom quiz device, or perhaps you even had some first hand experience with it during your university days. A number of hackers have worked to reverse engineer the devices over the years, and on the whole, it’s a fairly well understood system. But there are still a few gaps in the hacker’s map of the iClicker, and for some folks, that just won’t do.

[Ammar Askar] took it upon himself to further the state of the art for iClicker hacking, and has put together a very detailed account on his blog. While most efforts have focused on documenting and eventually recreating how the student remotes send their responses to the teacher’s base station, he was curious about looking at the system from the other side. Specifically, he wanted to know how the base station was able to push teacher-supplied welcome messages to the student units, and how it informed the clients that their answers had been acknowledged.

He started by looking through the base station’s software update tool to find out where it was downloading the firmware files from, a trick we’ve seen used to great effect in the past. With the firmware in hand, [Ammar] disassembled the AVR code in IDA and got to work piecing together how the hardware works. He knew from previous group’s exploration of the hardware that the base station’s Semtech XE1203F radio is connected to the processor via SPI, so he started searching for code which was interacting with the SPI control registers.

This line of logic uncovered how the radio is configured over SPI, and ultimately where the data intended for transmission is stored in memory. He then moved over to running the firmware image in simavr. Just like Firmadyne allows you to run ARM or MIPS firmware with an attached debugger, this tool allowed [Ammar] to poke around in memory and do things such as simulate when student responses were coming in over the radio link.

At that point, all he had to do was capture the bytes being sent out and decode what they actually meant. This process was complicated slightly by the fact the system uses to use its own custom encoding rather than ASCII for the messages, but by that point, [Ammar] was too close to let something like that deter him. Nearly a decade after first hearing that hackers had started poking around inside of them, it looks like we can finally close the case on the iClicker.

A Lemon Battery Via 3D Printing

There are a whole bunch of high school science experiments out there that are useful for teaching students the basics of biology, physics, and chemistry. One of the classics is the lemon battery. [iqless] decided to have a play with the idea, and whipped up a little something for his students.

The basic lemon battery is remarkably simple. Lemon juice provides the electrolyte, while copper and and zinc act as electrodes. This battery won’t have a hope of charging your Tesla, but you might get enough juice to light an LED or small bulb (pun intended).

[iqless] considered jamming electrodes directly into lemons to be rather unsophisticated. Instead, an electrolyte tray was 3D printed. The tray can be filled with lemon juice (either hand-squeezed or straight from a bottle) and the tray has fixtures to hold copper pennies and zinc-plated machine screws to act as the electrodes. The tray allows several cells to be constructed and connected in series or parallel, giving yet further teaching opportunities.

It’s a fun twist on a classroom staple, and we think there are great possibilities here for further experimentation with alternative electrolytes and electrode materials. We’d also love to see a grown-up version with a large cascade of cells in series for lemon-based high voltage experiments, but that might be too much to ask. There’s great scope for using modern maker techniques in classroom science – we’ve discussed variations on the egg drop before. Video after the break.

Continue reading “A Lemon Battery Via 3D Printing”

200KV Capacitor Uses Cake Pan And Bowl

[PhysicsGirl] posts videos that would be good to use in a classroom or homeschool environment. She recently showed a 200KV capacitor made from a cake pan, a bowl, and some other common items (see video, below).

One of the most interesting things about the project was how they charged the capacitor. A PVC pipe and some common hardware made a wand that they’d charge by rubbing a foam sleeve up and down against the dome formed by a metal bowl. We might have used a cat, but there’s probably some law against that.

To discharge, they used the end of the wand and were able to get a 10 cm spark. Based on the dielectric constant for air, they estimated that equated to a 200KV charge. They also discharged it through someone’s finger, which didn’t seem like a great idea.

We’ve talked about [PhysicsGirl’s] videos before. Granted, a lot of this won’t help the experienced hacker, but if you work with kids, they are a great way to make physics interesting and approachable. We wish she’d spent more time on the actual construction (you’ll need to slow it down to see all the details), though. If you really want a capacitor for your high voltage mad science, you might find these more practical. We’ve seen many homemade capacitors for high voltage.

Continue reading “200KV Capacitor Uses Cake Pan And Bowl”

Electric Train Demonstrator

If you ever want to pique a kid’s interest in technology, it is best to bring out something simple, yet cool. There was a time that showing a kid how a crystal radio could pull in a radio station from all the way across town fit the bill. Now, that’s a yawner as the kid probably carries a high-tech cell phone with a formidable radio already. Your latest FPGA project is probably too complicated to grasp, and your Arduino capacitance meter is–no offense–too boring to meet the cool factor criterion.

There’s an old school project usually called an “electromagnetic train” that works well (Ohio State has a good write up about it as a PDF file). You coil some bare copper wire around a tubular form to make a tunnel. Then a AAA battery with some magnets make the train. When you put the train in the tunnel, the magnetic forces propel the train through the tunnel. Well, either that or it shoots it out. If that happens, turn the train around and try again. There’s a few of these in Internet videos and you can see one of them (from [BeardedScienceGuy]) below.

Continue reading “Electric Train Demonstrator”

Air Quality Sensors In Every Classroom

One of the first electronics projects for the aspiring hobbyist is wiring a sensor of some sort to a microcontroller, and then doing something useful with the new information. [Brock] has taken this type of gateway project and turned it into a way to get his students involved and familiar with electronics. His take on an air quality meter accomplishes both of these goals, and hopefully helps turn all of his students into the next generation of hackers.

The bill of materials is pretty straightforward. Instead of the go-to Arduino, [Brock] has gone with a Particle Photon which has the added benefits of various wireless connectivity options. The air quality sensor is a Shinyei PP42ns which interfaces easily with the Photon. The only thing that might be out of reach of most public high schools (at least in the United States) is the 3D-printed enclosure, although if you have access to one, [Brock] put the files on the project page so anyone can use them.

Of course, we’re big fans of projects that get students involved in anything beyond standardized tests, and this project goes a long way towards teaching students more than how to pass a test. There are many videos and instructions on the project page if you want to try this on your own, but if the cost for the materials is the only thing scaring you off from doing this in your own classroom there are a few other options. You could use ATtiny chips, or try a different style of sensor, or maybe just try out a different project altogether.

Continue reading “Air Quality Sensors In Every Classroom”

One Dollar Board Targets Students

The Raspberry Pi was made to be inexpensive with an eye toward putting them into schools. But what about programs targeted at teaching embedded programming? There are plenty of fiscally-starved schools all over the world, and it isn’t uncommon for teachers to buy supplies out of their own pockets. What could you do with a board that cost just one dollar?

That’s the idea behind the team promoting the “One Dollar Board” (we don’t know why they didn’t call it a buck board). The idea is to produce a Creative Commons design for a simple microcontroller board that only costs a dollar. You can see a video about the project, below.

Continue reading “One Dollar Board Targets Students”