Remote Screen Viewer Is Text-Only

Have you been slowly falling down a rabbit hole of Stallman-like paranoia of computers ever since installing Ubuntu for the first time in 2007? Do you now abhor anything with a GUI, including browsers? Do you check your mail with the command line even though you’re behind seven proxies? But, do you still want to play Minecraft? If so, this command-line-only screen viewer might just be the tool to use a GUI without technically using one.

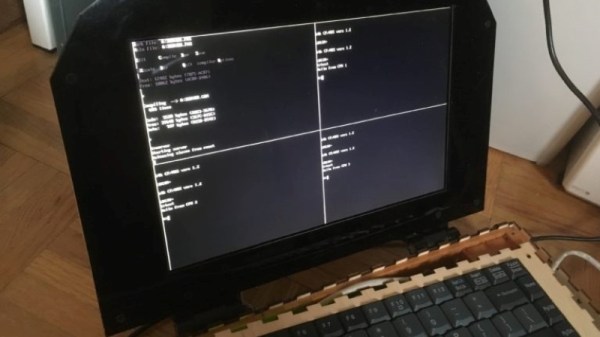
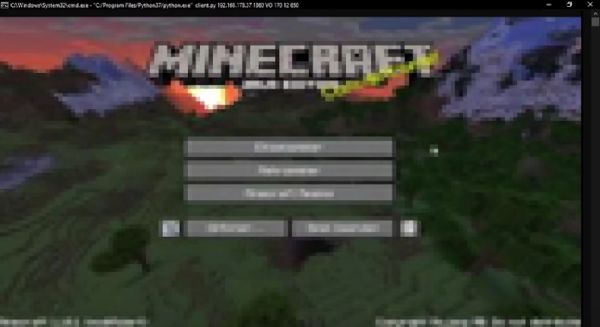
This remote screen viewer is built in Python by [louis-e] and, once installed, allows the client to view the screen of the server even if the client is a text-only console. [louis-e] demonstrates this from within a Windows command prompt. The script polls the server screen and then displays it in the console using the various colors and textures available. As a result, the resolution and refresh rate are both quite low, but it is still functional enough to play Minecraft and do other GUI-based tasks as long as there’s no fine text to read anywhere.

The video below only shows a demonstration of the remote screen viewer, and we can imagine plenty of uses beyond this proof-of concept game demonstration. Installing a desktop environment and window manager is not something strictly necessary for all computers, so this is a functional workaround if you don’t want to waste time and resources installing either of those components. If you’re looking for remote desktop software for a more specific machine, though, take a look at this software which enables remote desktop on antique Macs.

Continue reading “Remote Screen Viewer Is Text-Only”

Laptop Like It’s 1979 With A 16-Core Z80 On An FPGA

When life hands you a ridiculously expensive and massively powerful FPGA dev board, your first reaction may not be to build a 16-core Z80 laptop with it. If it’s not, perhaps you should examine your priorities, because that’s what [Chris Fenton] did, with the result being the wonderfully impractical “ZedRipper.”

Our first impression is that we’ve got to start hanging around a better class of lab, because [Chris] came by this $6000 FPGA board as the result of a lab cleanout; the best we ever scored was a few old Cat-5 cables and some power strips. The Stratix FPGA formed the heart of the design, surrounded by a few breakout boards for the 10.1″ VGA display and the keyboard, which was salvaged from an old PS/2. The 16 Z80 cores running in the FPGA are connected by a ring-topology network, which [Chris] dubs the “Z-Ring”. One of the Z80 cores, the server core, runs CP/M 2.2 and a file server called CP/NET, while the other fifteen machines are clients that run CP/NOS. A simple window manager shows 80 x 25 character terminal sessions for the server and any three of the clients at once, and the whole thing, including a LiPo battery pack, fits into a laser-cut plywood case. It’s retro, it’s modern, it’s overkill, and we absolutely love it.

Reading over [Chris]’s build log puts us in the mood to break out our 2019 Superconference badge and try spinning up a Z80 of our own. If you decide to hack the FPGA-est of conference badges, you might want to check out what [Sprite_TM] has to say about it. After all, he designed it. And you’ll certainly want to look at some of the awesome badge hacks we saw at Supercon.

Thanks to [yNos] for the tip.

Simultaneous AP & Client On The Pi Zero W

The Raspberry Pi Zero W is a great platform for IoT projects, with a smattering of GPIO and onboard WiFi. However, security is an important consideration when it comes to the Internet of Things and it can be beneficial to keep your IoT devices on a separate network for safety’s sake. [Albert] wanted to do this all on board the Pi Zero W, and figured out how to get it acting as an access point and a client all at the same time.

[Albert] starts off with a fresh install of Raspbian Stretch, and sets the Pi up in OTG mode. This allows access to the Pi over a USB serial terminal. This is great for productivity when working on headless networking projects, as it can be frustrating trying to work with an SSH session that keeps dropping out when you change settings.

After creating a second named device (ap0) to go along with the one created automatically by the kernal (wlan0), DNSmasq is installed to act as a DHCP server for the AP. Hostapd is then installed to control the AP settings. Following this, like anything in Linux, a flurry of configuration files are edited to get everything humming along and starting up automatically after a reboot. For some reason, things don’t start up smoothly, so [Albert] has a cron job that fires 30 seconds after bootup and toggles the interfaces off and on again, and that’s done the trick.

It’s a useful hack, as it allows the Pi Zero to act as a hub for IoT devices, while also creating a bridge between them and the internet. Traffic can be managed to stop random internet users flicking your lights on and off and overspeeding your dishwasher.

We’ve seen the Pi Zero used for just about everything under the sun so far. If you’re just starting your own IoT build, perhaps you’d like to use the Pi Zero as a streaming camera?


SqueezeBerry: A Raspberri Pi Powered Squeezebox Appliance

squeezeberry

We like the look which [Emmanuel] achieved with his Raspberry Pi based Squeezebox client. It’s got that minimalist slant that makes it seem like a commercial product at first glance. But one more look at the speakers without grates, the character LCD, and the utilitarian buttons, knobs, and switches tips us off that it’s filled with the hardware we know and love.

Since Logitech announced that it was terminating the Squeezebox line we’ve seen several projects which take up the torch. We’ve seen the RPi used as a Squeezebox server and several embedded Linux systems used as clients. This follows in the footsteps of the latter. The RPi is running Raspbian with the squeezelite package handling the bits necessary to talk to his server. The controls on the front include a power switch, rotary encoder and button for navigating the menus, and a potentiometer to adjust the HD44780 LCD screen’s contrast. The speakers are a set of amplified PC speakers that were liberated from their cases and mounted inside of the wooden box that makes up the enclosure. The in-progress shots of that case look pretty rough, but some sanding and painting really pulled everything together. As you would expect, we’ve embedded the demo video after the jump.

Continue reading “SqueezeBerry: A Raspberri Pi Powered Squeezebox Appliance”

Building An Inexpensive Squeezebox Client Replacement

squeezebox-replacement-built-on-the-cheap

[Andrew] is a fan of the audio quality provided by the Squeezebox hardware. Like many he was unhappy to hear that the devices were being discontinued, but he figured out a way to build a Squeezebox client clone for less than he could have bought an original.

He set several goals for the build. Most notably he wanted the system to be low-power, noiseless, and to support audio quality of at least 96 kHz at 24 bits. What he came up with is the Pogoplug seen in between the two speakers above. It can be acquired for under $20 and it runs embedded Linux. Another member of the Squeezebox community had been working on a custom distro called SqueezePlug to turn these types of devices into Squeezebox clients. After flashing the distro and tweaking the settings [Andrew] has accomplished his goals. The one caveat is the lack of an audio out port. Above he’s using some cheap USB speakers, but higher-fidelity is possible by choosing a more expensive external USB device.

This will work nicely with that Squeezebox server you built from a Raspberry Pi.

PropIRC: Propeller Based IRC Client

propeller

Many people don’t want to miss anything in their IRC room, so they “idle” or just leave the client open to capture all the conversations. It can be annoying to have it going in the background on your computer though. To remedy this, [Harrison] built a simple computer from a propeller microcontroller that’s only purpose is to connect to IRC servers. It can take a regular PS2 keyboard and works with a standard monitor at 1024×768. It’s compact size and low power requirements make it quite a useful tool to have around if you are always on IRC. you can download the source code and schematics on the site.

[Thanks Scott]