Bring Out The Fine Detail In Small Objects With This Coaxial Lighting Rig

All things considered, modern photography is pretty easy. It’s really just a matter of pointing the camera at the thing you want to take a picture of and letting the camera do the rest. But that doesn’t mean good photographs are easy to make, especially when fine detail is required. And that’s the reason this 3D printed coaxial lighting setup was built — to make quality photographs of small objects a snap.

The objects of [Peter Lin]’s photographic desire are coins, no doubt of the collectible variety. Since the condition of a coin is essential to determining its value, numismatic photographers really need to be meticulous about the quality of their work. The idea here is to keep the incoming light parallel to the optical axis of the camera, for which purpose ring lights around the camera lens are often used. But they can result in lighting artifacts, and can be awkward to use for such smaller subjects.

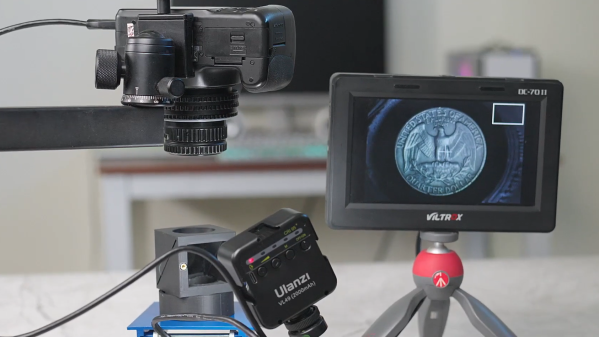
So for this setup, [Peter] essentially built a beam-splitter. The body is a printed block that’s painted matte black to keep reflections down; a little self-adhesive flocking paper helps with that too. The round aperture on the top is for the camera lens, with the square window on the side admitting light. The secret is a slot oriented at 45 degrees to both of those openings, into which the glass element from a cheap UV filter is inserted. The filter acts like a beam splitter which reflects light down onto the coin on the bottom of the block and lets it pass up into the camera lens directly above the coin, parallel to the optical axis. Genius!

The video below shows it in use with both DSLR and smartphone cameras, and the image quality is amazing. While most of us probably aren’t photographing coins, we do enough high-resolution photography of small objects that this seems applicable. In a way, it reminds us of [Big Clive]’s “TupperCam” method of high-res PCB photography (final item).

Continue reading “Bring Out The Fine Detail In Small Objects With This Coaxial Lighting Rig”

MoCA Networking Is A Niche Solution For Coax Lovers

When it comes to networking these days, the vast majority of our devices are connected wirelessly. Beyond that, we’re all familiar with the Cat 5 and Cat 6 cables that form the high-capacity Ethernet networks in our homes, schools, and offices.

It’s only if you go back to the very dawn of Ethernet that coaxial cables are relevant… right? Wrong! MoCA networking is all about coaxial cables, designed to hook up devices over cable TV infrastructure!

Continue reading “MoCA Networking Is A Niche Solution For Coax Lovers”

Omnirotor flies over obstacles with its gimballed, caged, coaxial rotors.

Gimballed Omnirotor Goes Over Great Obstacles

What can drive on the ground, hop in the air, and continuously move its coaxial rotor assembly without ever having to reset its position? The answer is [New Dexterity]’s Omnirotor All-Terrain Platform.

Although still very much a prototype, the video below the break shows that the dexterity claimed by Omnirotor isn’t just a lot of hype. Weaving through, around, and over obstacles is accomplished with relative ease by way of a coaxial rotor configuration that’s sure to turn some heads.

Omnirotor flies over obstacles with its gimballed, caged, coaxial rotors.
Omnirotor’s unique design lends to its agility

While not novel in every aspect, the Omnirotor’s strength comes from a combination of features that are fairly unique. The coaxial rotors are fully gimballed, and as such can be moved to and from any direction from any other direction. In other words, it can rotate in any axis infinitely without needing to return to a home position. Part of this magic comes from a very clever use of resources: The battery, speed controllers, and motors are all gimballed as one. This clever hack avoids the need for large, heavy slip rings that would otherwise be needed to transmit power.

Adding to the Omnirotor’s agility is a set of wheels that allow the craft to push itself along a surface, presumably to decrease power consumption. What if an obstacle is too difficult to drive around or past? The Omnirotor takes to the air and flies over it. The coaxial rotors are caged, protecting them from the typical rotor-snagging dangers you’d expect in close quarters.

[New Dexterity] has Open Sourced the entire project, with the Omirotor design, Firmware, and even the benchmarking platform available on Github so that others can share in the fun and iterate the design forward even further.

You might also enjoy this tetrahedron based omnirotor, or another omnirotor that knows how to play fetch. Really.

Continue reading “Gimballed Omnirotor Goes Over Great Obstacles”

Coaxcopter To Carry Man

One of the major perks of all the affordable flight controllers and motors available from the hobby market is that you can really experiment with some crazy aircraft designs. [amazingdiyprojects] is experimenting with a coaxial helicopter design, with the goal off possibly using for a manned version in the future. (Video link, embedded below.)

The aircraft uses a pair of coaxial counter-rotating motors with large propellers, with several redundant control surfaces below the propellers. One of the theoretical advantages of this arrangement, compared to the more conventional quadcopter type designs, is redundancy. While a quadcopter will start tumbling when a single motor fails, this design will still be able to descend safely with just one motor.

It is also not dependent on the main motors for yaw, pitch and roll control. In multirotors, the motors need to keep a significant amount of the motor’s available power in reserve to increase torque at a moment’s notice for attitude control. This craft can use all the available thrust from the motors for lift, since control is provided by the control surfaces. There are five sets of redundant control surfaces below the propellers, each set connected to a separate flight controller.

Another advantage of this design is efficient for a given footprint, since one large propeller will always be more efficient than multiple smaller propellers. One of the goals for [amazingdiyprojects] is to fit the full size craft in a shipping container or on a trailer for transport without dissasembly.

[amazingdiyprojects] has built manned drones before, using both electric motors and internal combustion engines. And don’t miss the most gonzo wind tunnel ever at 7:00 in the video below. Continue reading “Coaxcopter To Carry Man”

Homebrew Loop Antenna Brings The Shortwave World To You

Radio may be dead in terms of delivering entertainment, but it’s times like these when the original social network comes into its own. Being able to tune in stations from across the planet to get fresh perspectives on a global event can even be a life saver. You’ll need a good antenna to do that, which is where this homebrew loop antenna for the shortwave radio bands shines.

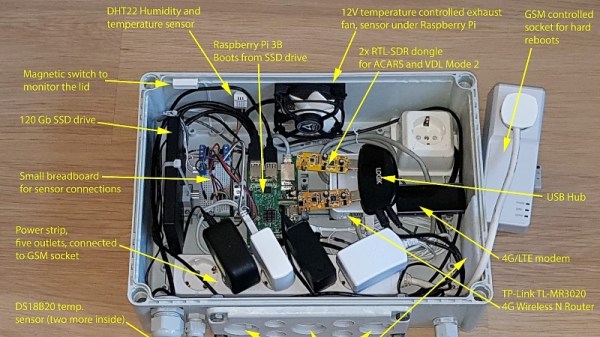
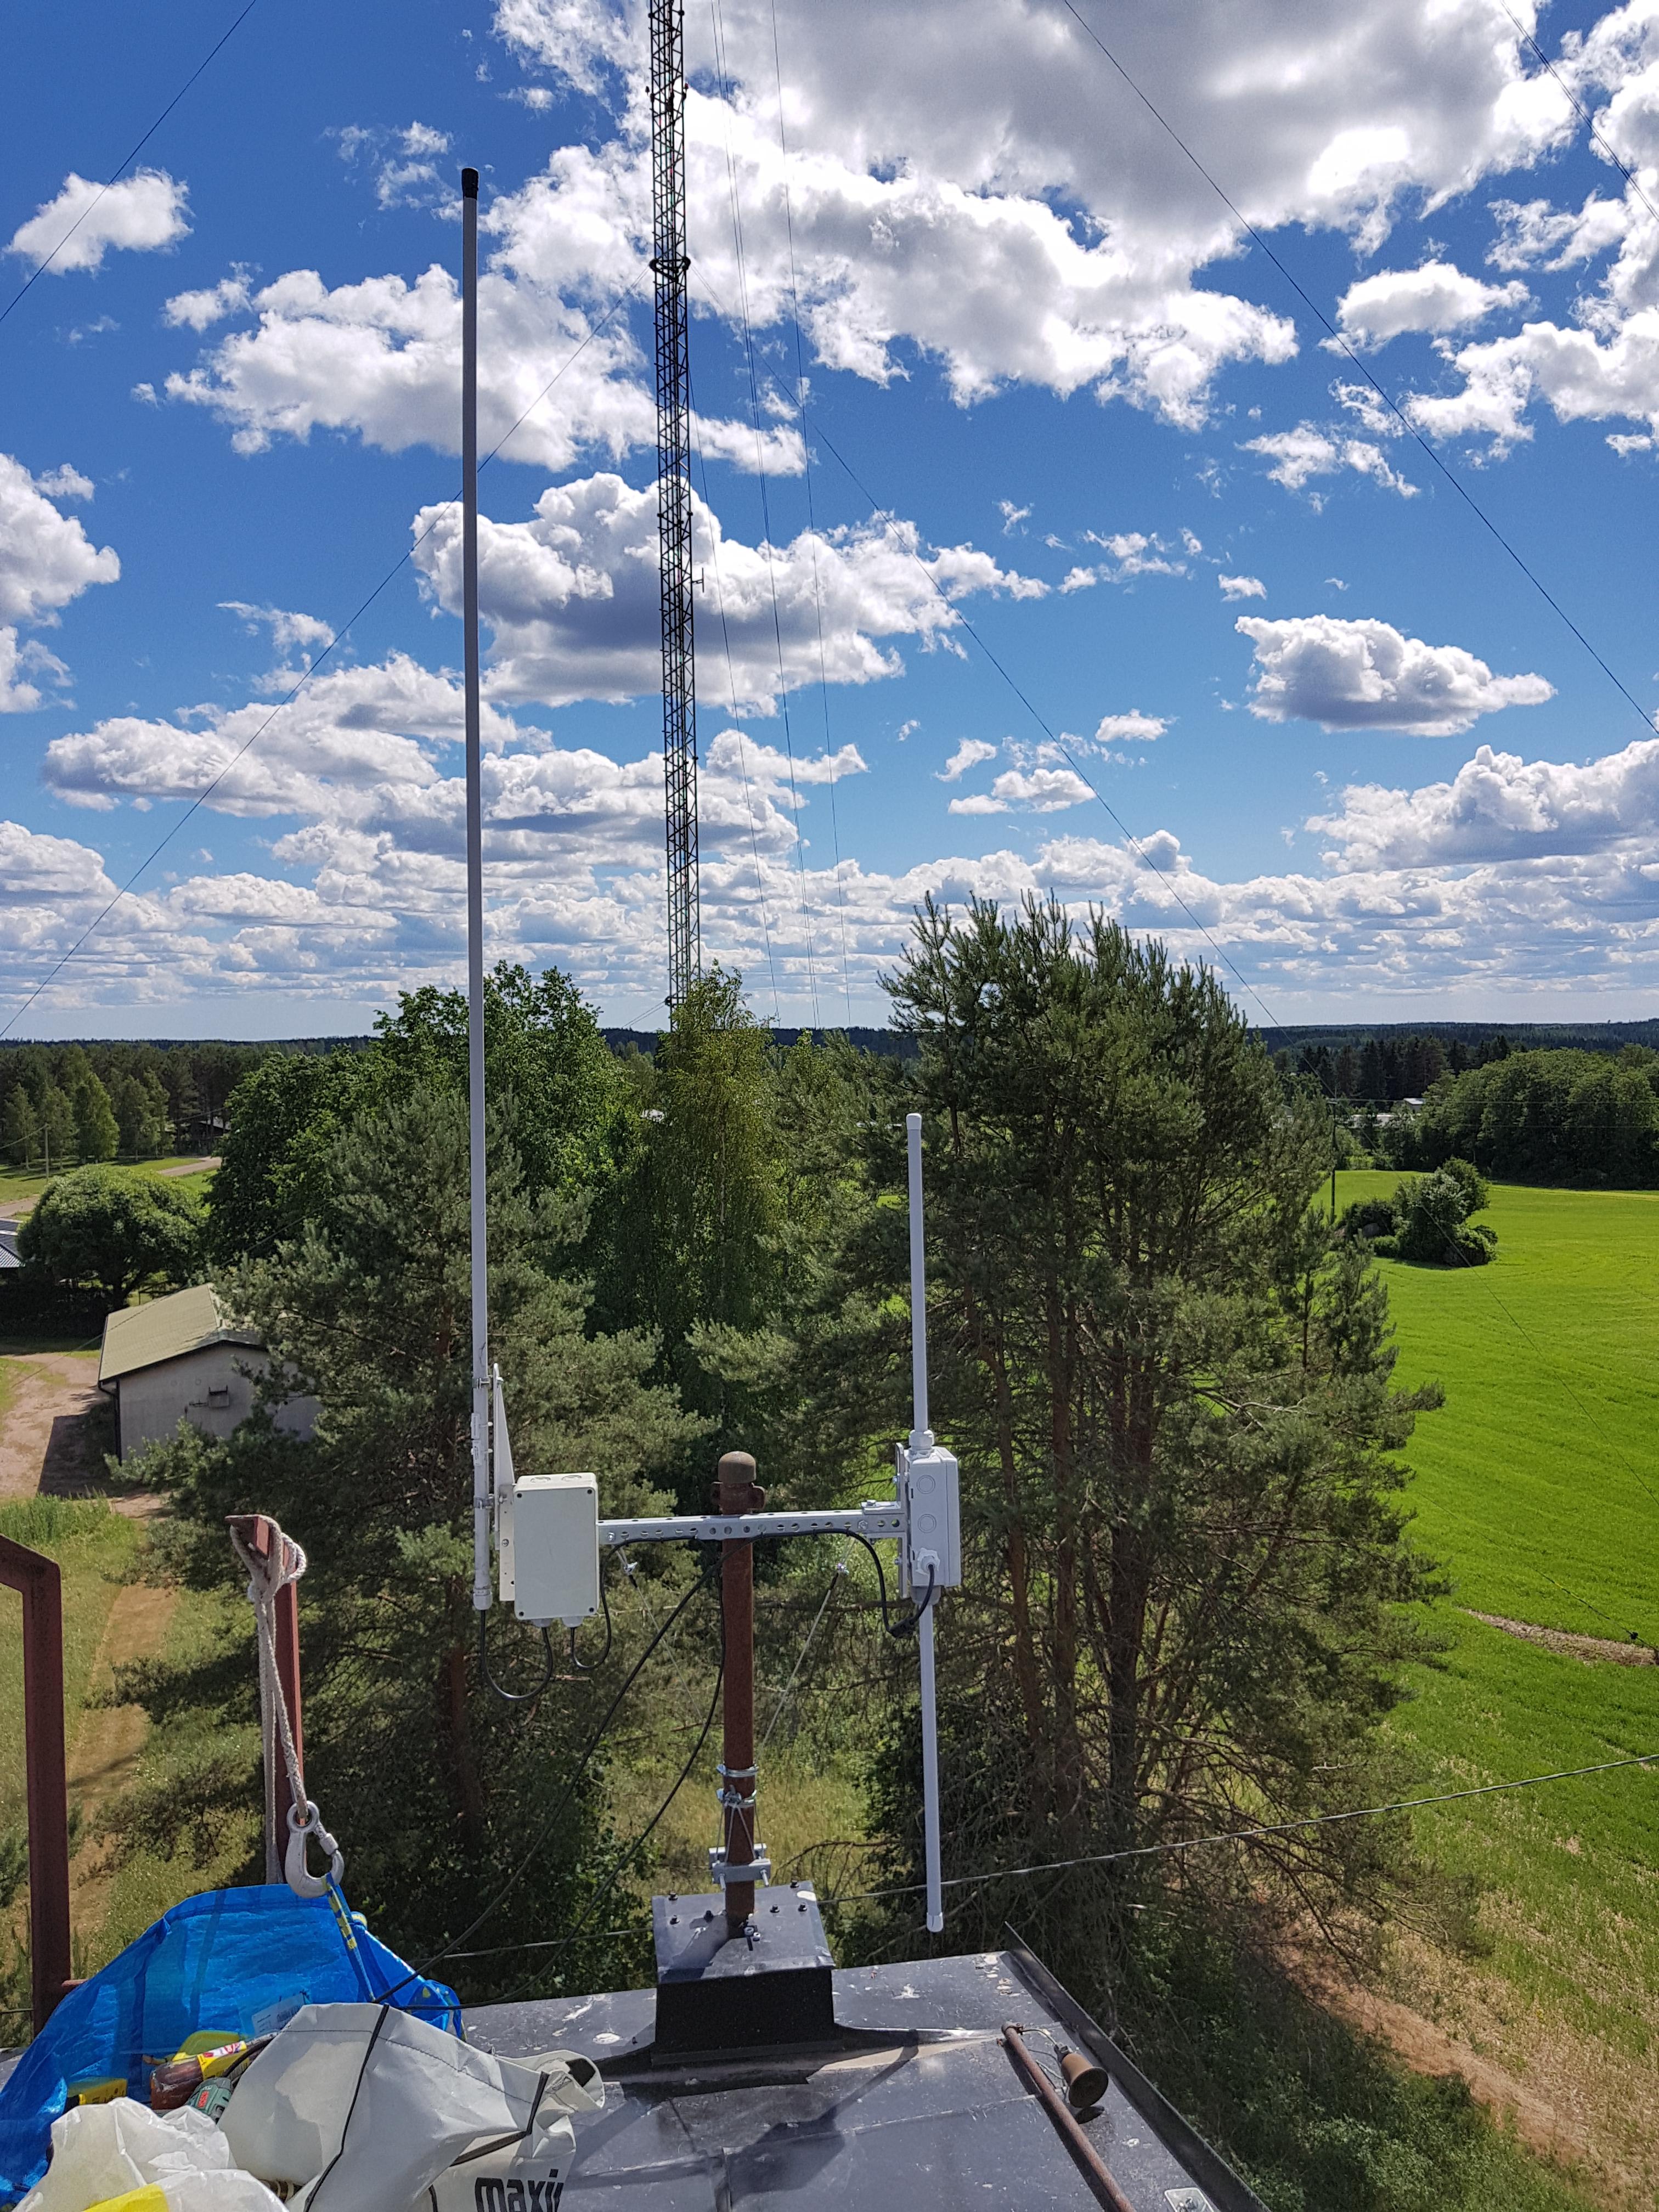
To be honest, pretty much any chunk of wire will do as an antenna for most shortwave receivers. But not everyone lives somewhere where it’s possible to string up a hundred meters of wire and get a good ground connection, which could make a passive loop antenna like this a good choice. Plus, loops tend to cancel the electrical noise that’s so part of life today, which can make it easier to pull in weak, distant stations.

[Thomas]’s design is based on a length of coaxial cable, which should be stiff enough to give the loop some stability, like a low-loss RG-8 or RG-213. The coax braid and dielectric are exposed at the midpoint of the cable to create a feed point, while the shield and center conductor at the other ends are cross-connected. A 1:1 transformer is wound on a toroid core to connect to the feedpoint; [Thomas] calls it a balun but we tend to think it’s more of an unun, since both the antenna and feedline are unbalanced. He reports good results from the loop across the shortwave band.

The shortwave and ham bands are a treasure trove of information and entertainment just waiting to be explored. Check them out — you might learn something, and you might even stumble across spies doing their thing.

[via RTL-SDR.com]

Remote ADS-B Install Listens In On All The Aircraft Transmissions With RTL-SDR Trio, Phones Home On Cellular

When installing almost any kind of radio gear, the three factors that matter most are the same as in real estate: location, location, location. An unobstructed location at the highest possible elevation gives the antenna the furthest radio horizon as well as the biggest bang for the installation buck. But remote installations create problems, too, particularly with maintenance, which can be a chore.

So when [tsimota] got a chance to relocate one of his Automatic Dependent Surveillance-Broadcast (ADS-B) receivers to a remote site, he made sure the remote gear was as bulletproof as possible. In a detailed write up with a ton of pictures, [tsimota] shows the impressive amount of effort he put into the build.

The system has a Raspberry Pi 3 with solid-state drive running the ADS-B software, a powered USB hub for three separate RTL-SDR dongles for various aircraft monitoring channels, a remote FlightAware dongle to monitor ADS-B, and both internal and external temperature sensors. Everything is snuggled into a weatherproof case that has filtered ventilation fans to keep things cool, and even sports a magnetic reed tamper switch to let him know if the box is opened. An LTE modem pipes the data back to the Inter, a GSM-controlled outlet allows remote reboots, and a UPS keeps the whole thing running if the power blips atop the 15-m building the system now lives on.

Nobody appreciates a quality remote installation as much as we do, and this is a great example of doing it right. Our only quibble would be the use of a breadboard for the sensors, but in a low-vibration location, it should work fine. If you’ve got the itch to build an ADS-B ground station but don’t want to jump in with both feet quite yet, this beginner’s guide from a few years back is a great place to start.

Reaction Wheels Almost Control This Unusual Drone

When you think about all the forces that have to be balanced to keep a drone stable, it’s a wonder that the contraptions stay in the air at all. And when the only option for producing those forces is blowing around more or less air it’s natural to start looking for other, perhaps better ways to achieve flight control.

Taking a cue from the spacecraft industry, [Tom Stanton] decided to explore reaction wheels for controlling drones. The idea is simple – put a pair of relatively massive motorized wheels at right angles to each other on a drone, and use the forces they produce when they accelerate to control the drone’s pitch and roll. [Tom]’s video below gives a long and clear explanation of the physics involved before getting to the build, which results in an ungainly craft a little reminiscent of a lunar lander. The drone actually manages a few short, somewhat stable flights, but in general the reaction wheels don’t seem to be up to the task. [Tom] chalks this up to the fact that he’s using the current draw of each reaction wheel motor as a measure of its torque, which is not exactly correct for all situations. He suggests that motors with encoders might do a better job, but by the end of the video the little drone isn’t exactly in shape for continued experimentation.

Of course, dodgy reaction wheels don’t only cause problems with drones. They can also be a problem for spacecraft when the Sun gets fussy too.

Continue reading “Reaction Wheels Almost Control This Unusual Drone”