DevTerm Beats Cyberdeck Builders To The Punch

What makes a cyberdeck? Looking as though it came from an alternate reality version of the 1980s is a good start, but certainly isn’t required. If you’re really trying to adhere to the cyberpunk ethos, any good deck should be modular enough that it can be easily repaired and upgraded over time. In fact, if it’s not in a constant state of evolution and flux, you’ve probably done something wrong. If you can hit those goals and make it look retro-futuristic at the same time, even better.

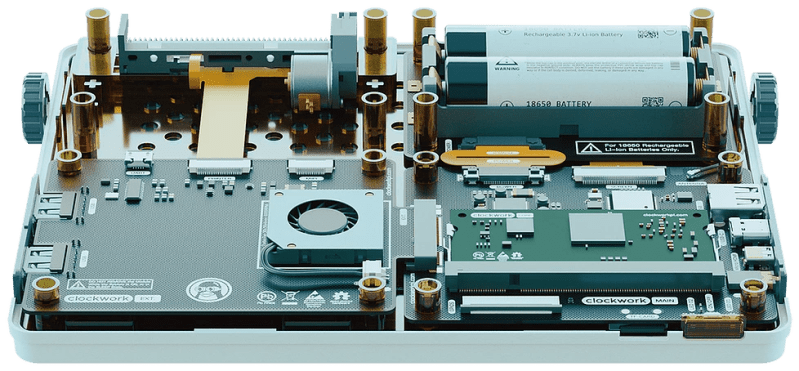
Which is why the Clockwork DevTerm is such an interesting device. It ticks off nearly every box that the custom cyberdeck builds we’ve covered over the last couple years have, while at the same time being approachable enough for a more mainstream audience. You won’t need a 3D printer, soldering iron, or hot glue gun to build your own DevTerm. Of course if you do have those tools and the skills to put them to work, then this might be the ideal platform to build on.

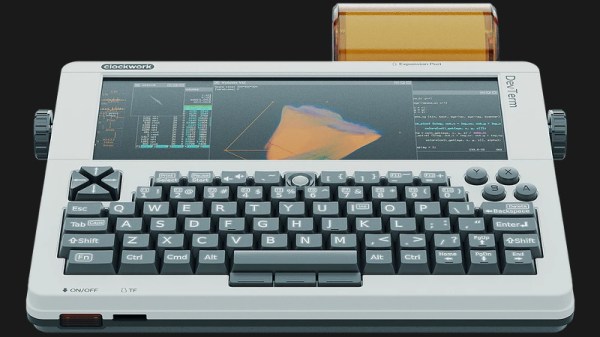
With a 65% QWERTY keyboard and widescreen display, the DevTerm looks a lot like early portable computers such as the TRS-80 Model 100. But unlike the machines it draws inspiration from, the display is a 6.8 inch 1280 x 480 IPS panel, and there’s no pokey Intel 8085 chip inside. The $220 USD base model is powered by the Raspberry Pi Compute Module 3, and if you need a little more punch, there are a few higher priced options that slot in a more powerful custom module. Like the Waveshare Pi CM laptop we recently looked at, there’s sadly no support for the newer CM4; but at least the DevTerm is modular enough that it doesn’t seem out of the question that Clockwork could release a new mainboard down the line. Or perhaps somebody in the community will even do it for them.

Speaking of which, the board in the DevTerm has been designed in two pieces so that “EXT Module” side can be swapped out with custom hardware without compromising the core functionality of the system. The stock board comes with extra USB ports, a micro USB UART port for debugging, a CSI camera connector, and an interface for an included thermal printer that slots into a bay on the rear of the computer. Clockwork says they hope the community really runs wild with their own EXT boards, especially since the schematics and relevant design files for the entire system are all going to be put on GitHub and released under the GPL v3.

They say that anything that sounds too good to be true probably is, and if we’re honest, we’re getting a little of that from the DevTerm. An (CPU BLOBs aside!) open hardware portable Linux computer with this kind of modularity is basically a hacker’s dream come true, and thus far the only way to get one was to build it yourself. It’s hard to believe that Clockwork will be able to put something like this out for less than the cost of a cheap laptop without cutting some serious corners somewhere, but we’d absolutely love to be proven wrong when it’s released next year.

Waveshare’s Pi CM3 Laptop Arrives A Bit Too Late

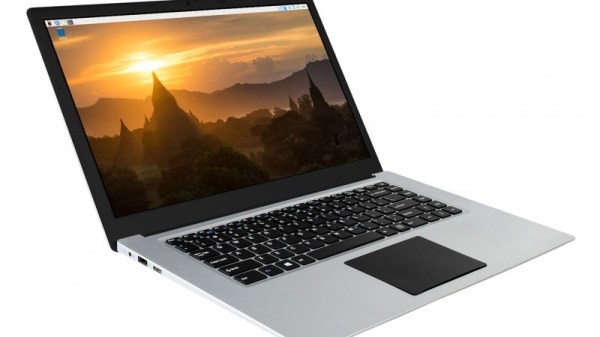
The good news it that you can now buy a pretty decent laptop that’s based around the Raspberry Pi Compute Module (CM). The bad news is that it was conceived before anyone knew the interface was going to change for the new CM4, so it doesn’t have any of the features that would make it really interesting such as support for PCI-Express. Oh, and it costs $300.

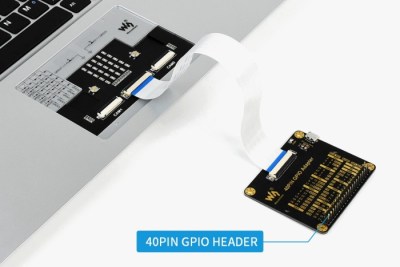
Waveshare, the company that most of us know best as a purveyor of e-paper displays, also made some rather interesting design choices on their laptop. See that black pad under the keyboard? No, it’s not a trackpad. It’s just a decorative cover that you remove to access an LED matrix and GPIO connectors. Make no mistake, a laptop that features a GPIO breakout right on the front is definitely our jam. But the decision to install it in place of the trackpad, and then cover it with something that looks exactly like a trackpad, is honestly just bizarre. It might not be pretty, but the Pi 400 seemed to have solved this problem well enough without any confusion.

On the other hand, there seems to be a lot to like about this product. For one, it’s a very sleek machine that doesn’t have the boxy and somewhat juvenile look that seems so common in other commercial Pi laptops. We also like that Waveshare included a proper Ethernet jack, something that’s becoming increasingly rare even on “real” laptops. As [ETA PRIME] points out in the video after the break, the machine also has a crisp IPS display and a surprisingly responsive keyboard. Though the fact that it still has a “Windows” key borders on being offensive considering how much it costs.

But really, the biggest issue with this laptop is when it finally hit the market. If Waveshare had rushed this out when the CM3 was first introduced, it probably would have been a more impressive technical achievement. On the other hand, had they waited a bit longer they would have been able to design it around the far more capable CM4. As it stands, the product is stuck awkwardly in the middle.

Continue reading “Waveshare’s Pi CM3 Laptop Arrives A Bit Too Late”

Circuit-Sword Delivers Retro Justice

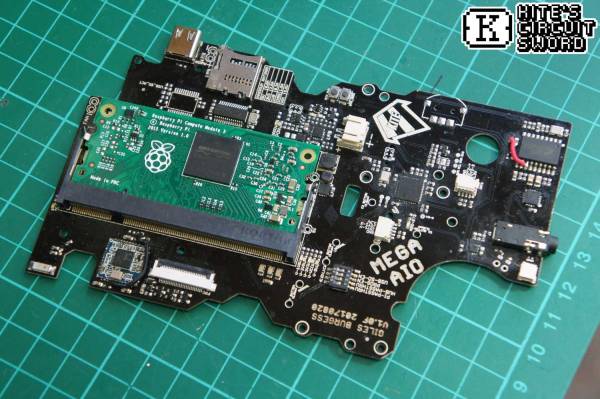
You can’t search for “retro gaming” without hitting a plethora of single board computers attached to all manner of controls, batteries, etc. Often these projects have an emphasis on functionality above all else but [Kite]’s Circuit-Sword is different. The Circuit-Sword is the heart of a RaspberryPi-based retro gaming machine with an enviable level of fit and finish.

Fundamentally the Circuit-Sword is a single board computer built around a Raspberry Pi Compute Module 3. We don’t see many projects which use a Compute Module instead of the full Pi, but here it is a perfect choice allowing [Kite] to useful peripherals without carrying the baggage of those that don’t make sense for a portable handheld (we’re looking at you, Ethernet). The Circuit-Sword adds USB-C to quickly charge an onboard LiPo (rates up to 1.5A available) and the appropriate headers to connect a specific LCD. The Compute Module omits wireless connectivity so [Kite] added an SDIO WiFi/Bluetooth module. And if you look closely, you may notice an external ATMega mediating a familiar looking set of button and switches.

Optional Drill Holes

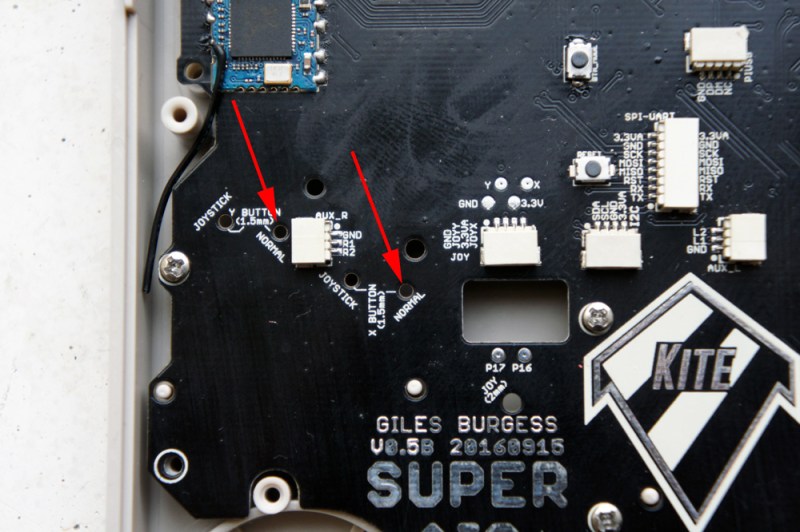
We think those buttons and switches are the most interesting thing going on here, because the whole board is designed to fit into an original GameBoy enclosure. It turns out replacement enclosures are available from China in surprising variety (try searching for “gameboy housing”) as are a variety of parts to facilitate the installation of different screen options and more. One layer deeper in the wiki there are instructions for case mods you may want to perform to make everything work optimally. The number of possible options the user can mod-in are wide. Extra X/Y buttons? Shoulder buttons on the back? Play Station Portable-style slide joysticks? All detailed. For even more examples, try searching the SudoMod forums. For example, here’s a very visual build log by user [DarrylUK].

The case mod instructions are worth a glance even if you have no intent to build a device. There are some clever techniques to facilitate careful alignment of buttons and accurate hole drilling. Predicting their buyers might want a variety of options, [Kite] added reference drill holes in the PCB for the builder to re-drill for mounting buttons or joysticks. To facilitate adding status LEDs externally there is a tiny PCB jig included. There are even instructions for adding a faux game cartridge for the complete look.

If you want to buy one (we certainly do!) [Kite] does group buys periodically. Check out the wiki for links to the right interest form.

Thanks [Speednut Dave] for the tip!

Raspberry Pi Compute Module 3 In A GameBoy Original

[Kite] has been making custom PCBs for GameBoys for a long time. Long enough, in fact, that other people have used his work to build even more feature-rich GameBoy platforms. Unfortunately some of their work had stagnated, so [Kite] picked it up and completed a new project: a GameBoy that uses a Raspberry Pi running on his upgraded GameBoy PCB.

At its core the build uses a Raspberry Pi 3, but one that has been shrunk down to the shape of a memory module, known as the Compute Module 3. (We featured the original build by [inches] before, but [Kite] has taken it over since then.) The upgrade frees up precious space in the GameBoy case to fit the custom PCB that was originally built by [Kite], and also eliminates the need to cut up a Raspberry Pi and solder it to the old version of his PCB. The build is very clean, and runs RetroPie like a champ. It has some additional features as well, such as having an HDMI output.

For anyone looking for that retro GameBoy feel but who wants important upgrades like a backlit color screen, or the ability to play PSP games, this might be the build for you. The video below goes into details about how it all fits together. If you’re looking for more of a challenge in your GameBoy hacks, though, there’s an ongoing challenge to build the tiniest GameBoy possible as well.

Continue reading “Raspberry Pi Compute Module 3 In A GameBoy Original”

LoRaWAN And Raspberry Pi Compute Module For A Remote Display

We see a lot of Raspberry Pi projects on these pages featuring all variants of the little board from Cambridge, but with one notable exception. Surprisingly few of them have featured its industrial embedded cousin, the Raspberry Pi Compute Module. The Pi-on-a-SODIMM form factor is a neat idea, but we are guessing that the high price of the development board relative to that of a Model B or a Pi Zero has pushed most people in our community towards the latter choice.

[Andrew Back] has put up a straightforward demonstration project on the RS DesignSpark site that provides an introduction to the Compute Module 3, using it to run a remotely operated display. In addition it uses an RN2483 LoRaWan radio module and The Things Network for communication, which makes it worth a look even if the Compute Module wasn’t of interest. Continue reading “LoRaWAN And Raspberry Pi Compute Module For A Remote Display”

Raspberry Pi Launches Compute Module 3

The forgotten child of the Raspberry Pi family finally has an update. The Raspberry Pi Compute Module 3 has been launched.

The Pi 3 Compute Module was teased all the way back in July, and what we knew then is just about what we know now. The new Compute Module is based on the BCM2837 processor – the same as found in the Raspberry Pi 3 – running at 1.2 GHz with 1 gigabyte of RAM. The basic form factor SODIMM form factor remains the same between the old and new Compute Modules, although the new version is 1 mm taller.

The Compute Module 3 comes with four gigabytes of eMMC Flash and sells for $30 on element14 and RS Components. There’s also a cost-reduced version called the Compute Module 3 Light that forgoes the eMMC Flash and instead breaks out those pins to the connector, allowing platform integrators to put an SD card or Flash chip on a daughter (mother?) board. The CM3 Lite version sells for $25. Continue reading “Raspberry Pi Launches Compute Module 3”