Upgrade Board Turns Typewriter Into A Teletype

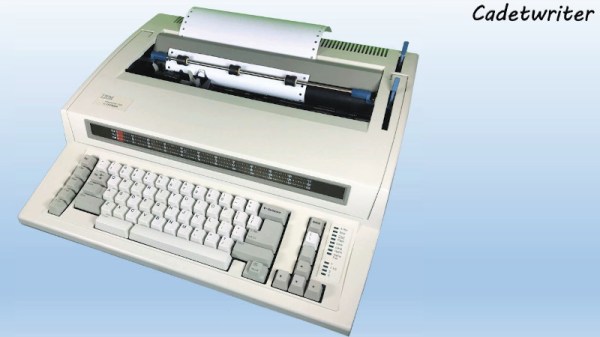
It may come as little surprise to find that Hackaday does not often play host to typewriter projects. While these iconic machines have their own particular charm, they generally don’t allow for much in the way of hardware modification. But then the IBM Wheelwriter 1000 isn’t exactly a traditional typewriter, which made its recent conversion to a fully functional computer terminal possible.

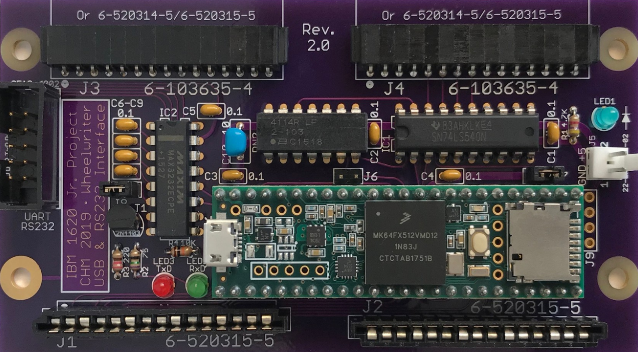
A product of the Computer History Museum’s [IBM 1620 Jr. Team], this modification takes the form of a serial interface board that can be built at home and installed into the Wheelwriter. The board allows the vintage electronic typewriter to speak RS-232 and USB, so it can be connected to whatever vintage (or not so vintage) computer you can imagine. The documentation for the project gives a rough cost of $150, though that does assume you’ve already got a Wheelwriter 1000 kicking around.

The GitHub repository includes everything you need to create your own board, and there’s even a highly detailed installation guide that goes over the case modifications necessary to get the new hardware installed. It also explains that you’ll want to get a new keycap set for your Wheelwriter if you perform this modification, as the original board doesn’t have all of the ASCII characters.

So why adapt an old electric typewriter to function as a teletype? As explained by the [IBM 1620 Jr. Team], there are projects out there looking to recreate authentic 1960s-era computing experiences that need a (relatively) affordable paper terminal. The originals are too rare to use in modern recreations, but with their adapter board, these slightly less archaic input devices can be used in their place.

Once you’ve built your new teletype, or in the somewhat unlikely event you already have one at the ready, we’ve seen a couple of projects that you might be interested in to put it to use.

A Super Tidy School Bus RV Conversion

Many of us have seen an old bus for sale for a tantalizingly low price, and begun thinking about the possibilities. [EpiclyEpicEthan1] is someone who took the next step, bought the bus, and got to work converting it to an RV, with impressive results.

The bus in question is a 2002 International RE3000, which in its former life had helped move school children and barrels of pool chemicals to and fro. The project began, as many do, with a full teardown of the interior. With this done, the floor was treated to remove rust and repainted. Insulation and new plywood boards were then installed, and the fit-out began.

The amount of work involved in the build is immense. There’s a master bedroom, auxiliary bedroom, bathroom, and kitchen area. It’s a fully featured RV in every sense of the word, and yes, there is hot water. There was also significant work done to improve the driving experience, with switches relocated, lights added, and a reversing camera installed for easier parking.

Overall, it’s an impressive project that should serve as great inspiration to anyone wanting to attempt something similar. Then again, if your means are a little more limited, you could always go for a Corolla build.

BikeOn Makes Electric Conversion A Snap

If you’re in a relatively urban area and your destination is within a reasonable distance, it’s hard to argue against riding your bike rather than taking a car. It’s a positive for the environment, and great way to exercise and keep active. But some of us, say folks who write for the Internet full-time, might appreciate a little electromechanical advantage when the going gets tough.

In an effort to make electrifying your bike as easy as possible, [Shushanik] and [Aram] are working on a product they call BikeOn which they’ve recently entered into the 2019 Hackaday Prize. Thanks to some very clever engineering, this small unit can clamp onto the frame of a standard bicycle and transfer the energy from its 350 watt motor directly into the rear wheel; all without any tools or permanent modifications.

In the video after the break, [Aram] demonstrates how the user can install the BikeOn motor assembly in literally just a few seconds. Naturally there’s a beefy battery that needs to get attached to the frame as well, but even that has been made modular enough that it can attach where many bikes have their water bottle holder.

The attentive reader will likely notice that there’s no obvious control mechanism for BikeOn. Instead of having to fumble around with it manually, BikeOn uses a combination of torque sensor, accelerometer, and gyroscope to intelligently determine when the rider could use a boost.

BikeOn nabbed Editor’s Choice award at Maker Faire 2019, and now that it’s in the running for the Hackaday Prize, we’re excited to see more information on the product as it moves towards commercial release.

Continue reading “BikeOn Makes Electric Conversion A Snap”

House Training A Military TA-1024A Field Telephone

After spotting some interesting military phones at a museum, [CuriousMarc] wondered what it would take to retrofit these heavy duty pieces of telecom equipment for civilian use. He knew most of the internals would be a lost cause, but reasoned that if he could reverse engineer key elements such as the handset and keypad, he might be able to connect them to the electronics of a standard telephone. Luckily for us, he was kind enough to document the process.

There were a number of interesting problems that needed to be solved, but the first and perhaps largest of them was the unusual wiring of the keypad. It wasn’t connected in the way modern hackers like us might expect, and [CuriousMarc] had to end up doing some pretty significant rewiring. By cutting the existing traces on the PCB with a Dremel and drilling new holes to run his wires around the back, he was able to convert it over to a wiring scheme that contemporary touch tone phones could use.

An adapter needed to be fabricated to mount a basic electret microphone in place of the original dynamic one, but the original speaker was usable. He wanted to adapt the magnetic sensor that detected when the handset was off the hook, but in the end it was much easier to just drill a small hole and use a standard push button.

The main board of the phone is a perfect example of the gorgeous spare-no-expense construction you’d expect from a military communications device, but unfortunately it had to go in the bin. In its place is the guts of a lowly RCA phone that was purchased for the princely sum of $9.99. [CuriousMarc] won’t be able to contact NORAD anymore, but at least he’ll be able to order a pizza. The red buttons on the keypad, originally used to set the priority level of the call on the military’s AUTOVON telephone network, have now been wired to more mundane features of the phone such as redial.

While this is fine for a one-off project, we’d love to see a drop-in POTS or VoIP conversion for these phones that didn’t involve so much modification and rewiring. Now that we have some documentation for things like the keypad and hook sensor, it shouldn’t be hard to take their idiosyncrasies into account with a custom PCB. Dragging vintage gear into the modern era is always a favorite pastime for hackers, so maybe somebody out there will be inspired to take on the challenge.

Continue reading “House Training A Military TA-1024A Field Telephone”

A 1940s Gangster-Mobile Gets An Electric Makeover

When referring to classic cars, there’s a good reason that “they don’t make ’em like that anymore.” Old cars represented the limits of what could be done in terms of materials and manufacturing methods coupled with the styles of the time and cheap fuel. The result was big, heavy cars that would cost a fortune in gas to keep on the road today.

Some people just don’t want to let those styles go, however, and send their beast off for some special modifications. This 1949 Mercury coupe with an electric drivetrain conversion is one way of keeping that retro look alive. Granted, the body of the car is not exactly showroom quality anymore, from the light patina of rust on its heavy steel body panels to the pimples cropping up under its abundant chrome. But that’s all part of the charm; this comes from conversion company Icon’s “Derelict” line, which takes old vehicles and guts them while leaving the outside largely untouched. This Mercury was given a fully electric, 298 kW drivetrain. The engine bay and trunk, together roomier than some Silicon Valley studio apartments, provided ample room for the 85 kWh Tesla battery pack and the dual electric motors, with room left over to craft enclosures for the battery controllers that look like a V8 engine. Custom electronic gauges and controls that look like originals adorn the chrome-bedazzled dash. The beast tops out at 120 mph (193 km/h) and has a 200 mile (322 km) range before it has to find a Tesla supercharger. Or a lemonade stand.

Say what you want about the old cars, but they had plenty of style. We appreciate the work that went into this conversion, which no doubt cost more than all the gas this thing has ever guzzled.

Thanks to [Qes] for the tip.

Turn A Cheap 3D Printer Into A Cheap Laser Cutter

We know it’s hard to hear it, but the days of you being a hotshot at the local Hackerspace because you’ve got a 3D printer at home are long gone. While they’re still one of the most persnickety pieces of gear on the hacker’s bench, they’re certainly not the rarest anymore. Some of these printers are so cheap now they’re almost impulse buys. Like it or not, few people outside of your grandmother are going to be impressed when you tell them you’ve got a personal 3D printer anymore; and we wouldn’t be surprised if even granny picked up a Monoprice Mini during the last open box sale.

But while 3D printer ownership isn’t the pinnacle of geek cred it once was, at least there’s a silver lining: cheap motion platforms we can hack on. [squix] writes in to tell us about how he added a laser to his $200 USD Tevo Tarantula 3D printer, greatly expanding the machine’s capabilities without breaking the bank. The information in his write-up is pretty broadly applicable to most common 3D printer designs, so even if you don’t have a Tarantula it shouldn’t be too hard to adapt the concept.

The laser is a 2.5 W 445 nm module which is very popular with low-cost laser cutter setups. It’s a fully self-contained air cooled unit that just needs a source of 12 V to fire up. That makes it particularly well suited to retrofitting, as you don’t need to shoehorn in any extra support electronics. [squix] simply connected it to the existing power wires for the part cooling fan he added to the Tarantula previously.

You may want to check the specs for your 3D printer’s control board before attaching such a high current device to the fan connector. Best case it just overloads the board’s regulator and shuts down, worst case the magic smoke might escape. A wise precaution here might be to put a MOSFET between the board’s fan output the and the laser, but we won’t tell you how to live your life. As far as laser safety, this device should probably work inside an opaque box, or behind closed doors.

Once the laser is hanging off the fan port of your printer’s controller, you can turn it on with the normal GCode commands for fan control, M106 and M107 (to turn it on and off, respectively). You can even control the laser’s power level by adding an argument to the “on” command like: M106 S30.

Then you just need to mount the laser, and it’s more or less business as usual. Controlling a laser engraver/cutter isn’t really that different from controlling a 3D printer, so [squix] is still using OctoPrint to command the machine; the trick is giving it a “3D model” that’s just a 2D image with no Z changes to worry about. We’ve seen the process for doing that in Inkscape previously.

With this laser module going for as little as $60 USD (assuming you’ve got a 3D printer or two laying around to do the conversion on), this is a pretty cheap way to get into the subtractive manufacturing game. Next stop from there is getting one of those K40’s everyone’s talking about.

Continue reading “Turn A Cheap 3D Printer Into A Cheap Laser Cutter”

Monoprice Mini Converted To Pick And Place (Kinda)

Would you believe that you can take a cheap 3D printer and easily convert it into a full function pick and place machine to help assemble your PCBs? No? Well good, because you can’t. A real pick and place needs all kinds of sensors and logic to identify parts, rotate them, make sure everything is aligned, etc, etc. There’s no way you could just bolt all that onto a cheap 3D printer, and let’s not even talk about the lack of closed loop control.

But if you have a very specific use case, namely a PCB that only has a relatively large single part that doesn’t need to be rotated, [Connor Nishijima] might have a solution for you. He bought a $150 USD Monoprice Mini, and with the addition of a few printed parts, was able to build a machine that drastically cuts down the time it takes for him to build his LED boards. Best of all the modification doesn’t involve any permanent changes to the printer, he can just pop off the vacuum attachment when he wants to print something.

Beyond the 3D printed parts (which were made on the printer itself), the only thing you need to make the modification is the vacuum pump. [Connor] is using a hot air station that includes a vacuum pump for picking up SMD components, but he mentions that you’d probably better off just modifying an aquarium pump and using that. A printed holder snaps over the cooling fan of the Monoprice Mini to hold the vacuum pickup tool, and another printed piece holds the strip of LEDs and the PCB. It’s worth noting that the machine has no ability to control the vacuum pump, and doesn’t need to. The pickup tool is so weak that when the LED lands in the solder paste it sticks to the board well enough that the tool can’t lift it back off.

The real genius in this build comes from the manually written G-Code. You load it from the printer’s built in menu system as if it was a normal 3D print, and it instructs the printer to move the vacuum tool over the line of LEDs, pick one up, and drop it in place on the PCB. It then uses a small peg built into the vacuum tool holder to advance the line of LEDs before starting the cycle all over again. Incredibly, it does this whole complex dance 20 times for each PCB without ever having any kind of feedback or alignment check. It only works because [Connor] was willing to go through the trial and error of getting the calibration and G-Code down as close to perfect as can be expected for such a cheap machine.

This isn’t the first time we’ve seen the Monoprice Mini converted into something a bit more impressive than a cheapo 3D printer. Seems that for whatever the machine lacks in the printing department, it more than makes up for in hackability.

Continue reading “Monoprice Mini Converted To Pick And Place (Kinda)”