Tritium Tesseract Makes A Nifty Nightlight

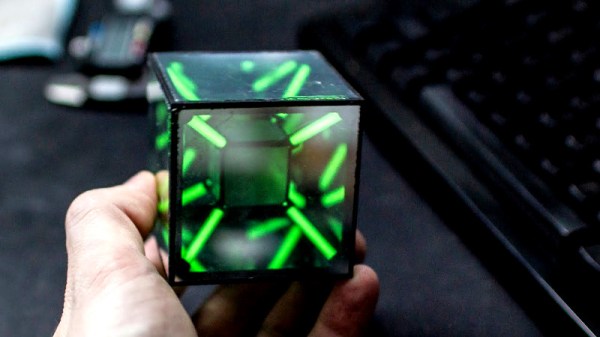
As the cube is to three dimensions, the tesseract is to four. Mortals in this universe find it difficult to contemplate four-dimensional geometry, but there are methods of making projections of such heretical shapes in our own limited world. [Sean Hodgins] was interested in the geometry, and decided to build a tesseract featuring everyone’s favourite isotope of hydrogen, tritium.

The build starts with a 3D printed inner and outer frame, sourced in this case from Shapeways in nylon. Both frames have holes which are designed as a friction fit for off-the-shelf tritium vials. These vials use the radioactive decay of tritium with a phosphor coating to create a dim glow which lasts approximately a decade. With the inner frame held inside the outer with the vials acting as structural supports, the inner and outer surfaces are then fitted with semi-transparent mirrored acrylic, creating a nice infinity effect.

It’s a fun trinket that would be perfect as a MacGuffin in any sci-fi film with a weak plot. [Sean] notes that while the tritium glow is disappointingly dim, the device does make a good nightlight. If you’ve built one and get bored with the hypercube, you can always repurpose your tritium vials into a nuclear battery. Video after the break.

Continue reading “Tritium Tesseract Makes A Nifty Nightlight”

Infinity Cube Is Gorgeous Yet Simple

Typically when we hear the words “LED” and “Cube”, we think of small blinking devices on protoboard designed to flex one’s programming and soldering skills. However, while [Heliox]’s Cube Infini could be described as “a cube of LEDs”, it’s rather a different beast (video in French, subtitles available).

The cube starts with a 3D printed frame, designed in Fusion 360. The devil really is in the details — [Heliox] puts in nice touches, such as the artistic cube relief on the base, and the smart integrated cable management in the edges. The faces of the cube are plexiglass sheets, covered with a one-way reflective film that is applied in a similar manner to automotive window tint. For lighting, a high-density LED strip is fitted to the inside edges, chosen for maximum visual effect. It’s controlled by an IR remote and a cheap control module from Amazon.

While the build contains no particularly advanced tools, materials, or techniques, the final result is absolutely stunning. It’s a piece we’d love to have as a lamp in a stylish loungeroom or study. [Heliox] does a great job of explaining how the cube is designed and fits together, and it’s a testament to just what can be achieved with a little ingenuity and hard work.

Once you’re done here, check out this ping-pong based build.

Continue reading “Infinity Cube Is Gorgeous Yet Simple”

Self-Solving Rubik’s Cube

Rubik’s Cube has been around for what seems like forever now, and has spawned an entire subculture devoted to solving the puzzle with automation. Most Rubik robots put the cube in a specially designed cradle bristling with actuators and sensors, and while those rigs are impressive, they don’t come close to this robotic Rubik solver built into the cube itself.

Fair warning that [Human Controller] doesn’t provide much detail on this build other than pictures; even translating the Japanese web page doesn’t offer much more information. But there are pictures, plus the video below, which reveal the engineering masterpiece encased within the standard sized Rubik’s cube. The internal mechanism of the original cube had been replaced by a spherical assembly around which the cube’s faces rotate. The sphere, which appears to be 3D-printed, houses six motors and gear trains, along with a microcontroller board and what appear to be Hall sensor boards to detect the position of each face. Everything is wired up with magnet wire to keep bundles to a minimum size, and buried deep inside is a LiPo battery pack. A disassembly video offers further clues to this ingenious device’s inner workings.

Once the cube senses that it has been scrambled, it sets to work on the solution, walking all over the table in the process. It’s clearly not just recording the scrambling steps and playing them back in reverse; the video below shows far more moves to solve the cube than the 15 it took to scramble it.

While we’re always impressed by marvels of speed like this robot with a 637 millisecond solve time, putting everything needed to solve the cube inside it is a feat worth celebrating. Here’s hoping that a build log shows up soon to satisfy our need for details.

Continue reading “Self-Solving Rubik’s Cube”

Go Portable With GameCube Advance SP

Off the hop, we love portable consoles. To be clear, we don’t just mean handhelds like the 3DS, or RetroPie builds, but when a maker takes a home console from generations past and hacks a childhood fantasy into reality — that’s amore. So, it’s only natural that [Bill Paxton]’s GameCube re-imagined as a Game Boy Advance SP has us enthralled.

Originally inspired by an early 2000’s imagined mockup of a ‘next-gen’ Game Boy Advance, [Paxton] first tried to wedge a Wii disk drive into this build. Finding it a bit too unwieldy, he opted for running games off of SD cards using a WASP Fusion board instead. Integrating the controller buttons into the 3D printed case took several revisions. Looking at the precise modeling needed to include the L and R shoulder buttons, that is no small feat.

Sadly, this GameCube SP doesn’t have an on-board battery, so you can’t go walking about with Windwaker. It does, however, include a 15 pin mini-din VGA-style port to copy game saves to the internal memory card, a switching headphone jack, amp, and speakers. Check it out after the break!

Continue reading “Go Portable With GameCube Advance SP”

The Cubic Cyphercon Badge

Last week in Milwaukee was Cyphercon, Wisconsin’s premier hacker conference. You can’t do a hacker con without either an electronic conference badge or a 45 hanging off a lanyard, and the Cyphercon 2017 badge doesn’t disappoint. It’s an electronic cube, lovingly designed by the folks at tymkrs. It’s also a puzzle box with security holes and wireless communications. It’s a mesh network of badges, and one of the best conference badges we’ve ever seen.

The most obvious feature of the Cyphercon 2.0 badge is the extra dimension. From the outset, the design of this badge was a 3-dimensional cube, constructed out of beautifully crafted PCBs and soldered together at the edges. The techniques to bring PCBs into the third dimension are really nothing new — we’ve seen 3D PCBs before — but never at this kind of volume. There were over four hundred badges constructed for Cyphercon, and every single joint was hand-soldered. This is something your assembly house just won’t do, and I would hate to think about the poor solder monkeys that would be forced to assemble 3D badges for a larger con.

3D isn’t the only trick up the Cyphercon badge. There are cutouts in each side of the cube exposing LEDs, microprocessors, busses, and a single USB port. This USB port allows the wearer to recharge the battery, yes, but if you install a terminal emulator on your laptop and plug in the badge, you’re dropped into a world of mystery, intrigue, and suffocation. This badge is a text adventure game, with the goal of a game to reassemble a relay-based computer from parts scrounged from around a missile silo. Once the relay computer is complete, the badge turns into an emulator for a vintage time-sharing operating system. In this OS, you’re able to write code and deploy it to other badges. This is seriously impressive stuff.

Between the cubic Cyphercon badge, the Hunter S. Rodriguez badge heading to Vegas this summer, and badges that are Nintendo emulators, this is looking like a great year for electronic conference badges. The artistry and skill here is amazing, and we can’t wait to see what else the community will come up with.

Below, you can check out a few videos on the Cypbercon badge. [Wire]’s explanation of how the badge was created over the last nine months is in there, as is the Cyphercon badge panel talk.

Continue reading “The Cubic Cyphercon Badge”

Python Solution To A Snake Cube Puzzle

Puzzles provide many hours of applied fun beyond any perfunctory tasks that occupy our days. When your son or daughter receives a snake cube puzzle as a Christmas gift — and it turns out to be deceptively complex — you can sit there for hours to try to figure out a solution, or use the power of Python to sort out the serpentine conundrum and use brute-force to solve it.

Continue reading “Python Solution To A Snake Cube Puzzle”

Make Math Real With This Analog Multiplier Primer

Remember learning all about functions in algebra? Neither do we. Oh sure, most of us remember linear plots and the magic of understanding y=mx+b for the first time. But a lot of us managed to slide by with only a tenuous grasp of more complex functions like exponentials and conic sections. Luckily the functionally challenged among us can bolster their understanding with this demonstration using analog multipliers and op amps.

[devttys0]’s video tutorial is a great primer on analog multipliers and their many uses. Starting with a simple example that multiplies two input voltages together, he goes on to show circuits that output both the square and the cube of an input voltage. Seeing the output waveform of the cube of a ramped input voltage was what nailed the concept for us and transported us back to those seemingly wasted hours in algebra class many years ago. Further refinements by the addition of an op amp yield a circuit that outputs the square root of an input voltage, and eventually lead to a voltage controlled resistor that can attenuate an input signal depending on its voltage. Pretty powerful stuff for just a few chips.

The chip behind [devttys0]’s primer is the Analog Devices AD633, a pretty handy chip to have around. For more on this chip, check out [Bil Herd]’s post on analog computing.

Continue reading “Make Math Real With This Analog Multiplier Primer”