Illustrated Kristina with an IBM Model M keyboard floating between her hands.

Keebin’ With Kristina: The One With The Pocket Cyberdeck

When you find something you love doing, you want to do it everywhere, all the time. Such is the case with [jefmer] and programming. The trouble is, there is not a single laptop or tablet out there that really deals well with direct sunlight. So, what’s a hacker to do during the day? Stay indoors and suffer?

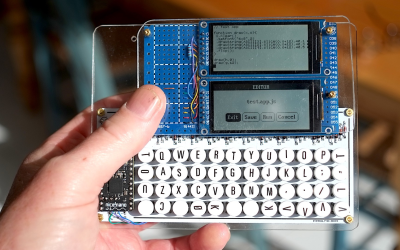
Image by [jefmer] via Hackaday.IO
The answer is a project like Pocket Pad. This purpose-built PDA uses a Nice! Nano and a pair of two very low-power ST7302-driven monochrome displays. They have no backlight, but they update much faster than e-paper displays. According to [jefmer], the brighter the ambient light, the more readable the displays become. What more could you want? (Besides a backlight?)

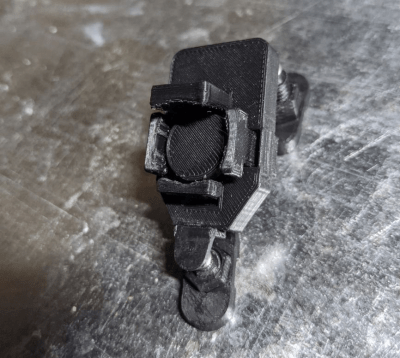
The miniature PocketType 40% is a little small for touch typing, but facilitates thumbs well. [jefmer] added those nice vinyl transfer legends and sealed them with clear nail polish.

All of the software including the keyboard scanner is written in Espruino, which is an implementation of JavaScript that targets embedded devices. Since it’s an interpreted language, [jefmer] can both write and execute programs directly on the Pocket Pad, using the bottom screen for the REPL. I’d sure like to have one of these in my pocket!
Continue reading “Keebin’ With Kristina: The One With The Pocket Cyberdeck”

Swapping Nunchucks For A Steering Wheel

Rather than chasing pure performance and high quality graphics like other gaming companies, Nintendo has made a name for themselves over the last few decades by favoring not only artistic design and gameplay, but the physical design of the game systems. Of course the hybrid handheld Switch console is among these, but it also includes things like the novel design of the Nintendo 64 controller and, of course, the Wii nunchuck controllers. They’re not always met with resounding approval, though. Some of us tend to prefer more traditional gamepad design, and will go to extreme lengths to get it like this D-pad for playing Mario Kart Wii.

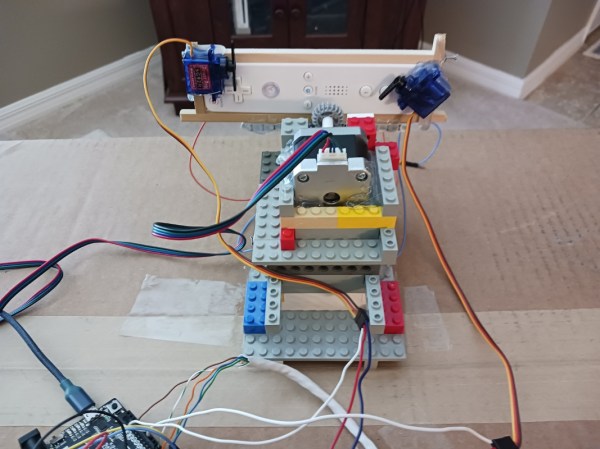
Rather than simply building a compatible controller for the Wii, or even using a GameCube controller, this controller setup takes a more roundabout approach. A Wiimote is placed in a holster built from Lego, and the game is set up to recognize it as if it were being used in its steering wheel mode. The Lego holster has a servo attached which can tilt the Wiimote from side to side, mimicking a player holding it to play the game, with another set of servos set up to press the various buttons. To control the controller, a homebrew D-pad built on perfboard with an Arduino at its core is used to send commands to the servos, allowing for a more standard controller layout to be used for the classic kart racing game than the steering wheel Wiimote allows.

While it’s quite obvious that there are simpler, easier solutions that avoid the sometimes awkward nature of using Wiimotes, we certainly appreciate the Rube Goldberg-like approach to setting up your gaming experience exactly the way you like. Whether that’s setting up an antique CRT effect for the authentic retro gaming experience or building a complete racing simulator from scratch, the gaming experience is ripe for personalization and unique builds like this one.

Continue reading “Swapping Nunchucks For A Steering Wheel”

Illustrated Kristina with an IBM Model M keyboard floating between her hands.

Keebin’ With Kristina: The One With The Ballpoint Typewriters

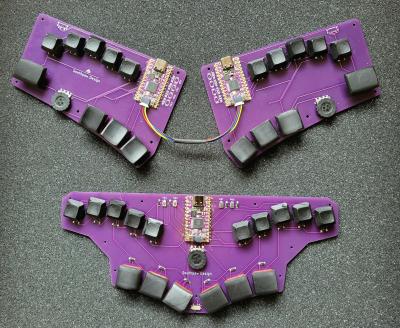
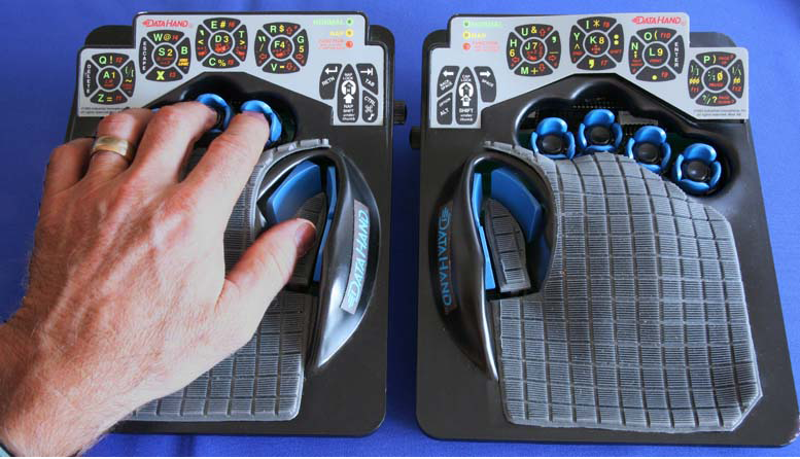
So you want to minimize finger movement when you type, but don’t have three grand to drop on an old DataHand, or enough time to build the open-source lalboard? Check out these two concept keebs from [SouthPawEngineer], which only look like chord boards.

Every key on the home row is a five-way switch — like a D-pad with straight down input. [SouthPawEngineer] has them set up so that each one covers a QWERTY column. So like, for the left pinky switch, up is Q, right is A, down is Z, and left is 1. Technically, the split has 58 keys, and the uni has 56.

Both of these keebs use KB2040 boards, which are Adafruit’s answer to the keyboard-building craze of these roaring 2020s. These little boards are of course easy to program with CircuitPython, which supports KMK, an offshoot of the popular QMK. Thanks for the tip, [foamyguy]!

Continue reading “Keebin’ With Kristina: The One With The Ballpoint Typewriters”

Adjustable, Low-Impact Keeb Is About As Comfortable As It Gets

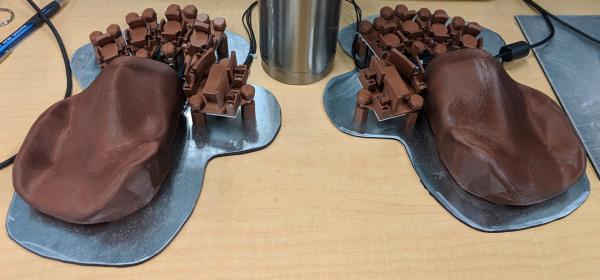
What’s the coolest-looking way to ease the repetitive stress of typing without quitting altogether? Move nothing but your fingers, and move them as little as possible without any stretching or reaching. We’ve been fans of the weirdly wonderful DataHand keyboard since we first laid eyes on one, but [Ben Gruver] has actually been using these out-of-production keyboards for years as a daily driver. And what do we do when we love something scarce? Make our own, improved version like [Ben] has done, with the lalboard.

[Ben] has been using the lalboard for about two years now and has a laundry list of improvements for version two, a project we are proud to host over on IO. Many of the improvements are designed to make this massive undertaking a bit easier to print and put together. Version one uses copper tape traces, but [Ben] is working on a fab-able PCB that will use something other than a pair of Teensy 2.0s, and perhaps QMK firmware.

Something that won’t be changing is the fantastic optical key switch design that uses an IR LED and phototransistor to capture key presses, and tiny square magnets to return the key to the home position and deliver what we’re quite sure is a satisfying clack.

The absolute coolest part of this keyboard is that it’s so adjustable. Every key cluster can be adjusted in 6 directions, which includes the ability to dial in different heights for each finger if that’s what works best. Once that’s all figured out, then it’s time to print some perfect permanent standoffs. Want to make one of these sci-fi clackers for yourself? [Ben] has the BOM, some printing instructions and tips, and a guide to making the copper tape PCBs over on GitHub. Check it out in action after the break as [Ben] rewrites Kafka’s Metamorphosis at 120 WPM.

Interested in learning more about the original DataHand keyboard? Here’s our take.

Continue reading “Adjustable, Low-Impact Keeb Is About As Comfortable As It Gets”

Inputs Of Interest: The Differently Dexterous DataHand Directionalizes Digits

If you had debilitating pain from repetitive stress injury in the 1990s, there were a lot of alternative keyboard options out there. One of the more eye-catching offerings was the DataHand keyboard made by DataHand Systems out of Phoenix, AZ. The DataHand debuted in 1993 with a price tag around $2,000. While this is admittedly pretty steep for the average consumer, it was well within the IT budgets of companies that wanted to avoid workman’s comp claims and keep their employees typing away.

In theory, this is holy grail territory for anti-RSI keyboards. The DataHand was designed to eliminate wrist motion altogether by essentially assigning a d-pad plus a regular push-down button to each finger. The layout resembles QWERTY as closely as possible and uses layers to access numbers, symbols, and other functions, like a rudimentary mouse.

Although if you put them this close together, you’re kind of missing the point. Image via Bill Buxton

Ergonomic to the Max

Typing on the DataHand is supposed to be next to effortless. The directional switches are all optical, which probably has a lot to do with the eye-popping price point. But instead of being spring-loaded, these switches use magnets to return to the neutral position.

Continue reading “Inputs Of Interest: The Differently Dexterous DataHand Directionalizes Digits”

Shotgun Blast Lights Up Your Controller

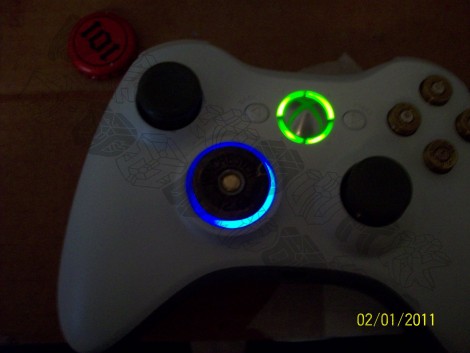
[Jrfhoutx] makes gaming in the dark a bit easier with this backlight shotgun shell d-pad for an Xbox 360 controller. He’s building on another tutorial he posted showing how to use the brass base of a shotgun shell to replace the stock plastic direction pad. That hack uses most of the original plastic part, cutting it down a bit and capping it off with the shell base. But now he’s detailing the process used to add LEDs around the base. He picked surface mount 0603 packages which are first chained together, then held in place using hot glue. While you’re in there, give this rapid-fire mod a try as well.