Jana showing the board in action, with a magnetic probe attached to it

Add The Analog Toolkit To Your…Toolkit

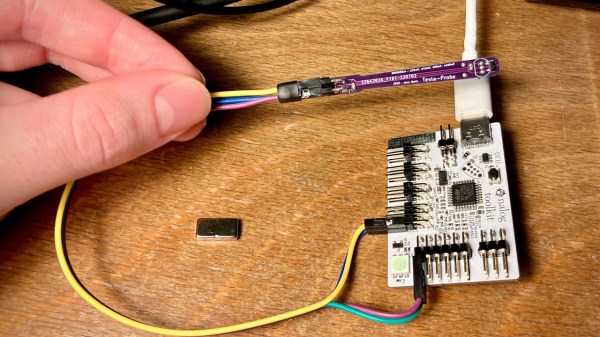
Analog acquisition tools are super helpful whenever you want to run an experiment, test out a theory, or improve upon your code, and you won’t realize how much you always needed one up until you’re facing a situation where it’s the only tool for the task. Well, here’s a design you might just want to add to your next PCB order — the STM32G4 Analog Toolkit from [Jana Marie].

The recommended STM32G431 is a wonderful tool for the task in particular. For a start, this board exposes nine 16-bit ADC inputs, with six of them capable of differential mode and three of them having the PGA (Programmable Gain Amplifier) feature. There’s also two 12-bit DAC pins, two timer outputs, three GPIOs, and UART with I2C for the dessert. As a bonus, it can work as a PD trigger, giving you higher-than-5V voltages out of USB-C for any experiments of yours.

The board requires only a few components, most of them easily solderable, with the STM32 in the TQFP32 package. The BOM is optimized, the GPIOs are used up to the max, with two spare GPIOs driving an RGB LED using a witty control scheme. There’s even a place to clip an alligator clip, in case that’s what your probing hardware wants! All in all, this is a carefully crafted design certainly worth having on hand.

Make sure to get a few of these made before you find yourself desperately needing one! That said, there’s always a backup option, the venerable ATtiny85.

A shot of the underside of a "One Fast Cat" cat wheel with an installed ESP8266 and hall effect sensors attached to the base.

Spy On Your Cat To Make Sure It Gets Its Paws In

[Scott Cutler] has a young cat, [Cygnus], that loves to run on a cat wheel and [Scott] had some some important questions about [Cygnus]’s usage of the cat wheel like, how often it’s used, what direction is preferred and how fast does [Cygnus] go. To answer these questions, [Scott] put some telemetry sensors onto the cat wheel and analyzed the results.

An ESP8266 microcontroller and two 3144E hall effect modules were used to sense eight magnets glued onto the outer housing of a “One Fast Cat” cat wheel. [Scott] installed the ESP8266 and hall effect modules onto the base support for the wheels, using 3D printed brackets to secure them.

For the software side, the ESP8266 attaches an interrupt handler whenever a sensor passes by, recording a window of three previous measurements for valid sample determination and, if accepted, uses the time between samples to infer direction and speed. The ESP8266 connects to a pre-configured local WiFi network and has a telnet interface to extract stored log information, in the form of JSON data.

[Scott] has some nice graphs and other data visualizations on [Cygnus]’s usage, including a preference for running at 3 AM, achieving a maximum speed of 14 mph and an average of 4 seconds per run. The source is available on GitHub and the STL files are available embedded in [Scott]’s write-up. We’ve featured cat exercise trackers before with a giant hamster wheel outfitted with a Raspberry Pi and it’s nice to see some options that allow for a retrofit option in addition to a complete DIY solution.

Exploring Basement Humidity With A Raspberry Pi

Sometimes a hack isn’t about building something cool. Sometimes it’s more tactical, where the right stuff is cobbled together to gather the information needed to make decisions, or just to document some interesting phenomenon.

Take this impromptu but thorough exploration of basement humidity undertaken by [Matthias Wandel]. Like most people with finished basements in their homes, [Matthias] finds the humidity objectionable enough to warrant removal. But he’s not one to just throw a dehumidifier down there and forget about it. Seeking data on how well the appliance works, [Matthias] wired a DHT22 temperature/humidity sensor to a spare Raspberry Pi to monitor room conditions, and plugged the dehumidifier into a Kill-A-Watt with a Pi camera trained on the display to capture data on electrical usage.

His results were interesting. The appliance does drop the room’s humidity while raising its temperature, a not unexpected result given the way dehumidifiers work. But there was a curious cyclical spike in humidity, corresponding to the appliance’s regular defrost cycle driving moisture back into the room. And when the dehumidifier was turned off, room humidity gradually increased, suggesting an unknown source of water. The likely culprit: moisture seeping up through the concrete slab, or at least it appeared so after a few more experiments. [Matthias] also compared three different dehumidifiers to find the best one. The video below has all the details.

We always appreciate [Matthias]’ meticulous approach to problems like these, and his field expedient instrumentation. He seems to like his creature comforts, too – remember the target-tracking space heater from a few months back?

Continue reading “Exploring Basement Humidity With A Raspberry Pi”

Friday Hack Chat: High Speed Data Acquisition

For this week’s Hack Chat, we’re going to be talking all about High-Speed Data Acquisition. If you’ve ever needed to shove voltages, currents, logic signals, temperature, pressure, or sound into a computer, you’ve used a DAQ. If you’ve ever needed to acquire a signal at a very high speed, you’ve probably paid a lot of money for that piece of equipment.

Our guest for this week’s Hack Chat will be [Kumar Abhishek], engineering student, Hackaday Prize finalist, and creator of the very, very cool Beaglelogic, a logic analyzer for the BeagleBone. The interesting bit about the Beaglelogic is its utilization of the Programmable Real-Time Units (PRUs) found in every BeagleBone.

These PRUs are basically DMA machines, shuttling bits back and forth between memory and GPIOs. This year, [Kumar] turned the Beaglelogic cape into the Beaglelogic Standalone, a device based on the Octavo Systems OSD3358 (the ‘BeagleBone On A Chip‘) that gives those Saleae logic analyzers a run for their money.

In this Hack Chat, we’ll be discussing the PRUs found in various iterations of the BeagleBoard, how the Beaglelogic performs its data acquisition, and how programming the PRUs is actually accomplished. If you have a question for [Kumar], leave a comment on the Hack Chat page

join-hack-chatOur Hack Chats are live community events on the Hackaday.io Hack Chat group messaging. Usually, our Hack Chats go down at noon, PDT, Friday. This one is different. Because [Kumar] is in India, we’ll be running this Hack Chat at 9:30a PST, Friday, November 17th. What time is that in India, and what time is that where you live? Who cares! Here’s a time zone converter!

Click that speech bubble to the left, and you’ll be taken directly to the Hack Chat group on Hackaday.io.

You don’t have to wait until Friday; join whenever you want and you can see what the community is talking about.

We’re also looking for new Hack Chat guests! If you’ve built something cool, you’re working on an interesting project, or you’re about to introduce a really cool product, hit us up! Email our wonderful community managers, and we’ll see if we can slot you in.

Kansas City Maker Faire: Pi-Plates

As soon as he spied the Jolly Wrencher on my shirt, [Jerry Wasinger] beckoned me toward his booth at Kansas City Maker Faire. Honestly, though, I was already drawn in. [Jerry] had set up some interactive displays that demonstrate the virtues of his Pi-Plates—Raspberry Pi expansion boards that follow the HAT spec and are compatible with all flavors of Pi without following the HAT spec. Why not? Because it doesn’t allow for stacking the boards.

[Jerry] has developed three types of Pi-Plates to date. There’s a relay controller with seven slots, a data acquisition and controller combo board, and a motor controller that can handle two steppers or up to four DC motors. The main image shows the data acquisition board controlling a fan and some lights while it gathers distance sensor data and takes the temperature of the Faire.

The best part about these boards is that you can stack them and use up to eight of any one type. For the motor controller, that’s 16 steppers or 32 DC motors. But wait, there’s more: you can still stack up to eight each of the other two kinds of boards and put them in any order you want. That means you could run all those motors and simultaneously control several voltages or gather a lot of data points with a single Pi.

The Pi-Plates are available from [Jerry]’s site, both singly and in kits that include an acrylic base plate, a proto plate, and all the hardware and standoffs needed to stack everything together.

Talking Car Automation Computer Is Like KITT Without The Sass

It’s a wonder that drivers are given so little insight into what’s going on under the hood. We mostly have the illusion of insight in the form of gauge, idiot lights, and when things get real, our eyesight and sense of smell. The older a car gets, the more important it is to be aware of the condition of its systems.

[Mjtrinihobby] drives a beat-up 1999 Honda Civic. He likes creating automation systems as a hobby and figured that his car would make an excellent test subject. [Mjtrinihobby] began this project with several features in mind. He wanted more control over several of the car’s systems—the A/C, lights, the fuel level, and the blower motor in the cabin to name a few—and a compact, user-friendly way to interface with them that could handle road shock and the heat of the climate he calls home.

He chose a Windows 8.1 netbook with a touchscreen display for the user interface. The netbook is running FlowStone, which is a robust graphical programming language with a long list of applications. A LabJack data acquisition board (DAQ) handles the communication between the car’s systems and the netbook.

This is much more than just a cool way to control the climate and make the headlights come on when darkness falls. For instance, [Mjtrinihobby]’s system continuously monitors the alternator’s voltage. If it measures between 7 and 12V, a friendly voice warns about possible alternator failure and disables high-draw accessories so the car has a fighting chance of making it to the mechanic.

Be sure to check out the demonstration video after the break. If OBD-II car hacks are more your speed, try building an RGB tachometer.

Continue reading “Talking Car Automation Computer Is Like KITT Without The Sass”

ATtiny85 Data Acquisition

85

The folks at Ivmech recently had a need for some new hardware. They needed a small, cheap device able to sense some analog values, toggle a few digital pins, and log everything to a computer. What they came up with is the IViny, an extremely small data acquisition device built around the ATtiny85, capable of logging data to a computer.

The IViny features two digital channels and two 10 bit analog channels, just like you’d find in any ATtiny85 project. Power is supplied over USB, and a connection to a computer is provided by V-USB. There’s also a pretty cool Python app that goes along with the project able to plot the analog inputs and control the digital I/O on the device.

It’s not exactly a fast device – the firmware only supports 100 samples per second, but an upcoming firmware upgrade will improve that. Still, if you ever need to read some analog values or toggle a few pins on the cheap, it’s a nice little USB Swiss army knife to have.