LMN-3: Putting The ‘OP’ In Open Source Synthesizers

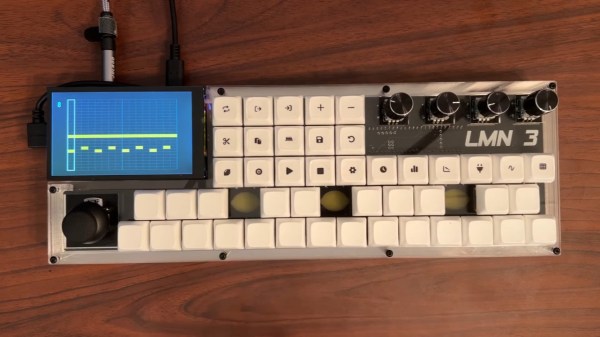
Some projects you come across simply leave you in awe when you look at the thought and the resulting amount of work that went into it, not only for the actual implementation, but everything around it. Even more so when it’s a single-developer open source project. [Stone Preston]’s synth / sampler / sequencer / DAW-in-a-box LMN-3 absolutely fits the description here, and it seems like he has set his heart on making sure everyone can built one for themselves, by providing all the design files from case down to the keycaps.

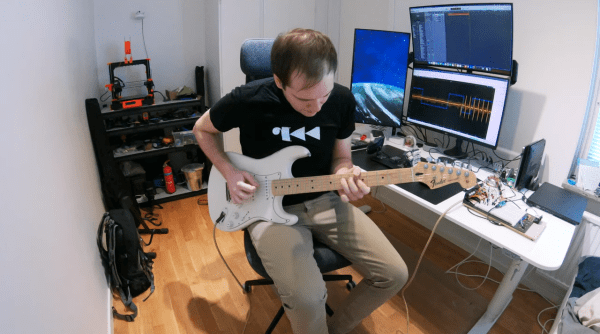
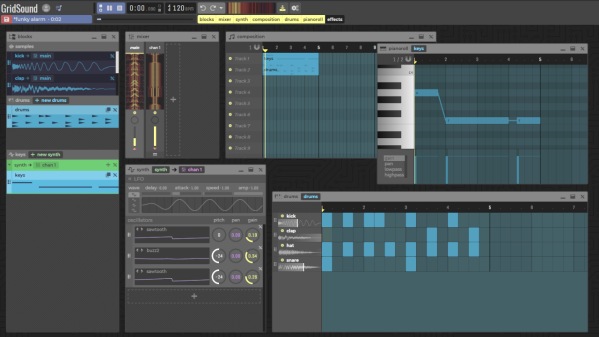
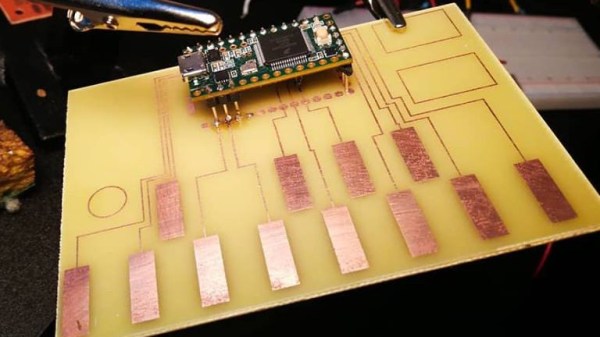
The LMN-3 (LMN as in “lemon”, not “comes before the OP“) is intended as a standalone, portable digital audio workstation, and is built around a Raspberry Pi 4 with a HyperPixel display for the user interface. The UI itself, and with it the core part of the software, was created using the Tracktion Engine, which itself uses the JUCE framework and combines your typical synthesizer, sequencer, and sampler features with the DAW part to handle recording, editing, and mixing. The remaining hardware is a custom-designed PCB with a set of function and keyboard buttons, along with a pitch bend joystick and four rotary encoders with push buttons that serve as main input handlers. Oh yes, and a Teensy board.

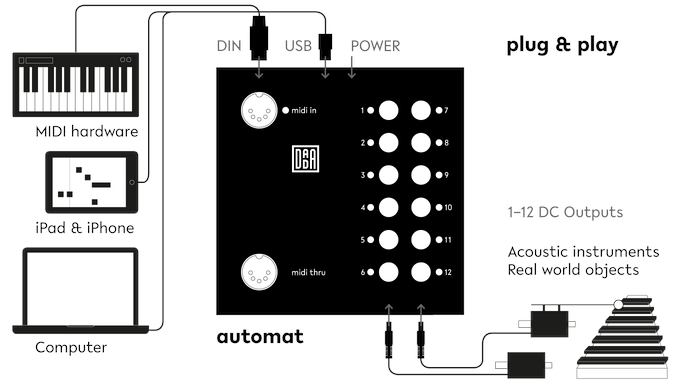
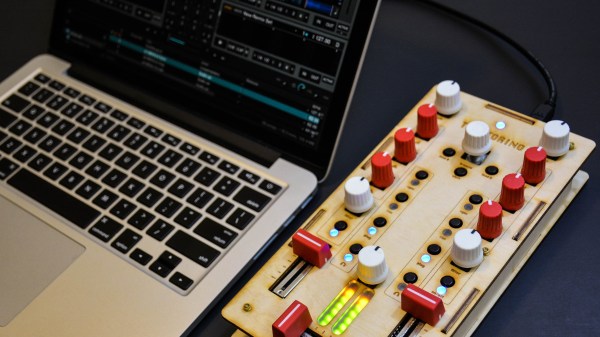
The UI is actually entirely controlled via MIDI commands, and custom firmware on the Teensy is translating the input events from buttons, encoders, and joystick accordingly. This essentially decouples the hardware from the software, and using a cross-platform framework underneath, you can also run the UI standalone on your computer and use any 3rd-party MIDI controller you like. Or then, as [Stone] thought really about everything, use a hardware emulator he created in addition. You could even leave out the Raspberry Pi and software altogether and turn this into a pure MIDI controller. If that sounds tempting, but you’re looking for something with more knobs and sliders instead of buttons, check out the Traktorino. And if you actually prefer a mouse as input device, there’s always something running in a browser.

Continue reading “LMN-3: Putting The ‘OP’ In Open Source Synthesizers”

Guitar Effects With No (Unwanted) Delay

MIDI has been a great tool for musicians and artists since its invention in the 1980s. It allows a standard way to interface musical instruments to computers for easy recording, editing, and production of music. It does have a few weaknesses though, namely that without some specialized equipment the latency of the signals through the various connected devices can easily get too high to be useful in live performances. It’s not an impossible problem to surmount with the right equipment, as illustrated by [Philip Karlsson Gisslow].

The low-latency MIDI interface that he created is built around a Raspberry Pi Pico. It runs a custom library created by [Philip] called MiGiC which specifically built as a MIDI to Guitar interface. The entire setup consists of a preamp to boost the guitar’s signal up to 3.3V where it is then fed to the Pi. This is where the MIDI sampling is done. From there it sends the information to a PC which is able to play the sound back quickly with no noticeable delay.

[Philip] also had to do a lot of extra work to port the software to the Pi which lacks a lot of the features of its original intended hardware on a Mac or Windows machine, and the results are impressive, especially at the end of the video where he uses the interface to play a drum machine via his guitar. And, while MIDI is certainly a powerful application for a guitarist, we have also seen the Pi put to other uses in this musical realm as well.

Continue reading “Guitar Effects With No (Unwanted) Delay”

GridSound – An Audio Workstation In Your Browser

If you’re into creating music, you’ll have a surprisingly large variety of open source options at your disposal, ranging from Audacity as rather simple audio editor to Ardour as a full-blown, studio-worthy DAW — and LMMS, Rosegarden, MusE etc. for anything in between. With [Thomas Tortorini]’s GridSound project, you’ll have one additional choice on your list now, except this one runs in your browser. So if you find yourself in a sudden moment of inspiration, all you’ll need is a browser and off you go.

From the feature set’s point of view, GridSound leans towards LMMS and offers a drum kit, piano roll, and synthesizer. It appears that you won’t be able to record real world instruments at this point, but it’s also a work in progress, so who knows what the future will bring. The code is available on GitHub and you can explore GridSound itself here — no login required, unless you want to save your work. Running in a browser, GridSound is naturally written in JavaScript and uses the Web Audio API to perform the actual audio tasks.

What’s impressive is that [Thomas] opted against any UI framework-of-the-week, but instead implemented everything from scratch in pure vanilla JavaScript. In fact, the entire code base seems to be self-contained without any third party dependencies, and that alone deserves some respect. Sure, JavaScript isn’t everybody’s cup of tea — “real developers use assembly” — so if you prefer something more physical, how about some cardboard music?

Making Music From Cardboard

Fans of MaKey MaKey may find this project similar, but there’s a lot more to the Mini Automat than making music from fruit.

The idea for the Mini Automat (which is an off-shoot of the original Automat project by [Dada Machines]) is to make music accessible to anyone. The device functions as a plug and play MIDI-controller that connects to a computer, MIDI workstation (keyboards and sequencers), or DAW for input and triggers actuators on the output to create music.

The modifications make the originally Automat more hackable by making the board compatible with Arduino and Circuit Python, as well as adding in digital and analog pins for connecting to sensors, buttons, or light systems.

The team has released all schematics, firmware, and software, with only the board layouts unreleased to the public. From solenoids that push, pull, jiggle, smash, and bash at drums to surfaces that vibrate screws and beads, there’s a huge variety of household objects that can be used to make complex layered musical compositions, even for a one-person musician.


The Berlin-based team works on open source music tech hardware with the hopes of bringing environmentally and financially sustainable ideas to market.

Continue reading “Making Music From Cardboard”

DIY Piano: Look, Ma, No Moving Parts

[Michael Sobolak] has a penchant for pianos, concern for capacitive touch, and special sentiment for solid state. This alliterate recipe results in a DIY PCB piano that leaves out the levers and is barren of buttons unless you count the stock RESET button on the Teensy. A real stickler might point out that speakers have moving cones. Beyond these tangential parts, which have motionless options, it is an electronic instrument with no moving parts.

The heart of the project is a Teensy 3.2 which natively supports twelve capacitive touch sensors. The infamous demo board is mounted to a homemade PCB featuring twelve keys but is actually an incomplete octave plus another key one octave above the first. If you look sharp, you already noticed the missing and extra touchpads. PCB traces were made in Illustrator because if you have a familiar tool, you use what you know and you cannot argue that it works. The design was transferred to a copper board using the old magazine page trick that we love and reliable old ferric acid.

We couldn’t help but notice that the posts of the Teensy were soldered to the top of the board, rather than drilling through, IMT-style. Again, the results speak, even if there is room for improvement. Reportedly, there is a second version on the way which includes every expected key.

Continue reading “DIY Piano: Look, Ma, No Moving Parts”

Build A Plate Reverb From Ikea

Back before we all pirated FruityLoops, before ProTools, and before VSTs and DAWs, audio recording was much, much cooler. Reverbs were entire rooms. Sometimes they were springs. Sometimes, in the high-end music studios, reverbs were plates. These plate reverbs were simply a gigantic sheet of metal mounted in a box about ten feet long, four feet high, and a foot thick. Inside, you had some transducers, some pickups, and not much else. Send a signal into the plate reverb and it will bounce around on this flexible membrane, and  emerge through the output in a suitably reverberant form.

Of course, very few places have a plate reverb anymore because they’re gigantic and expensive and software effects are small and cheap. That doesn’t mean a plate reverb is made of unobtanium. [Leo] just made his own plate reverb out of Ikea shelves and some simple electronics.

This build used an Ikea Bror shelving unit that cost about $50 sans meatballs. The electronics are a surface transducer and two piezo pickups. Total cost was about $100. That’s all that’s needed to put this plate reverb together, but the real trick is making it work as a reverb.

The plate is driven by the audio output of [Leo]’s computer, through a battery-powered amp, and into a transducer. The transducer is then simply placed on the metal shelf. The two piezo pickups are placed on either end of the shelf, with one going to the right channel of one input, the other going to the left channel of the same input. From there, it’s a simple matter of using this Ikea shelf in an effects loop.

From the video below, the setup absolutely works. [Leo] is playing a few drum loops through the reverb, and the results sound like they should. There’s also a neat trick in using a shelf as a reverb; by placing a rag or a cardboard box on the shelf, the reverb is dampened allowing you to ‘mix’ this reverb in real time.

Continue reading “Build A Plate Reverb From Ikea”

Tracktorino Shields You From Poor Interfaces

On-screen controls in a digital audio workstation expand the power of a DJ or musician, but they are not intuitive for everyone. The tactility of buttons, knobs, sliders and real-world controls feels nothing like using a mouse, trackpad, or even a touchscreen. Unfortunately, devices meant to put control into a DJs hands can be unavailable due to location or cost. [Gustavo Silveira] took charge of the situation so he could help other DJs and musicians take control of their workstations with a customized MIDI interface for Traktor DJ software.

MIDI is a widely used serial protocol which has evolved from a DIN connector to USB, and now it is also wireless. This means that the Traktorino is not locked to Traktor despite the namesake. On the Hackaday.io page, there’s even a list of other workstations it will work with, but since many workstations, all the good ones anyway, accept MIDI hardware like this, the real list is a lot longer.

The custom circuit board is actually a shield. Using an Arduino UNO, the current poster child of the Arduino world, opens up the accessibility for many people who don’t know specialized software. A vector drawing for a lasercut enclosure is also included. This means that even the labeling on the buttons are not locked into English language.

Here’s another project which combined laser cutting and MIDI to make some very clever buttons or turn your DIN MIDI connector into USB.

Continue reading “Tracktorino Shields You From Poor Interfaces”