Feed Your Fasteners In Line, With A Bowl Feeder

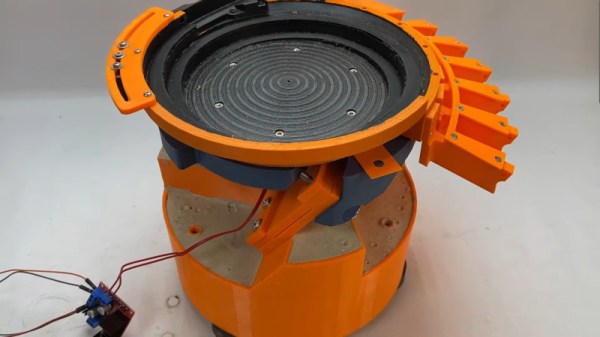
If you spend much time around industrial processes, you may have seen a vibrating bowl feeder at work. It’s a clever but simple machine that takes an unruly pile of screws or nuts and bolts, and delivers them in a line the correct way up. They do this by shaking the pile of fasteners in a specific way — a spiral motion which encourages them to work to the edge of the pile and align themselves on a spiral track which leads to a dispenser. It’s a machine [Fraens] has made from 3D printed parts, and as he explains in the video below the break, there’s more to this than meets the eye.

The basic form of the machine has a weighted base and an upper bowl on three angled springs. Between the two is an electromagnet, which provides the force for the vibration. The electromagnet needed to be driven with a sine wave which he makes with an Arduino and delivers as PWM via an H-bridge, but the meat of this project comes in balancing the force and frequency with the stiffness of the springs. He shows us the enormous pile of test prints made before the final result was achieved, and it’s a testament to the amount of work put into this project. The final sequence of a variety of objects making the march round the spiral is pure theatre, but we can see his evident satisfaction in a job well done.

Oddly this isn’t the first bowl feeder we’ve seen, though it may be one of the most accomplished. We particularly like this tiny example for SMD parts.

Continue reading “Feed Your Fasteners In Line, With A Bowl Feeder”

Boat Anchor Twins Get A Little Digital Help Staying On Frequency

In the ham radio trade, gear such as the old Drake units [Dr. Scott M. Baker] has in his radio shack are often referred to as “boat anchors.” It refers to big, heavy radios that were perhaps a bit overengineered compared to the state of the art at the time they were designed, and it’s actually a shame that the name has taken on something of a pejorative connotation, since some of this gear is rock solid half a century or more after it was built.

But older gear is often harder to use, at least compared to the newer radios with microcontrollers and more stable oscillators inside. To make his 1970s-era Drake “Twins” setup of separate but linked receiver and transmitter a little more fun to use, [Scott] came up with this neat Raspberry Pi-based DDS-VFO project to keep his boat anchors afloat. Compared to the original mechanically tuned variable frequency oscillator in the Drake receiver, the direct-digital synthesis method promises more stability, meaning less knob-nudging to stay on frequency.

The hardware used for the DDS-VFO is actually pretty simple — just a Raspberry Pi Zero W driving an AD9850-based signal-generator module. Sending the signal to the Twins was another matter. That was done by tapping into the injection cable linking both units, which meant a few circuit complications to deal with signal attenuation. [Scott] also added amenities like a digital frequency display, optical encoder with crank-style knob to change frequency, and a host of Cherry MX keyswitches for quick access to different features.

From the look of the video below, the Twins are now rock-solid and a lot easier to use. This project is loosely based on a recent panadapter project [Scott] undertook for the receiver side of the Twins.

Continue reading “Boat Anchor Twins Get A Little Digital Help Staying On Frequency”

Low-Cost, Two-Channel Scriptable Waveform Generator

Microcontroller addict [Debraj] decided to make his own programmable sine wave generator, and was able to put it together for under $40 USD. Other than low-cost, his list of requirements was as follows:

  • Dual sine wave output, synchronized
  • Frequency, Amplitude, and Phase control
  • Low harmonics under 1 MHz
  • Scriptable via Python

The heart of the project is the Analog Devices AD9833, a complete Direct Digital Synthesis (DDS) waveform generator system on a chip. If you’ve ever rolled your own DDS using discrete ICs or in an FPGA, you can appreciate the benefit of squeezing the phase accumulator, sine lookup table, DAC, and control logic all into a single ten-pin package. [Debraj] uses AD9833 modules from the usual online vendors for a few dollars each. He synchronizes the generators by disconnecting the reference crystal on the second module and driving it from the first one. The remaining specifications are met by the inherent characteristics of the DDS system, and the scriptable interface is accomplished with an Arduino controlling the AD9833 chips and two programmable gain amplifiers (MCP6S31). We like the confidence that [Debraj] displays by sketching the initial circuit diagram with a ball-point pen — check out the sketch and the final pictorial schematic in the video below the break.

This is a good example of combining off-the-shelf modules to quickly build a project. This approach is great for one-off builds or as a proof-of-concept test bed that can later be spun onto a custom PCB. Another reason to use modules these days is that the modules are often in-stock but the chips are unobtainable. Though it appears [Debraj]’s only needs one of these generators, it would be an easy board to layout and build — if you can buy the parts.

Continue reading “Low-Cost, Two-Channel Scriptable Waveform Generator”

Arduino Piano Tuner Is Pitch Perfect

[JanHerman] knows that tuning musical instruments is all about precision and that precision is measured in a logarithmic unit called a cent. A cheap tuner unit might be accurate to 1.5 cents which sounds good until you look at one for ten times the price and find it is accurate to 0.1 cents. So you can spend $800 for precision or $60 for something less. [Jan] decided to build something better and cheaper using a 32-bit Arduino and a DDS frequency generator chip on a breakout board.

Oddly enough, the device doesn’t have a display. Instead, it generates a precise frequency and couples it to the piano using a transducer. You tune the string to the corresponding note. The post has a lot of detail about how piano tuning works.

Continue reading “Arduino Piano Tuner Is Pitch Perfect”

Review: Unnamed Chinese DDS Function Generator

Best forgotten: my awful 2018 function generator.

A lifetime of amassing random pieces of test equipment has left me with a gap in my armoury, namely that I don’t possess a low frequency function generator. This could easily be addressed, but for two things. I have a love for exploring the cheaper end of exported electronics and my need for a function generator is less than my desire to spend significant cash. I’ve tried to balance these competing forces in the past by picking up an astoundingly cheap instrument; that time I ended up with a lemon, but will lightning strike twice in the same spot? I spent £10 ($13) on a different cheap function generator and set off to find out. Continue reading “Review: Unnamed Chinese DDS Function Generator”

DIY Scalar Network Analyzer

[Steven Merrifield] built his own Scalar Network Analyzer and it’s a beauty! [Steve]’s SNA has a digital pinout matching a Raspberry Pi, but any GPIO could be used to operate the device and retrieve the data from the ADC. The design is based around a few tried and true chips from Analog Devices. He’s taken some care to design it to be nice and accurate which is why he’s limited it to 1kHz to 30Mhz. We think it’s quite a fetching board once the shielding is in place.

We’ve covered network analyzers and their usefulness before. If you want to know how, for example, a mystery capacitor from your junk bin will respond to certain frequencies, a network analyzer could tell you. We’ve even taken a stab at hacking together our own.

There is more documentation on his website as well as some additional example curves. The board is easily ordered from OSHpark and the source code is available for review.

CB Radio + Arduino = 6 Meter Ham Band

Somehow [hvde] wound up with a CB radio that does AM and SSB on the 11 meter band. The problem was that the radio isn’t legal where he lives. So he decided to change the radio over to work on the 6 meter band, instead.

We were a little surprised to hear this at first. Most radio circuits are tuned to pretty close tolerances and going from 27 MHz to 50 MHz seemed like quite a leap. The answer? An Arduino and a few other choice pieces of circuitry.

Continue reading “CB Radio + Arduino = 6 Meter Ham Band”