Vintage Silverstone Bluetooth speaker

Vintage Silvertone Cabinet Gets Bluetooth Treatment

This Bluetooth speaker is full of delightful surprises. The outer shell is an antique radio cabinet, but its practically empty interior is a combination of Dead Bug circuitry and modern BT receiver.

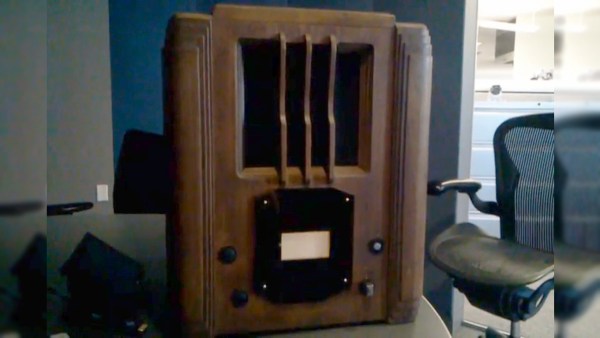
[PJ Allen] found the BT receiver on Groupon and decided to whip up amplifier and threshold detector circuits using only parts he already had in order to make this vintage-looking Bluetooth speaker. The cabinet is from a Silvertone Model 1955 circa 1936. Don’t worry, no antiques were harmed in the making of this hack, the cabinet was empty when he bought it.

LM4871 based amplifiers

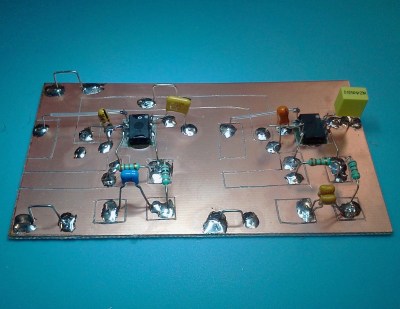
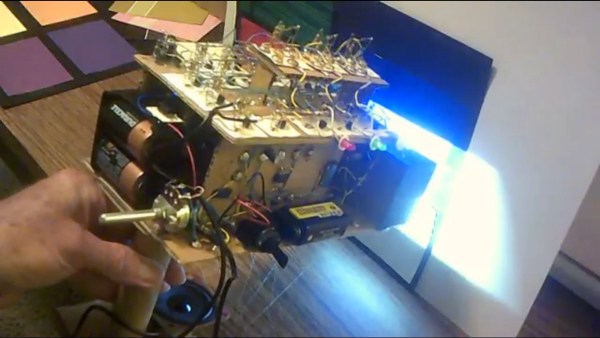
The amplifiers, one per speaker, began life as a circuit from TI’s LM4871  datasheet. Some of the departures came about because he didn’t have the exact component values, even paralleling capacitors to get in the right range. The finished board is a delightful mix of “Dead Bug” and quasi-Manhattan style construction, “quasi” because he carved up the ground plane instead of laying pads on top of it.

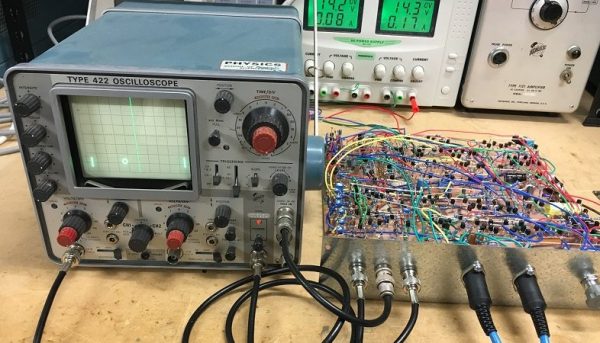
Look at the front of the cabinet and you’ll see a rectangular display. Watch the video below and you’ll see that it throbs in time to the music. To do that he came up with a threshold detector circuit which started out based on a circuit from a  Sharp/Optonica cassette tape deck, but to which he made improvements.

Not all cabinets come empty though. Check out this post by our own [Gregory L. Charvat] about restoring these wonderful old radios.

Continue reading “Vintage Silvertone Cabinet Gets Bluetooth Treatment”

Colorchord steampunk dead bug device

Electronic ColorChord Turns Color Into Sound

[Dr. Cockroach] has delighted us again with another of his circuits on cardboard. He calls it steampunk inspired, and while we guess we can see what he’s getting at, it’s more like a sweet example of artful dead bug construction. He calls it the ColorChord. Point its photo cells at a color and it’ll play a tone or a combination of tones specific to that color.

Three 555-centric boards use thumbtacks as connection points which he solders to, the same technique he used for his cardboard computer. They provide simple tones for red, green, and blue and a mix for any other color. However, he found that the tones weren’t distinguishable enough for similar colors like a bright sun yellow and a reddish yellow. So he ended up pulsing them using master oscillator, master-slave flip-flop, and sequencer circuits, all done dead bug style.

We’re not sure how practical it is but the various pulsed tones remind us of the B space movies of the 1950s and 60s. And as for the look of it, well it’s just plain fun to look at. Hear and see it for yourself in the video below.

And if you want to see some dead bug circuitry as high art then check out this awesome LED ring, this sculptural nixie clock, and perhaps the most wondrous of all, The Clock.

Continue reading “Electronic ColorChord Turns Color Into Sound”

An Artsy And Functional LED Filament Lamp

Some projects end up being more objet d’art than objet d’utile, and we’re fine with that — hacks can be beautiful too. Some hacks manage both, though, like this study in silicon and gallium under glass that serves as a bright and beautiful desk lamp.

There’s no accounting for taste, of course, but we really like the way [commanderkull]’s LED filament lamp turned out, and it’s obvious that a fair amount of work went into it. Five COB filament strips were suspended from a lacy frame made of wire, which also supports the custom boost converter needed to raise the 12-volt input to the 60 volts needed by the filaments. The boost converter is based on the venerable 555 timer chip, which sits in the middle of the frame suspended by its splayed-out legs and support components. The wooden base sports a few big electrolytics and some hand-wound toroidal inductors, as well as the pot for adjusting the lamp’s brightness. The whole thing sits under a glass bell jar, which catches the light from the filaments and plays with it in a most appealing way.

There’s just something about that dead bug building technique that we love. We’ve seen it before — this potentially dangerous single-tube Nixie clock comes to mind — but we’d love to see it done more.

[via r/electronics]

Discrete Pong Project Goes Big, Adds A Player

Some projects just take on a life of their own. What started as a pleasant diversion or a simple challenge becomes an obsession, and the next thing you know you’ve built a two-player color Pong game with audio completely from discrete components.

If this one seems familiar, it’s because we were dazzled by its first incarnation last year. As impressive as version 1.0 was, all the more so since it was built using the Manhattan method and seemingly over the course of a weekend, it did have its limitations. [GK] has been refining his design ever since and keeping accurate track of the process, to the tune of 22 pages on the EEVblog forum. We haven’t pored through it all yet, but the state of the project now is certainly worth a look. The original X-Y output to an oscilloscope was swapped out to composite video for a monitor, in both mono and color. This version also allows two people to play head-to-head instead of just battling the machine. It looks like [GK] had to add a couple of blocks worth of real estate to his Manhattan board to accommodate the changes, and he tidied the wiring significantly while he was at it.

It’s a project that keeps on giving, so feast your eyes and learn. We suspect [GK] doesn’t have any plans to finish this soon, but if he does, we can’t wait to see what’s next.

Thanks to [David Gustafik] for reminding us to check back on this one.

Non-standard circuit boards

Non-standard Circuits: Jazz For Electrons

How creative are you when you make your circuit boards? Do you hunt around for different materials to use for the board? As long as it’s an insulator and can handle the heat of a soldering iron, then anything’s fair game. Or do you use a board at all? Let’s explore some options, both old favorites and some you may not have seen before, and see if we can get our creative juices flowing.

Transparent Circuit Boards

Let’s start with the desire to show more circuit and less board. For that we can start with [CNLohr]’s circuits on glass, usually microscope slides. What’s especially nice about his is that he provides detailed videos of the whole process, including all the failed things he tried along the way. Since he didn’t start with copper clad board, he instead glued his copper sheet to the glass using Loctite 3301. That was followed by the usual etching process, though with plenty of gotchas along the way.

In the end, he made a number of circuits, including an LED clock with the LEDs on the glass itself, and even attempted leading the community in making a glass keytar. The latter didn’t work out, but the resulting glass circuits are a work of art anyway.

What about making a transparent circuit board out of acrylic? [Frank Zhao] attempted just that by laser cutting troughs into the acrylic for the traces, and then drawing in nickel ink. But something in the ink ate into the acrylic, and as if that wasn’t bad enough, the voltage drop across the nickel was too high for his circuit. Suggestions were made in the comments for how to solve these problems, but unless we missed it, we haven’t seen another attempt yet.

But we’ve only just begun. What if you wanted even more transparency?

Continue reading “Non-standard Circuits: Jazz For Electrons”

Jaw-Dropping, IC-Free Pong On An Oscilloscope

Pong may not be much anymore, but it’s the granddaddy of all video games, and there’s still a lot to learn by studying its guts. And what better way to do that than by having it all laid out before you as you play? All it takes is 200 discrete transistors and two large handfuls of passives tacked to a piece of copper clad board to get a version of Pong executed without a single chip that’s playable on an oscilloscope.

Clearly a labor of love, if not an act of temporary insanity, [GK]’s realization of Pong is a sight to behold. Every scrap of it is circuits of his own design, executed dead bug style, apparently because [GK] enjoys life on hard mode. The game itself is surprisingly playable and you can even play against the machine. The video below is a little hard to watch, what with some glare on the oscilloscope CRT, but we’ll cut [GK] plenty of slack on this one; after all, it looks like this whole project was pulled off in one marathon weekend build session.

We’re still busy poring over the hand-drawn Forrest Mims-style schematics, which by themselves are almost a complete course in analog design. A lot of the circuits remind us [GK]’s bouncing ball simulation, which we covered a while back.

Continue reading “Jaw-Dropping, IC-Free Pong On An Oscilloscope”

Sculptural Nixie Clock Has Shockingly Exposed Design

Single tube Nixie clocks? Been there, seen that. A single tube Nixie clock with sculptural wiring that exposes dangerous voltages? Now that’s something you don’t see every day.

[Andrew Moser]’s clock is clearly a case of aesthetic by anesthetic — he built it after surgery while under the influence of painkillers. That may explain the questionable judgment, but we won’t argue with the look. The boost converter for the Nixie lives near the base of the bent wire frame, with the ATmega 328 and DS1307 RTC supported in the midsection by the leads of attached passive components and jumper wires. A ring at the top of the frame supports the octal socket for the Nixie and a crown of driver transistors for each element.

In the video after the break, [Andrew] speaks of rebuilding this on a PCB. While we’ve seen single tube Nixie PCB clocks before, and we agree that the design needs to be safer, we wouldn’t ditch the dead bug style at all. Maybe just throw the whole thing in a glass bell jar or acrylic tube.

Continue reading “Sculptural Nixie Clock Has Shockingly Exposed Design”