The Bootup Guide To Homebrew Two-Stage Tentacle Mechanisms

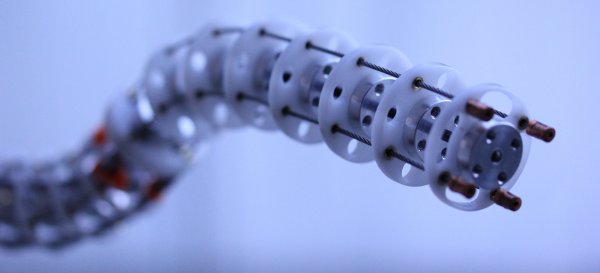
What’s not to love about animatronics? Just peel back any puppet’s silicone skin to uncover a cluster of mechatronic wizardry that gives it a life on the big screen. I’ve been hunting online for a good intro to these beasts, but I’ve only turned up one detailed resource–albeit a pretty good one–from the Stan Winston Tutorials series. Only 30 seconds into the intro video, I could feel those tentacles waking up my lowest and most gutteral urge to create physical things. Like it or not, I was hooked; I just had to build one… or a few. This is how you built a very real animatronic tentacle.

29172101050_b8d50d333e_z
I built this. And you can too!

If you’re getting started in this realm, I’ll be honest: the Stan Winston Tutorial is actually a great place to start. In about two hours, instructor Richard Landon covers the mindset, the set of go-to components, and the techniques for fabricating a tentacle mechanism with a set of garage tools–not to mention giving us tons of real-film examples along the way [1].

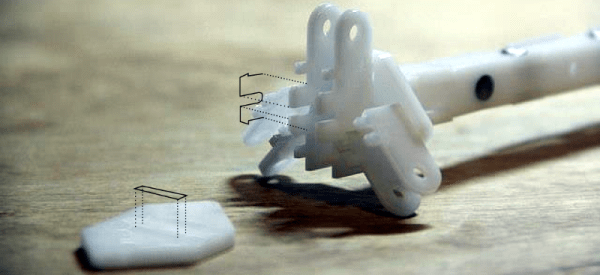
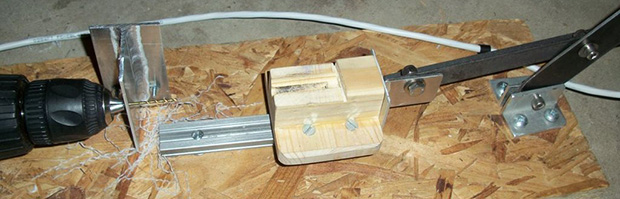
We also get a sneak peek into how we might build more complicated devices from the same basic techniques.  I’d like to pick up exactly where he left off: 4-way two-stage tentacles. And, of course, if you’ve picked up on just how much I like a certain laser-cuttable plastic at this point, I’m going to put a modern twist on Landon’s design. These design tweaks should enable you to build your own tentacle and controller with nothing more but a few off-the-shelf parts, some Delrin, and a laser cutter… Ok, fine, a couple 3D printed parts managed to creep their way in too.

bom_graphic
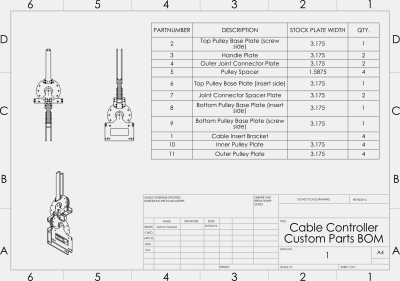
In a good-ol’ engineers-for-engineers fashion, I’m doing something a little different for this post: I’m finishing off this series with a set of assembly videos, a BOM, and the original CAD files to make that beast on the front page come to life. As for why, I figured: why not? Even though these mechanisms have lived in the robotics community and film industry for years, they’re still lacking the treatment of a solid, open design. This is my first shot at closing that gap. Get yourself a cup of coffee. I’m about to give you every bleeding detail on the-how-and-why behind these beasts.

All right; let’s get started.

Continue reading “The Bootup Guide To Homebrew Two-Stage Tentacle Mechanisms”

How To Build Anything With Delrin And A Laser Cutter — Advanced Tricks

Everyone wants their prototypes to look polished, as opposed to looking like 3D-squirted weekend afterthoughts. The combination of Delrin and a Laser Cutter make this easy, especially if you learn a few tricks-of-the-trade that will make your assemply pop, both functionally and aesthetically.

Last time, we took a deep dive into fabbing parts with Delrin and a typical 40-watt laser cutter, and we discussed some of the constraints of the material. More recently, [Gerrit] gave us a close look at the material itself. It’s been about a year since our first post, but the list of tricks is far from complete.

If you’re just getting started in this domain, let me introduce you to two classic techniques for laser-cut prototypes: puzzle-piecing and the T-nut-slotting. While these techniques are tried-and-true, I hope, fearless reader, that they’ll leave you hungry for something cleaner, something more refined. If that’s the case, read on!

Continue reading “How To Build Anything With Delrin And A Laser Cutter — Advanced Tricks”

Materials To Know: Acetal And Delrin

Delrin, Acetal, and its many trade names is a material properly known as Polyoxymethylene or POM. It is one of the strongest plastics and is a good go-to material when you want the best properties of plastic, and don’t need the full strength of a metal part. It was originally formulated to compete with Zinc and Aluminum castings after all.

I won’t go too deep into the numbers behind POM. If you need the Young’s Modulus, you probably don’t need this guide. This is intended to be more of a guide to its general properties. When you’re looking for something to fit an application it is usually easier to shift through the surface properties to select a few candidates, and then break the calculator out later to make sure it will work if you’re uncertain about the factor of safety.

The most popular property of POM is its ease of machining. While doing this research every single site I came across referred to it as the most machinable plastic. That’s about as objective as subjective praise can get. It doesn’t tend to grab tools like, for example, HDPE. It also chips nicely unlike UHMW and Nylon. Some plastics, like UHMW, have the unfortunate tendency to render the dials on a mill or lathe meaningless as the plastic deflects away from the tool. POM does not do this as much. Of course these other plastics have their strengths as well, but if any plastic will do, and you’re machining, POM is a very good choice.

Continue reading “Materials To Know: Acetal And Delrin”

Drawbacks Of Laser Cut Delrin–and How To Slip Around Them

Welcome back to part II in this ensemble of techniques with laser-cut Delrin. Thanks for many of the great insights along the way in the comments. In this guide, I’d like to go over some of the more immediate kinks that come to mind when getting started with this material.

Sourcing Delrin Sheets

When it comes to shopping, there are a variety of suppliers to choose from, but there are a few key words and thoughts to keep in mind.

Names

First, Delrin, is the “brand name” that refers to the Acetal homopolymer. Variants may also be labeled, acetal or acetal homopolymer. Delrin’s natural color is a soft white, but dyes can take it into a range of other colors. Black and white are, by far, the most common, though.

Tolerances

In the previous guide, all of the examples were cut from a small range of sheet thicknesses (0.0625[in], 0.09375[in], and .125[in]) sourced from OnlineMetals. As the thickness of the sheet increases, the tolerances on the thickness rating will also become more loose. You might buy a .125[in] plate and find it to be .124[in] in some places and .126[in] in others. If you purchase a .250[in] sheet, however, you’ll find that it may vary as much as .126[in] oversize though!

Buy it Flat

Despite McMaster-Carr being my go-to solution for one-off prototypes where rapid build iterations trump BOM cost, I don’t recommend purchasing Delrin from them as their sheets don’t have a flatness rating and often gets shipped bent in (oddly sized) boxes. (Seriously, has anyone else gotten a few oddly-sized parts in a gigantic McMaster-box before?)

Internal Stresses

Extruded Delrin has internal stresses built up inside of the sheet. There are a variety of reasons why this could be the case, but my biggest hunch is that the extrusion process at the factory results in different parts of the sheets solidifying at different times as the sheet cools, possibly causing some parts of the sheet to tighten from the cooling before other gooier sections have yet to finish cooling. What this means for you is that as your part gets lased out of the sheet, you’re, in a sense, relieving that stress. As a result, the part that you cut–especially for thin sheets–may come out of the laser cutter slightly warped.

Continue reading “Drawbacks Of Laser Cut Delrin–and How To Slip Around Them”

How To Build Anything Using Delrin And A Laser Cutter

Need a simple fab process to go from a humble vector graphic to a final part — in a matter of minutes? The CO2  laser cutter might be the right choice. As these tools open themselves up to widespread use through hackerspaces, I decided to give Delrin some well-deserved time under the spotlight.

The laser cutter yet-again proves itself a formidable tool with the construction of GameCube-Bot V2

This guide is a brief collection of tips and techniques that I’ve either learned from others or discovered on my own over the last couple years working with laser-cut Delrin (a.k.a Acetal) for functional prototypes. I hope this guide serves you well as we keep exploring the limits of the material.

As a disclaimer, keep in mind that in no way are these techniques unique or limited to Delrin. Many are not only years old but also common practice in either engineering design or the local machine shop. This article simply highlights the techniques shown here that perform both repeatably and predictably with Delrin and a couple hand-tools, and I hope to share them with a growing audience of laser cutter enthusiasts.

Continue reading “How To Build Anything Using Delrin And A Laser Cutter”

Pen Gun

Pneumatic Pen Gun Is Fit For James Bond

The James Bond franchise is well-known for many things, but perhaps most important to us hackers are the gadgets. Bond always had an awesome gadget that somehow was exactly the thing he needed to get out of a jam. [hw97karbine’s] latest project would fit right into an old Bond flick. He’s managed to build a single-shot pellet gun that looks like a pen.

[hw97karbine] started out by cutting the body from a tube of carbon fiber. He used a hacksaw to do the cutting, and then cleaned up the edges on a lathe. A barrel was cut from a piece of brass tubing with a smaller diameter. These two tubes will eventually sit one inside of the other. A custom front end cap was machined from brass. One end is ribbed and glued into the carbon fiber tube. The barrel is also glued to this end of the front cap, though it’s glued to the inside of the cap. The other end of the cap has 1/8″ BSP threads cut into it in order to allow for attachments.

A rear end cap is machined from Delrin. This piece also has a Delrin piston placed inside. The piston has a small piece of rubber used as a gasket. This piston valve is what allows the gun to operate. The rear cap gets glued into place and attached to a Schrader valve, removed from an automotive tire valve stem.

To pressurize the system, a bicycle pump is attached to the Schrader valve. This pushes the piston up against the barrel, preventing any of the air from escaping. The piston doesn’t make a perfect seal, so air leaks around it and pressurizes the carbon fiber tube. The Schrader valve prevents the air from leaking out of the pen body. A special machined button was threaded onto the Schrader valve. When the button is pressed, the air escapes; the sudden pressure imbalance causes the piston to shoot backwards, opening up a path for the air to escape through the barrel. This escaping air launches the projectile. The whole process is explained better with an animation.

Now, the question left in our mind: is this the same pressure imbalance concept that was used in that vacuum pressure bazooka we saw a couple years back?

Continue reading “Pneumatic Pen Gun Is Fit For James Bond”

Drilling Custom Standoffs

standoff

Every electronics project of sufficient complexity needs standoffs – little plastic or metal cylinders – to mount boards to one another. Keeping hundreds of little plastic trinkets around doesn’t really fit with the hacker mentality, though: it would be far simpler to keep some Delrin rod stock around to drill and cut standoffs as needed. [HomeCSP] created a device to do just that, allowing him to turn 1/4″ Delrin rod stock into any size standoff he needs.

Before building this device, [HomeCSP] was taking plastic rods to the drill press fitted with a very tiny drill bit for a #2 screw. The problems with that technique should be evident to anyone. The new solution uses an old cordless drill and a 6 inch piece of linear rail, effectively turning some bits of scrap into a horizontal drill press with a stationary bit.

The end result is a machine that can bore a hole straight down a 1/4″ rod. With a box of screws these homebrew plastic rods are much cheaper than off-the-shelf parts and can be made in any length desired.