We’ve devoted a fair amount of virtual ink here to casting shade at self-driving vehicles, especially lately with all the robo-taxi fiascos that seem to keep cropping up in cities serving as testbeds. It’s hard not to, especially when an entire fleet of taxis seems to spontaneously congregate at a single point, or all it takes to create gridlock is a couple of traffic cones. We know that these are essentially beta tests whose whole point is to find and fix points of failure before widespread deployment, and that any failure is likely to be very public and very costly. But there’s someone else in the self-driving vehicle business with way, WAY more to lose if something goes wrong but still seems to be nailing it every day. Of course, we’re talking about NASA and the Perseverance rover, which just completed a record drive across Jezero crater on autopilot. The 759-meter jaunt was completely planned by the onboard AutoNav system, which used the rover’s cameras and sensors to pick its way through a boulder-strewn field. Of course, the trip took six sols to complete, which probably would result in negative reviews for a robo-taxi on Earth, and then there’s the whole thing about NASA having a much bigger pot of money to draw from than any start-up could ever dream of. Still, it’d be nice to see some of the tech on Perseverance filtering down to Earth.
digit4 Articles
Spice Up The Humble 16×2 LCD With Big Digits
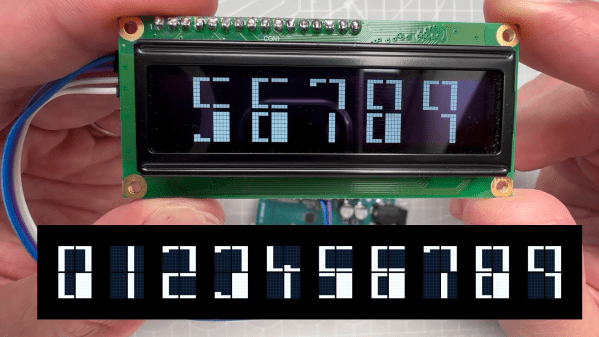
The 16×2 LCD display is a classic in the microcontroller world, and for good reason. Add a couple of wires, download a library, mash out a few lines of code, and your project has a user interface. A utilitarian and somewhat boring UI, though, and one that can be hard to read at a distance. So why not spice it up with these large-type custom fonts?
As [upir] explains, the trick to getting large fonts on a display that’s normally limited to two rows of 16 characters each lies in the eight custom characters the display allows to be added to its preprogrammed character set. These can store carefully crafted patterns that can then be assembled to make reasonable facsimiles of the ten numerals. Each custom pattern forms one-quarter of the finished numeral, which spans what would normally be a two-by-two character matrix on the display. Yes, there’s a one-pixel wide blank space running horizontally and vertically through each big character, but it’s not that distracting.
Composing the custom patterns, and making sure they’re usable across multiple characters, is the real hack here, and [upir] put a lot of work into that. He started out in Illustrator, but quickly switched to a spreadsheet because it allowed him to easily generate the correct binary numbers to pass to the display for each pattern. It seems to have really let his creative juices flow, too — he came up with 24 different fonts! Our favorite is the one he calls “Tron,” which looks a bit like the magnetic character recognition font on the bottom of bank checks. Everyone remembers checks, right?
Hats off to [upir] for a creative and fun way to spice up the humble 16×2 display. We’d love to see someone pick this up and try a complete alphanumeric character set, although that might be a tall order with only eight custom characters to work with. Then again, if Bad Apple on a 16×2 is possible…
Continue reading “Spice Up The Humble 16×2 LCD With Big Digits”
A One-Servo Mechanical Seven-Segment Display
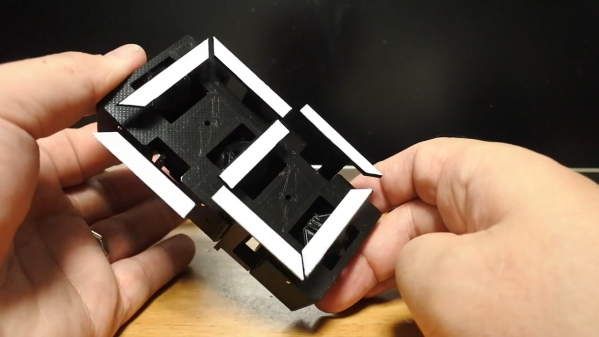
The seven-segment display may be a bit prosaic after all these years, but that doesn’t mean there aren’t ways to spice it up. Coming up with a mechanical version of the typical photon-based display is a popular project, of which we’ve seen plenty of examples over the years. But this seven-segment display is quite a mechanical treat, and a unique way to flip through the digits.
With most mechanical displays, we’re used to seeing the state of each segment changed with some kind of actuator, like a solenoid or servo. [Shinsaku Hiura] decided on a sleeker design using a 3D-printed barrel carrying one cam for each segment. Each hinged segment is attached to an arm that acts as a follower, riding on its cam and flipping on or off in a set pattern. Which digit is displayed depends on the position of the barrel, which is controlled with a single servo and a pair of gears. It trades mechanical complexity for electrical simplicity and overall elegance, and as you can see from the video below, it’s pretty snappy.
We think the best part of this build is figuring out the shape of the cams. We wonder how they compare to the cam profiles in [Greg Zumwalt]’s mechanical display; it uses two separate discs with grooves, but the principle is pretty much the same.
Continue reading “A One-Servo Mechanical Seven-Segment Display”
LED Retrofit For Vintage Edge-lit Numeric Display Modules

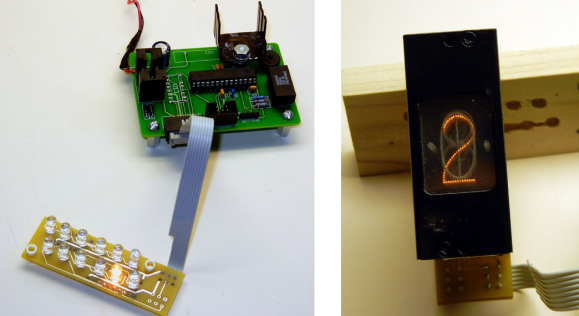
This single digit display is an old edge-lit module that [Ty_Eeberfest] has been working with. The modules were built for General Radio Company and have a really huge PCB to control just one digit. [Ty’s] modules didn’t come with that driver board, so he was left with the task of controlling an incandescent bulb for each digit. After a bit of thought he figured it would be much easier to just replace the edge-light bulbs with a set of LEDs.
We’ve seen these exact modules before, referenced in a project that created an edge-lit Nixie tube from scratch. Each digit in the display is made from a piece of acrylic with tiny drill holes which trace out the numerals. The acrylic is bent so that the edge exits out the back of the module where it picks up light from the bulb. [Ty] laid out his circuit board so that each LED was in the same position as the bulb it was replacing. As you can see, his retrofit works like a charm.
Continue reading “LED Retrofit For Vintage Edge-lit Numeric Display Modules”


