Salvaged Drill Gets A Magnetic Upgrade

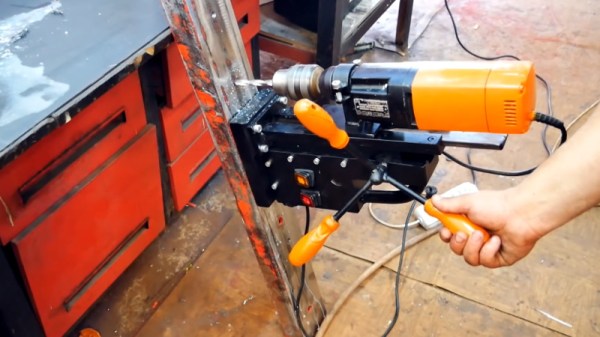
For most people, a broken tool is at the end of its useful life. But rather than toss a heavy-duty drill that had its handle broken off, [Workshop From Scratch] thought it was a perfect opportunity to create something new. In his latest video, he shows how he converted this old hand tool into a magnetic drill press with predictably impressive results.

Despite being assembled largely from pieces of scrap metal cut into shape with an angle grinder, we wouldn’t blame you for believing the end result was a commercial product. From the handles salvaged from chewed up old screwdrivers to the scratch-built rack and pinion assembly, the attention to detail here is really fantastic.
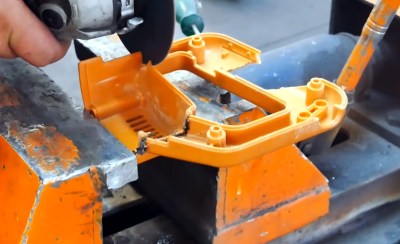
Removing what was left of the broken handle.

It’s difficult to pick a favorite detail, but the reinvented enclosure for the drill certainly ranks up there. [Workshop From Scratch] could have simply bolted on the tool as-is, but instead he surgically removed the vestigial handle to make it look as though the drill was always meant for this application. After cutting, it was finished off with some body filler, a bit of sanding, and a coat of his signature orange spray paint.

When he built his magnetic vise, [Workshop From Scratch] used magnets pulled from automotive air conditioning systems. They got the job done, but were somewhat annoying to work with given their round shape. This time around, he’s used off-the-shelf magnetic locks intended for steel doors. When energized with a 19 V laptop power supply, he says the three rectangular electromagnets have a combined pull of 540 kilograms.

If you don’t have a broken drill to use as a donor for this type of project, don’t worry. You could always use a salvaged hoverboard motor instead.

Continue reading “Salvaged Drill Gets A Magnetic Upgrade”

Syringes Put The Squeeze On This Mini Drill Press

If you’re making your own PCBs for through-hole projects at home, getting the board etched is only half the battle; you’ve still got to drill all those little holes. It’s a tedious process, and if you’ve got a lot of them, doing them freehand with a drill just isn’t going to cut it. Which is why [Ruchir Chauhan] built this tiny 3D printed drill press.

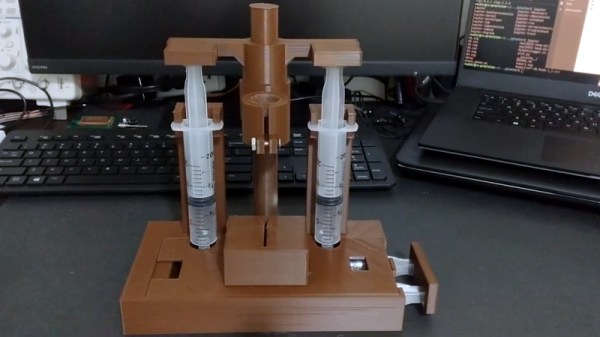
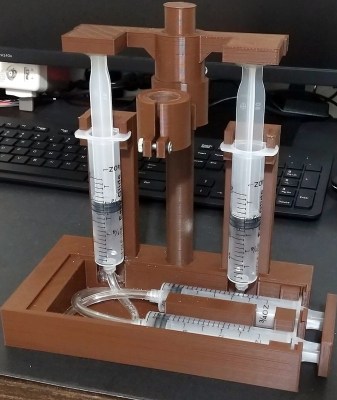
This design is actually interesting for a number of reasons. The fact that it’s primarily 3D printed is a big one, though of course it’s not the first time we’ve seen that. We also like the minimal part count and low-cost, which is sure to appeal to those looking to produce PCBs on a budget. But the most impressive feature has to the hydraulic system [Ruchir] has come up with to actually do the drilling.

Rather than pulling an arm to lower the bit towards the work piece, a system utilizing four syringes, some water, and a bit of tubing is used to pull the tool down. This might seem extravagant, but if you’ve got a lot of holes to drill, this design is really going to save your arms. This method should also give you more consistent and accurate results, as you won’t be putting any torque on the structure as you would with a manually operated press.

[Ruchir] doesn’t offer much in the way of instructions on the project’s Hackaday.io page, but once you print out all of the provided STLs and get your syringes ready to go, the rest should be fairly self explanatory. Personally we might have added a smooth steel rod in there to make sure the movement is nice and straight, but we can see the appeal of doing it with a printed part to keep things cheap.

Looking for more ideas? If you’re after something a bit larger we might suggest this one made from PVC pipes, and this 3D printed desktop press would look good on anyone’s bench. Just don’t blame us if your arms get tired.

Continue reading “Syringes Put The Squeeze On This Mini Drill Press”

Custom Drill Press Table Eliminates Hassles

Getting a perfect workshop together, with all the right tools, is a dream for many. A lot of us cobble together what we can with a dremel tool, a soldering iron, and whatever work surface happens to be available in the kitchen or spare bedroom. But even when we finally get a permanent garage or shop to work in, there are still some challenges to overcome with our workspaces. [Workshop From Scratch] was having issues with his drill press, and solved them with this custom build.

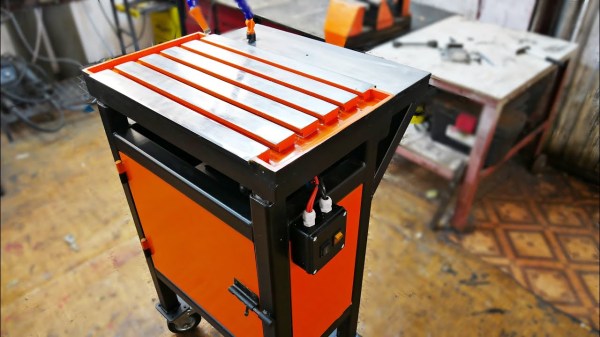
Rather than modify an existing press, he first welded a table together from scratch using square tube. From there he set about solving those issues. The first was having to make a large number of adjustments up and down when working on larger pieces. For that he added an electrically adjustable worktop which keeps him from having to make constant adjustments of the press itself. The second improvement over the standard press workspace was adding a cooling system for the cutting tools, saving himself money in bits and allowing quicker drilling.

The finished product looks professional thanks to a quality paint job and, of course, having all the right tools in the workshop in the first place to put something like this together. We all have an idea in our heads about the perfect workshop for our own needs, but don’t forget to think outside the box when it comes to building one yourself.

Continue reading “Custom Drill Press Table Eliminates Hassles”

Converting A Drill Press Into A Milling Machine

Mills are a huge investment, and for hobbyists without the space to install their own personal mill, it can sometimes be a pain to have to find a facility with a mill to complete your project.

What if you could convert your drill press into a mill instead? YouTuber [Small Metalworking Machines] explores this in his video, where he takes a small Central Machinery drill press and adds a few mods. He took some steps to improve the quill, spindle, and bearings — boring down the quill, replacing the bearings, and finally turning and re-threading the spindle it at 1/2-20.

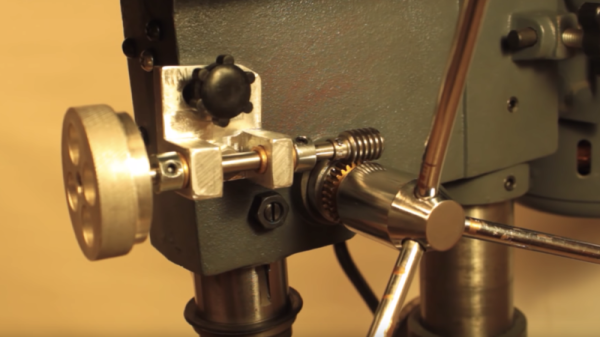
With the adjustments, he was able to add in a cheap drill chuck, which fit in quite nicely with just a slight wobble of 5 thousandths on either side. To introduce some control, he added in a worm gear to engage a gear on the spindle. A pivot point disengages the worm gear, while bearings provide it controlled movement from the worm wheel.

He also added a cheap milling table from eBay, attached to the base of the drill press, all for a total of $120. While it’s not perfect, it’s still significantly less expensive than buying a mill!

Continue reading “Converting A Drill Press Into A Milling Machine”

The Home-Made Drill Press Of Your Dreams

We are lucky to live in an age when tools have almost never been so affordable, when if we’d like a drill press on our benches we can pick one up for not a lot from our nearest discount store. If the cheapest tools aren’t very good quality then even the better ones aren’t that much more expensive. It’s evident that [Workshop DIY] has the resources to buy a decent drill press if he wanted one, but we’re fortunate that instead he’s taken the time to build one of his own from scratch (Russian language audio, Anglophones will have to enable YouTube subtitle translation).

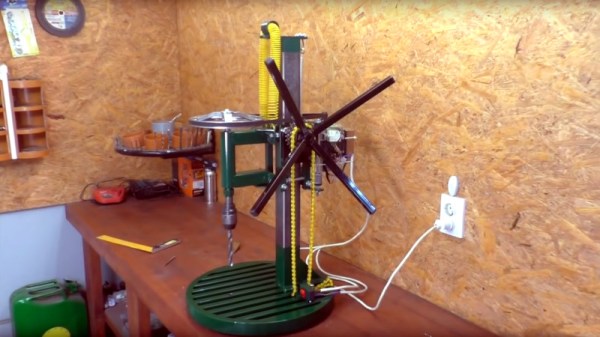
The press itself is made entirely from box section steel tube, with what looks like 25mm square used for the base and 50mm for the vertical shaft. Instead of a rack and pinion to raise and lower the tool it has a slider that runs on a set of bearings and is lifted with a bicycle chain. The chuck itself is mounted to a shaft that runs through another set of bearings to the large pulley and motor from a washing machine. The result is a beautifully made drill press that seems to work very effectively. It may lack an adjustable table or selectable speeds, but we certainly couldn’t build it better than he has. Take a look, the video is below the break.

It shouldn’t be surprising what can be made in a well-appointed metalworking shop, perhaps we have been blinded by the convenience of readily available tools. If you’d like to see more, take a look at this DIY engine crane.

Continue reading “The Home-Made Drill Press Of Your Dreams”

Print A Drill Press For Your Printed Circuit Boards

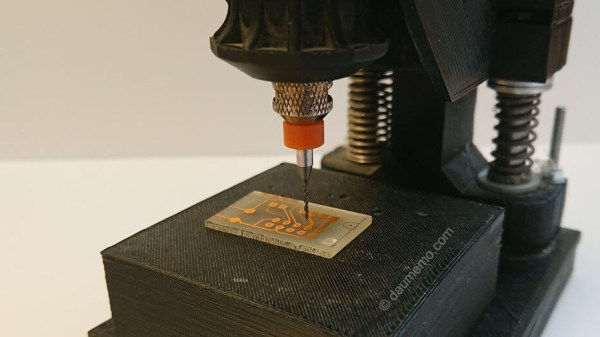
If you make printed circuit boards the old fashioned way by etching them yourself, you may need to drill a lot of holes; even surface-mount converts still need header pins on occasion. But, drilling these holes by hand often leads to broken drill bits, which always seems to happen with one un-drilled hole and no spare bits left. [Daumemo] came up with a solution: a 3D printed drill press for a Dremel or similar rotary tool.

While you can buy commercial presses designed to fit these tools, there’s a certain satisfaction to building your own, and if you have a well-stocked parts bin you might even finish it before a mail-ordered version could arrive. Certainly you could do it at lower cost. The design is straightforward, and uses printed parts augmented with “reprap vitamins” (i.e. the non-printable, typically metal, components). If you’ve ever built — or repaired — a 3D printer, you may have these pieces already: a couple of LM8UU bearings, some 8 mm steel rod, and a pair of springs seem like the most esoteric parts required, although even these could probably be substituted without much trouble.

Only a few pieces need to be printed: a base is outfitted with a removable table for holding the workpiece, while a lever actuates the frame holding the tool. [Daumemo] chose to print the design in ABS, but found that it flexes a little too much, occasionally requiring some care during use — a stiffer filament such as PLA might yield better results. Overall, though, this seems like a great project for that 3D printer you haven’t used in a while.

Be sure to check out the video of the press in action, after the break.

Continue reading “Print A Drill Press For Your Printed Circuit Boards”

Drill Jig Helps Mount WeMos D1 Mini

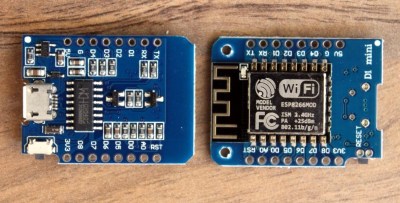
As far as ESP8266 boards go, the WeMos D1 Mini is a great choice if you’re looking to get started with hackerdom’s microcontroller du jour. It’s small, well supported, and can be had ridiculously cheap. Often going for as little as $3 USD each, we buy the things in bulk just to have spares on hand. But that’s not to say it’s a perfect board. For one, it lacks the customary mounting holes which would allow you to better integrate it into finished products.

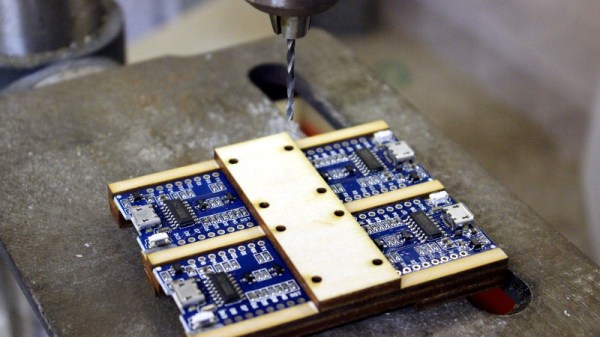
This minor annoyance was enough to spring [Martin Raynsford] into action. He noticed there was some open area on the D1 Mini’s PCB where it seemed he could drill through to add his own mount points, but of course popping holes in a modern PCB can be risky business. There’s not a lot of wiggle room between success and heartbreak, and it’s not like the diminutive D1 Mini is that easy to hold down to begin with. So he designed a laser-cut jig to allow him to rapidly add mounting holes to his D1 Mini’s assembly line style.

For those who might be skeptical, [Martin] reports he’s seen no adverse effects from drilling through the board, though does admit it’s possible the close proximity of the metal screw heads to the ESP8266’s antenna may have a detrimental effect. That said, he’s tested them in his projects out to 25 m (82 feet) with no obvious problems. He’s using a 2 mm drill bit to make his hole, and M2 x 6 mm machine screws to hold the boards down.

The jig design is released as a SVG and DXF for anyone with a laser cutter to replicate, but it shouldn’t be too difficult to extrude those designs in the Z dimension for hackers who haven’t yet jumped on the subtractive manufacturing bandwagon.

When a project makes the leap from prototype to in-house production, designing and building jigs become an essential skill. From flashing firmware to doing final checkout, the time and effort spent building a jig early on will pay for itself quickly in production.