Impressively Responsive Air Drums Built Using The Raspberry Pi Pico

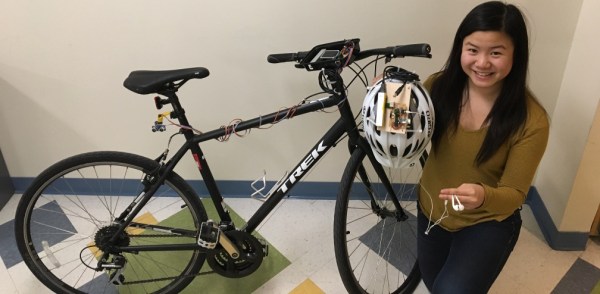
Drum kits are excellent fun and a terrific way to learn a sense of rhythm. They’re also huge and unwieldy. In contrast, air drums can be altogether more compact, if lacking the same impact as the real thing. In any case, students [Ang], [Devin] and [Kaiyuan] decided to build a set of air drums themselves for their ECE 4760 microcontroller class at Cornell.

As per the current crop of ECE4760 projects, the build relies on the Raspberry Pi Pico microcontroller as the brains of the operation. The Pico is charged with reading the output of MPU6050 inertial measurement units mounted to a pair of drum sticks. The kick pedal itself simply uses a button instead.

Where the project gets really interesting, though, is in the sound synthesis. The build doesn’t simply play different pre-recorded samples for different drums. Instead, it uses the Karplus-Strong Drum Synthesis function combined with a wavetable to generate different sounds.

In the demo video, we get to hear the air drums in action, complete with a Stylophone playing melody. Unlike some toy versions that trigger seemingly at random with no rhythm, these air drums are remarkably responsive and sound great. They could be a great performance instrument if designed for the purpose.

We’ve seen similar builds before, too.

Continue reading “Impressively Responsive Air Drums Built Using The Raspberry Pi Pico”

Talking Ohmmeter Also Spits Out Color Bands For You

If you’ve got a resistor and you can’t read the color bands (or they’re not present), you can always just grab a multimeter and figure out its value that way. [Giacomo Yong Cuomo] and [Sophia Lin] have built an altogether different kind of ohmmeter, that can actually spit out color values for you, and even read the resistance aloud. It’s all a part of their final project for their ECE 4760 class.

The build is based around a Raspberry Pi Pico. It determines the value of a resistor by placing it in a resistor divider, with the other reference resistor having a value of 10 kΩ. The resistor under test is connected between the reference resistor and ground, while the other leg of the reference resistor is connected to 3.3 V. The node between the two resistors is connected to the Pi Pico’s analog-to-digital converter pin. This allows the Pico to determine the voltage at this point, and thus calculate the test resistor’s value based on the reference resistor’s value and the voltages involved.

A large fake resistor provides user feedback. It’s filled with addressable LEDs, which light up the appropriate color bands depending on the test resistor’s value. It’s capable of displaying both 3-band, 4-band, and 5-band color configurations. While six-band resistors do exist, the extra band is typically used for denoting temperature coefficients which can’t readily be determined by this simple test. It can also play audio files to announce the resistance value over a speaker.

It’s a neat project that surely taught the duo many useful skills for working with microcontrollers. Plus, it’s kinda fun — we love the big glowing resistor. We’ve featured some other fancy resistors before, too!

Continue reading “Talking Ohmmeter Also Spits Out Color Bands For You”

Tweetbot Expresses Twitter Emotions

When reading textual communications, it can be difficult to accurately acertain emotional intent. Individual humans can be better or worse at this, with sometimes hilarious results when it goes wrong. Regardless, there’s nothing a human can do that a machine won’t eventually do better. For just this purpose, Tweetbot is here to emotionally react to Twitter so you don’t have to.

The ‘bot receives tweets over a bluetooth link, handled by a PIC32, which also displays them on a small TFT screen. The PIC then analyses the tweet for emotional content before sending the result to a second PIC32, which displays emotes on a second TFT screen, creating the robot’s face. Varying LEDs are also flashed depending on the emotion detected – green for positive emotions, yellow for sadness, and red for anger.

The final bot is capable of demonstrating 8 unique emotional states, far exceeding the typical Facebook commenter who can only express unbridled outrage. With the ‘bot packing displays, multiple microcontrollers, and even motor drives, we imagine the team learned a great deal in the development of the project.

The project was the product of [Bruce Land]’s ECE 4760 course, which has shown us plenty of great hacks in the past – Bike Sonar being one of our favorites. Video after the break.

Continue reading “Tweetbot Expresses Twitter Emotions”

Touch-A-Sketch Gives An Old Toy A New Twist

After nearly 60 years and a lot of stairs and squares, there is finally an easier way to draw on an Etch A Sketch®. For their final project in embedded microcontroller class, [Serena, Francis, and Alejandro] implemented a motor-driven solution that takes input from a touch screen.

Curves are a breeze to draw with a stylus instead of joysticks, but it’s still a 2-D plotter and must be treated as such. The Touch-A-Sketch system relies on the toy’s stylus starting in the lower left hand corner, so all masterpieces must begin at (0,0) on the knobs and the touch screen.

The BOM for this project is minimal. A PIC32 collects the input coordinates from the touch screen and sends them to a pair of stepper motors attached to the toy’s knobs. Each motor is driven by a Darlington array that quickly required a homemade heat sink, so there’s even a hack within the hack. The team was unable to source couplers that could deal with the discrepancy between the motor and knob shaft sizes, so they ended up mounting the motors in a small plywood table and attaching them to the stock knobs with Velcro. This worked out for the better, since the Etch A Sketch® screen still has to be reset the old-fashioned way.

They also considered using belts to drive the knobs like this clock we saw a few years ago, but they wanted to circumvent slippage. Pour another glass of your aunt’s high-octane eggnog and watch Touch-A-Sketch draw something festive after the break.

Continue reading “Touch-A-Sketch Gives An Old Toy A New Twist”

This Bike Sonar Is Off The Chain

On paper, bicycling is an excellent form of transportation. Not only are there some obvious health benefits, the impact on the environment is much less than anything not directly powered by a human. But let’s face it: riding a bike can be quite scary in practice, especially along the same roads as cars and trucks. It’s hard to analyze the possible threats looming behind you without a pair of eyes in the back of your head.

radar-sweep-display
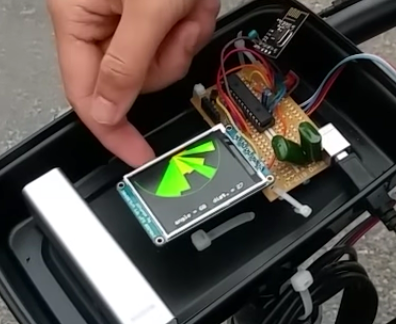
[Claire Chen] and [Mark Zhao] have come up with the next best thing—bike sonar. It’s a two-part system that takes information from an ultrasonic rangefinder and uses it to create sound-localized pings in a rider’s ears. The rangefinder is attached to a servo mounted on the seat post. It sweeps back and forth to detect objects within 4 meters, and this information is displayed radar-sweep-style graphic on a TFT screen via a PIC32.

Though the graphic display looks awesome, it’s slow feedback and a bit dangerous to have to look down all the time — the audio feedback is by far the most useful. The bike-side circuits sends angle and distance data over 2.4GHz to another PIC mounted on a helmet. This PIC uses sound localization to create a ping noise that matches the distance and location of whatever is on your tail. The ping volume is relative to the distance of the object, and you just plug headphones into the audio jack to hear them. Bunny-hop your way past the break to check it out.

Continue reading “This Bike Sonar Is Off The Chain”

A Shareable Wireless Biometric Flash Drive

Wireless storage and biometric authentication are both solved problems. But as [Nathan] and [Zhi] have noticed, there is no single storage solution that incorporates both. For their final project in [Bruce Land]’s ECE 4760, they sought to combine the two ideas under a tight budget while adding as many extras as they could afford, like an OLED and induction coil charging.

final_product_600
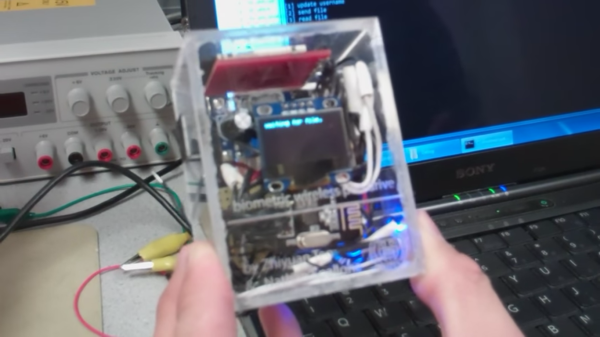
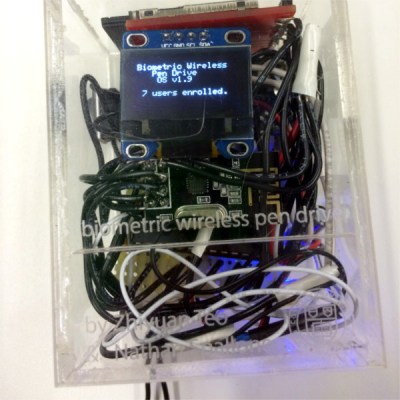
Their solution can be used by up to 20 different people who each get a slice of an SD card in the storage unit There are two physical pieces, a base station and the wireless storage unit itself. The base station connects to the host PC over USB and contains an Arduino for serial pass-through and an nRF24L01+ module for communicating with the storage side. The storage drive’s components are crammed inside a clear plastic box. This not only looks cool, it negates the need for cutting out ports to mount the fingerprint sensor and the OLED. The sensor reads the user’s credentials through the box, and the authentication status is displayed on an OLED. Files are transferred to and from the SD card over a second nRF24L01+ through the requisite PIC32.

Fingerprint authorization gives the unit some physical security, but [Nathan] and [Zhi] would like to add an encryption scheme. Due to budget limitations and time constraints, the data transfer isn’t very fast (840 bytes/sec), but this isn’t really the nRF modules’ fault—most of the transmission protocol was implemented in software and they simply ran out of debugging time. There is also no filesystem architecture. In spite of these drawbacks, [Nathan] and [Zhi] created a working proof of concept for wireless biometric storage that they are happy with. Take a tour after the break.
Continue reading “A Shareable Wireless Biometric Flash Drive”

Color Sonification Could Be Key To Rainbow Connection

Have you seen any loud sweaters this holiday season? Now there is a way to quantify their vibrancy and actually hear them at the same time. Cornell engineering students [Mengcheng Qi] and [Ryan Land] focused on the sonification of color and translated the visible spectrum into audible sounds.

They originally planned to use pixel samples from an OV7670 camera module, but weren’t able to extract any useful color data from it. We prefer their Plan B anyway, which was to use CdS photo resistors and the plastic color filters used for photography in red, blue, and green. The varying intensity of light falling on the photo resistors creates different patterns according to the voltage levels. The actual sound generation was done with FM sound synthesis.

There wasn’t a lot of natural sound variation between different RGB values, so in order to make it more fun, they created different instruments which play different patterns at variable speeds and pitch according to the colors. In addition to the audio feedback, the RGB values are displayed in real-time on a small TFT. Below those are dynamic bar graphs that show the voltages of each color.

Check out the demo after the break; they walk through the project and try it out on different things to hear their colors.

Continue reading “Color Sonification Could Be Key To Rainbow Connection”