DIY Chemistry Points The Way To Open Source Blood Glucose Testing

Every diabetic knows that one of the major burdens of the disease is managing supplies. From insulin to alcohol wipes, diabetes is a resource-intensive disease, and running out of anything has the potential for disaster. This is especially true for glucose test trips, the little electrochemical dongles that plug into a meter and read the amount of glucose in a single drop of blood.

As you might expect, glucose test strips are highly proprietary, tightly regulated, and very expensive. But the chemistry that makes them work is pretty simple, which led [Markus Bindhammer] to these experiments with open source glucose testing. It’s all part of a larger effort at developing an open Arduino glucometer, a project that has been going on since 2016 but stalled in part thanks to supply chain difficulties on the chemistry side, mainly in procuring glucose oxidase, an enzyme that oxidizes glucose. The reaction creates hydrogen peroxide, which can be measured to determine the amount of glucose present.

With glucose oxidase once again readily available — from bakery and wine-making suppliers — [Markus] started playing with the chemistry. The first reaction in the video below demonstrates how iodine and starch can be used as a reagent to detect peroxide. A tiny drop of glucose solution turns the iodine-starch suspension a deep blue color in the presence of glucose oxidase.

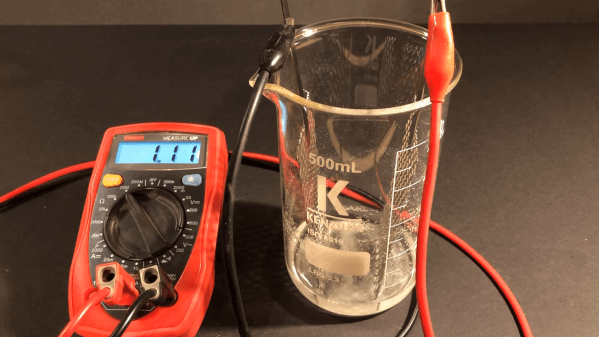
While lovely, colorimetric reactions such as these aren’t optimal for analyzing blood, so reaction number two uses electrochemistry to detect glucose. Platinum electrodes are bathed in a solution of glucose oxidase and connected to a multimeter. When glucose is added to the solution, the peroxide produced lowers the resistance across the electrodes. This is essentially what’s going on in commercial glucose test strips, as well as in continuous glucose monitors.

Hats off to [Markus] for working so diligently on this project. We’re keenly interested in this project, and we’ll be following developments closely. Continue reading “DIY Chemistry Points The Way To Open Source Blood Glucose Testing”

A cartoon vehicle is connected to two wires. One is connected to an illustrated Li anode and the other to a γ-sulfur/carbon nanofiber electrode. Lithium ions and organic carbonate representations float between the two electrodes below the car. A red dotted line between the electrodes symbolizes the separator.

Lithium Sulfur Battery Cycle Life Gets A Boost

Lithium sulfur batteries are often touted as the next major chemistry for electric vehicle applications, if only their cycle life wasn’t so short. But that might be changing soon, as a group of researchers at Drexel University has developed a sulfur cathode capable of more than 4000 cycles.

Most research into the Li-S couple has used volatile ether electrolytes which severely limit the possible commercialization of the technology. The team at Drexel was able to use a carbonate electrolyte like those already well-explored for more traditional Li-ion cells by using a stabilized monoclinic γ-sulfur deposited on carbon nanofibers.

The process to create these cathodes appears less finicky than previous methods that required tight control of the porosity of the carbon host and also increases the amount of active material in the cathode by a significant margin. Analysis shows that this phase of sulfur avoids the formation of intermediate fouling polysulfides which accounts for it’s impressive cycle life. As the authors state, this is far from a commercial-ready system, but it is a major step toward the next generation of batteries.

We’ve covered the elements lithium and sulfur in depth before as well as an aluminum sulfur battery that could be big for grid storage.

Raspberry Pi biosensor with screen-printed electrodes

Raspberry Pi And PpLOGGER Make A Low-Cost Chemiluminescence Detector

[Laena] and her colleagues at the La Trobe Institute for Molecular Science in Melbourne, Australia used a Raspberry Pi to make a low-cost electrochemiluminescence (ECL) detector to measure inflammation markers, which could be used to detect cardiovascular disease or sepsis early enough to give doctors a better chance at saving a patient’s life.

ECL reactions emit light as a result of an electrically-activated chemical reaction, making them very useful for detecting biochemical markers in blood, saliva, or other biological samples.  ECL setups are fundamentally fairly straightforward. The device includes a voltage reference generator to initiate the chemical reaction and a photomultiplier tube (PMT) to measure the emitted light. The PMT outputs a current which is then converted to a voltage using a transimpedance amplifier (TIA). That signal is then sampled by the DAQCplate expansion board and the live output can be viewed in ppLOGGER in real-time.

Using the RPi allowed the team to do some necessary, but pretty simple signal processing, like converting the TIA voltage back to a photocurrent and integrating the current to obtain the ECL intensities. They mention the added signal processing potential of the RPi was a huge advantage of their setup over similar devices, however, simple integration can be done pretty easily on most any microcontroller. Naturally, they compared their device to a standard ECL setup and found that the results were fairly comparable between the two instruments. Their custom device showed a slightly lower limit of detection than the standard setup.

Their device costs roughly $1756 USD in non-bulk quantities with the PMT being the majority of the cost ($1500). Even at almost $2000, their device provides more than $8000 in savings compared to ECL instruments on the market. Though cost is much more than just the bill of materials, we like seeing the community making efforts to democratize science, and [Laena] and her colleagues did just that. I wonder if they can help us figure out the venus fly trap while they’re at it?

Picture of NanoStat in 3D-printed enclosure with LiPo battery and US quarter for scale.

An ESP32-Based Potentiostat

Ever wanted to make your own wireless chemical sensor? Researchers from the University of California, Irvine (UC Irvine) have got you covered with their ESP32-based potentiostat.

We’ve talked about potentiostats here on Hackaday before. Potentiostats are instruments that analyze the electrical properties of an electroactive chemical cell. Think oxidation and reduction reactions (redox) from your chemistry course, if you can remember that far back. Potentiostats can be used in several different modes/configurations, but the general idea is for these instruments to induce redox reactions within a given electroactive chemical cell and then measure the resulting current produced by the reaction. By measuring the current, researchers can determine the concentration of a known substance within a sample or even determine the identity of an unknown substance, to name a few potential applications.

These instruments have become mainstays in research labs around the world and have incredible utility in the consumer space. Glucometers, devices used to measure blood glucose levels, are an example of technologies that have made their way into everyday life due to the advances made in electrochemistry and potentiostat research over the last few decades. Given their incredible utility to scientific research and medical technologies, a great deal of effort has gone into democratizing potentiostats, making them more available to the general public for educational and hobbyist purposes. Of course, any medical applications must go through rigorous testing and approvals by each country’s appropriate governing bodies. So we’re talking more non-medical purposes here.

The first popular open-source, DIY potentiostat was the CheapStat, which we’ve covered here on Hackaday before. Since then, developing newer and more advanced open-source potentiostats has become a popular endeavor within the scientific community. The researchers from UC Irvine wanted to put their own special spin on the open-source potentiostat craze and they did so with their inclusion of the ESP32 as their main processor. This obviously opens up them up do a whole host (see what we did there) of wireless capabilities that others before them have not explored.

With the ESP32, they developed a nice web-based GUI that makes controlling and collecting data from the potentiostat very seamless and user-friendly. You can imagine the great possibilities here. Teacher-led classroom demonstrations where the instructor can easily access each student’s device over the cloud to help troubleshoot or explain results. Developing soil monitoring sensors that can be deployed all around a farm to remotely collect data on feed, soil composition, and plant health. The possibilities here sure are promising.

We hope you’ll dive into their paper as it’s well worth a read. Happy hacking, Hackaday.

Low Cost Metal 3D Printing By Electrochemistry

[Billy Wu] has been writing for a few years about electrochemical 3D printing systems that can handle metal. He’s recently produced a video that you can see below about the process. Usually, printing in metal means having a high-powered laser and great expense. [Wu’s] technique is an extension of electroplating.

Boiling down the gist of the process, the print head is a syringe full of electroplating solution. Instead of plating a large object, you essentially electroplate on tiny areas. The process is relatively slow and if you speed it up too much, the result will have undesirable properties. But there are some mind-bending options here. By using print heads with different electrolytes, you can print using different metals. For example, the video shows structures made of both copper and nickel. You can also reverse the current and remove metal instead of depositing it.

This looks like something you could pretty readily replicate in a garage. Electroplating is well-understood and the 3D motion parts could be a hacked 3D printer. Sure, the result is slow but, after all, slow is a relative term. You might not mind taking a few days to print a metal object compared to the cost and trouble of creating it in other ways. Of course, since this is copper, we also have visions of printing circuit board traces on a substrate. We imagine you’d have to coat the board with something to make it conductive and then remove that after all the copper was in place. When you build this, be sure to tell us about it.

We’ve seen electroplating pens before and that’s really similar to this idea. Of course, you can also make your 3D prints conductive and plate them which is probably faster but isn’t really fully metal.

Continue reading “Low Cost Metal 3D Printing By Electrochemistry”

Electrochemistry At Home

A few years ago, I needed a teeny, tiny potentiostat for my biosensor research. I found a ton of cool example projects on Hackaday and on HardwareX, but they didn’t quite fulfill exactly what I needed. As any of you would do in this type of situation, I decided to build my own device.

Now, we’ve talked about potentiostats before. These are the same devices used in commercial glucometers, so they are widely applicable to a number of biosensing applications. In my internet perusing, I stumbled upon a cool chip from Texas Instruments called the LMP91000 that initially appeared to do all the hard work for me. Unfortunately, there were a few features of the LMP91000 that were a bit limiting and didn’t quite give me the range of flexibility I required for my research. You see, electrochemistry works by biasing a set of electrodes at a given potential and subsequently driving a chemical reaction. The electron transfer is measured by the sensing electrode and converted to a voltage using a transimpedance amplifier (TIA). Commercial potentiostats can have voltage bias generators with microVolt resolution, but I only needed about ~1 mV or so. The problem was, the LMP91000 has a resolution of ~66 mV on a 3.3 V supply, mandating that I augment the LMP991000 with an external digital-to-analog converter (DAC) as others had done.

However, changing the internal reference of the LMP91000 with the DAC confounded the voltage measurements from the TIA, since the TIA is also referenced to the same internal zero as the voltage bias generator. This seemed like a problem other DIY solutions I came across should have mentioned, but I didn’t quite find any other papers describing this problem. After punching myself a little, I thought that maybe it was a bit more obvious to everyone else except me. It can be like that sometimes. Oh well, it was a somewhat easy fix that ended up making my little potentiostat even more capable than I had originally imagined.

I could have made a complete custom potentiostat circuit like a few other examples I stumbled upon, but the integrated aspect of the LMP91000 was a bit too much to pass up. My design needed to be as small as possible since I would eventually like to integrate the device into a wearable. I was using a SAMD21 microcontroller with a built-in DAC, therefore remedying the problem was a bit more convenient than I originally thought since I didn’t need an additional chip in my design.

I am definitely pretty happy with the results. My potentiostat, called KickStat, is about the size of a US quarter dollar with a ton of empty space that could be easily trimmed on my next board revision. I imagine this could be used as a subsystem in any number of larger designs like a glucometer, cellphone, or maybe even a smartwatch.

Check out all the open-source files on my research lab’s GitHub page. I hope my experience will be of assistance to the hacker community. Definitely a fun build and I hope you all get as much kick out of it as I did.

An All-Iron Battery Isn’t Light, But It’s Cheap

Rechargeable batteries are a technology that has been with us for well over a century, and which is undergoing a huge quantity of research into improved energy density for both mobile and alternative energy projects. But the commonly used chemistries all come with their own hazards, be they chemical contamination, fire risk, or even cost due to finite resources. A HardwareX paper from a team at the University of Idaho attempts to address some of those concerns, with an open-source rechargeable battery featuring electrode chemistry involving iron on both of its sides. This has the promise of a much cheaper construction without the poisonous heavy metal of a lead-acid cell or the expense and fire hazard of a lithium one.

A diagram of the all-iron cell.

The chemistry of this cell is split into two by an ion-exchange membrane, iron (II) chloride is the electrolyte on the anode side where iron is oxidised to iron 2+ ions, and Iron (III) chloride on the cathode where iron is reduced to iron hydroxide. The result is a cell with a low potential of only abut 0.6V, but at a claimed material cost of only $0.10 per kWh Wh of stored energy. The cells will never compete on storage capacity or weight, but this cost makes them attractive for fixed installations.

It’s encouraging to see open-source projects coming through from HardwareX, we noted its launch back in 2016.

Thanks [Julien] for the tip.