The Clickspring Playing Card Press Is A Work Of Art

We have no idea what a playing card press is, nor do we care. All we know is that after watching [Chris] from Clickspring make his playing card press, we want it.

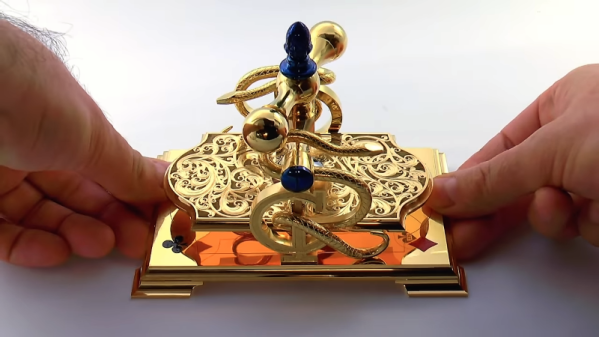
Digging a little deeper, [Chris] offered to make this card press for [Chris Ramsay], a magician who specializes in cardistry, or the art of illusions with cards. The feel of playing cards is crucial to performing with them, and a card press keeps a deck of cards in shape. Not a commonly available device, [Clickspring Chris] designed one in an elaborate style that brought in elements from [Chris Ramsay]’s logo.

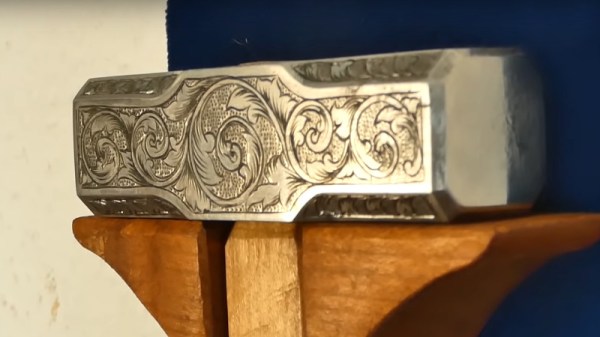
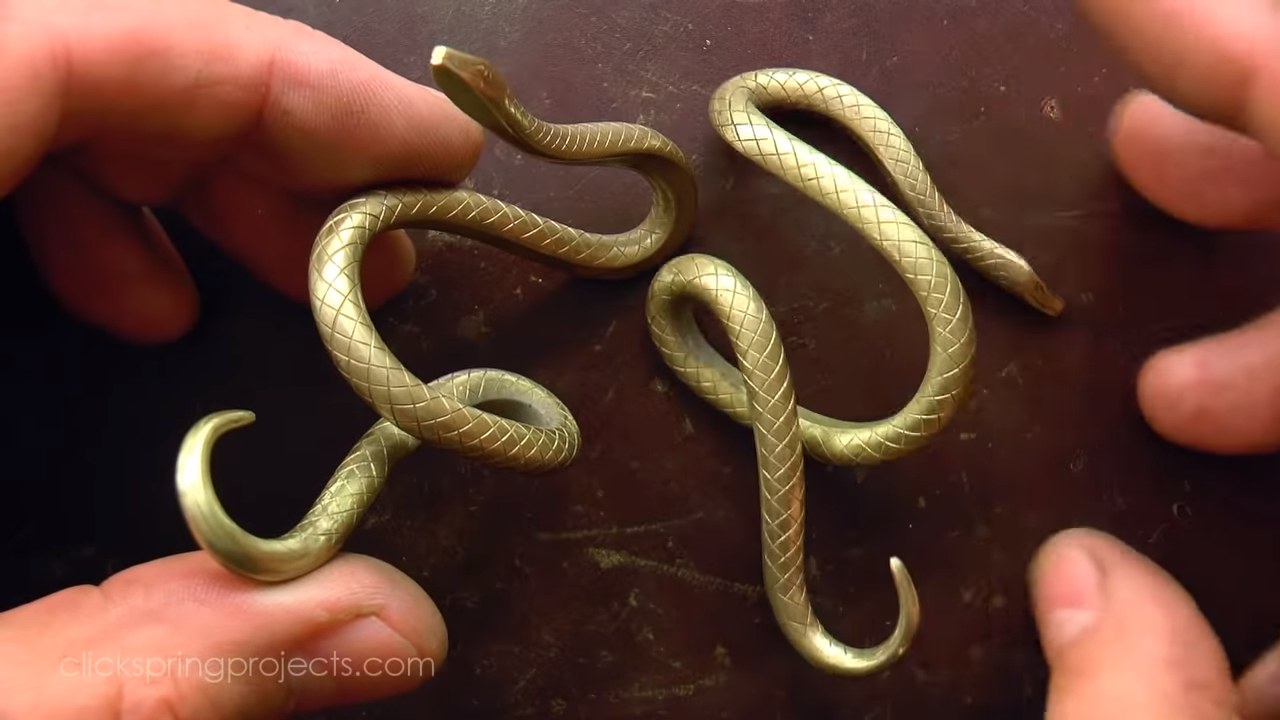
Like all Clickspring videos, this one is a joy to watch, but in a departure, there’s no narration — just 30 minutes of precision machining and metal finishing. [Chris] has gotten into metal engraving in a big way, and used his skills to add details to everything from the stylized acorn at the top to the intricate press plate, all of which was done freehand. And those snakes! Made from brass rod and bent into shape by hand, they wrap around the side supports to form [Chris Ramsay]’s logo. All the brass ended up gold plated, while all the screws ended up with a heat-blued finish. Settle in and enjoy the video below.

It’s been a while since the Clickspring skeleton clock was finished, in which time [Chris] has been working on a reproduction of the Antikythera mechanism. His video output slowed considerably, though, when he made a new finding about the mechanism, an observation worthy of writing up as a scholarly paper. We can’t begrudge him the time needed to pursue that, and we’re glad he found time for this project too.

Continue reading “The Clickspring Playing Card Press Is A Work Of Art”

Watch This LEGO Pantograph Carve Chocolate Messages

[Matthias Wandel] is best known for his deeply interesting woodworking projects, so you might be forgiven for not expecting this lovely chocolate-engraving pantograph made from LEGO. With it, he carves a delightful valentine’s message into a square of chocolate, but doesn’t stop there. He goes the extra mile to cut the chocolate carefully into a heart, and a quick hit with a heat gun takes the rough edges off for a crisp and polished end result.

The cutting end is a small blade stuck inside a LEGO piece, but that’s the only non-LEGO part in the whole assembly. A key to getting a good carve was to cool the chocolate before engraving, and you can see the whole process in the video embedded below.

Continue reading “Watch This LEGO Pantograph Carve Chocolate Messages”

Making A Hammer With Beautiful Engravings

Tools are a key part of any maker’s pursuit of their work. For most of us, our tools come from the local hardware store or are purchased online. Some prefer to craft their own, however, and [Uri Tuchman] is just one such person.

[Uri] starts at the absolute beginning, with a piece of unfinished rectangular stock. The workpiece is marked up, and the shape of the hammer head meticulously filed out by hand. The wooden handle is similarly prepared from raw stock with a combination of planes, chisels and files.

It may not be the fastest way to work, but careful hand craftsmanship is always impressive to watch. The build also showcases [Uri]’s talent at engraving, with the complex designs all carved out of the surface a millimeter at a time. [Uri] recommends enamel paint to highlight such works, for its rich color and the ease of removing excess paint.

Where [Uri] has built a beautiful piece of art that moonlights as a hammer, it’s possible to go in completely the opposite direction with a build. Video after the break.

[Thanks to BrightBlueJim for the tip!] Continue reading “Making A Hammer With Beautiful Engravings”

Simple Hand Tools Turn Brass And Steel Into An Amazing Astrolabe

There’s something enchanting about ancient tools and instruments. The idea that our forebears were able to fashion precision mechanisms with nothing but the simplest hand tools is fascinating. And watching someone recreate the feat, such as by building an astrolabe by hand, can be very appealing too.

The astrolabe is an ancient astronomical tool of incredible versatility, allowing the user to do everything from calculating when the sun will rise to predicting the positions of dozens of stars in the night sky. That it accomplishes all this with only a few moving parts makes it all the more fascinating. [Uri Tuchman] began the astrolabe build shown in the video below with only a few hand tools. He quickly had his fill of the manual fretsaw work, though, and whipped up a simple scroll saw powered by an old sewing machine foot treadle to speed up his work. The real treat though is the hand engraving, a skill that [Uri] has clearly mastered. We couldn’t help musing that a CNC router could do the same thing so much more quickly, but watching [Uri] do it was so much more satisfying. Everything about the build really makes a statement, from the contrasting brass and steel parts to the choice of complex Arabic script for the markings. [Uri] has another video that goes over astrolabe basics and his design process that’s well worth watching too.

While it’s nowhere near as complicated an instrument, this astrolabe puts us in the mood to watch the entire Clickspring clock build again. And [Chris] is working on his own ancient instrument build at the moment, recreating the Antikythera mechanism. We can’t wait to binge-watch that one too.

Continue reading “Simple Hand Tools Turn Brass And Steel Into An Amazing Astrolabe”

Video Shows Power Isn’t Everything In Laser Engraving

When it comes to power tools, generally speaking more watts is better. But as laser maestro [Martin Raynsford] shows, watts aren’t everything. He shares a brief video showing his older 100 W laser being handily outperformed by a newer 30 W machine. Shouldn’t the higher power laser be able to do the same job in less time? One might think so, but wattage isn’t everything. The 30 W laser engraves and cuts a wooden tile in just under half the time it takes the 100 W machine to do the same job, and with a nicer end result, to boot.

Why such a difference? Part of the answer to that question lies in that the newer machine has better motion control and can handle higher speeds, but the rest is due to the tubes themselves. The older 100 W machine uses a DC-excited (big glass water-cooled tube) CO2 laser, and the newer 30 W machine uses an RF-excited laser that looks a bit like a big metal heat sink instead of oversized lab glassware. Both tubes output what is essentially the same beam, but the RF tube is overall capable of a more refined, more stable, and more finely focused point than that of the glass tube. Since engraving uses only a small fraction of even the 30 W laser’s power, the finer control that the RF laser has over the low end of the power scale results in a much higher quality engraving.

Embedded below is a short video showing both machines engraving and cutting the same tile, side by side. You may wish to consider watching this one full screen, to better see the fine details.

Continue reading “Video Shows Power Isn’t Everything In Laser Engraving”

Walnut Windfall Winds Up In Custom Keyboard

When a neighbor decided to cut down a walnut tree, [voluhar] decided to make something of the wood. The result was this custom keyboard that combines wood and metal in a lovely and functional package.

Walnut is a wood with a rich heritage in consumer electronics. Back in the early days of TV, huge console sets were built into solid walnut cabinets and proudly displayed along with the other fine furnishings in a home. [voluhar]’s keyboard captures a little of that spirit while retaining all the functionality you’d expect. From the custom PCB to the engraved aluminum key caps, it looks like every part was machined with a CNC router. The keyboard sports satisfyingly clicky Cherry MX switches, and a few cleverly positioned LEDs provide subtle feedback on the state of the locking keys. As for the imperfections in the walnut case, we think it just adds to the charm and warmth of the finished product, which would look great on any desktop.

Wood has appeared in a couple of custom keyboards that we’ve featured before, like this all-wood version. But if you want the retro look without the wood, you could always try a keyboard built out of a typewriter.

Continue reading “Walnut Windfall Winds Up In Custom Keyboard”

Brass Clock Face Etched With PCB Techniques

Over the last few months, [Chris] has been machining a timepiece out of brass and documenting the entire process on his YouTube channel. This week, he completed the clock face. The clock he’s replicating comes from a time before CNC, and according to [Chris], the work of engraving roman numerals on a piece of brass would have been sent out to an engraver. Instead of doing things the traditional way, he’s etching brass with ferric chloride. It’s truly artisan work, and also provides a great tutorial for etching PCBs.

[Chris] is using a photoresist process for engraving his clock dial, and just like making PCBs, this task begins by thoroughly scrubbing and cleaning some brass with acetone. The photoresist is placed on the brass, a transparency sheet printed off, and the entire thing exposed to four blacklights. After that, the unexposed photoresist is dissolved with a sodium carbonate solution, and it’s time for etching.

The clock face was etched in ferric chloride far longer than any PCB would; [Chris] is filling these etchings with shellac wax for a nice contrast between the silvered brass and needs deep, well-defined voids.

You can check out the video below, but that would do [Chris]’ channel a disservice. When we first noticed his work, the comments were actually more positive than not. That’s high praise around here.

Continue reading “Brass Clock Face Etched With PCB Techniques”