Custom Aluminum Monitor Stand For The Home Office

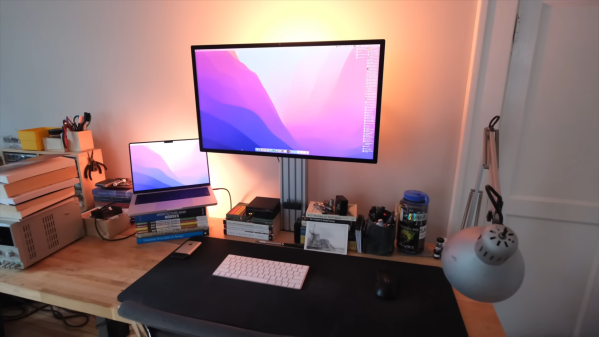
Monitor stands vary wildly in price, from a few cents for a pile of books from a thrift store to hundreds of dollars. One trendy style, as [Steven Bennett] puts it, is the “General Grievous,” with adjustable arms splayed around a central pole. While effective, it is not particularly aesthetically pleasing. [Steven] set out to make his monitor stand out of extruded aluminum.

[Steven] started with a cantilever design with a VESA adapter and a c-clamp. With some 3D-printed adapter brackets, he could attach them directly to the tracks in the aluminum. Of course, the 3D printed parts, while great for prototyping, might not be the best choice for the loads he was planning on. He sent it off to a fab to get some powder-coated steel parts. After using it for a few months, he revisited the drawing board. Moving away from the cantilever with an offset center post, he switched to a single 1×4 piece of aluminum. This allowed him to create 3D-printed attachments to hold his headphones, flash drives, and cables. A build guide is available online, as well as printable add-ons.

While it doesn’t have a built-in computer like this glorious wooden stand, we can’t deny the utility or the aesthetic of the aluminum version.

Video after the break.

Continue reading “Custom Aluminum Monitor Stand For The Home Office”

Cryptocurrency Mining Post-Bitcoin

While the age of using your own computer to mine Bitcoin during spare CPU cycles has long passed, average folks aren’t entirely shut out of the cryptocurrency game yet. Luckily, Bitcoin isn’t the only game in town anymore, and with GPUs coming down in price it’s possible to build a mining rig for other currencies like Etherium.

[Chris]’s build starts with some extruded aluminum and a handful of GPUs. He wanted to build something that didn’t take up too much space in the small apartment. Once the main computer was installed, each GPU was installed upwards in the rack, with each set having its own dedicated fan. After installing a fan controller and some plexiglass the rig was up and running, although [Chris] did have to finagle the software a little bit to get all of the GPUs to work properly.

While this build did use some tools that might only be available at a makerspace, like a mill and a 3D printer, the hardware is still within reason with someone with a little cash burning a hole in their pockets. And, if Etherium keeps going up in value like it has been since the summer, it might pay for itself eventually, providing that your electric utility doesn’t charge too much for power.

And if you missed it, we just ran a feature on Etherium.  Check it out.

CNC Router Built With 80/20 Rail

There’s still quite a bit of machining that goes into a CNC mill build of this size. But using 80/20 brand extruded rail optimizes most of the build process into tasks manageable by the average basement hacker. That’s not to say that we think [Jim] is average. He took this mill from start to finish in just two weeks.

He picked up the set of three ball screws on eBay for $180. Two of them drive the X axis with the third moving the cutter assembly along the Y axis. The X axis travels along a set of precision rails instead of precision rods. He machined his own mounting plates to which those are attached. For now he’s not running the motors at full speed because the vibration starts to make the table shake. He may end up bolting the base to the floor once all is said and done.

We see this extruded rail used all over the place. We could highlight some other mill builds or 3d printers, but instead we think you’ll enjoy an extruded rail robotic bass guitar.

Oh, one last thing. We’re not against a bit of pandering. Below you can see the mill cutting out the Hackaday logo:

Continue reading “CNC Router Built With 80/20 Rail”