Simple Tip Helps With Powder Coating Perfection On Difficult Parts

To say that that the commercially available garden path lights commonly available at dollar stores are cheap is a vast overstatement of their true worthlessness. These solar-powered lights are so cheaply built that there’s almost no point in buying them, a fact that led [Mark Presling] down a fabrication rabbit hole that ends with some great tips on powder coating parts with difficult geometries.

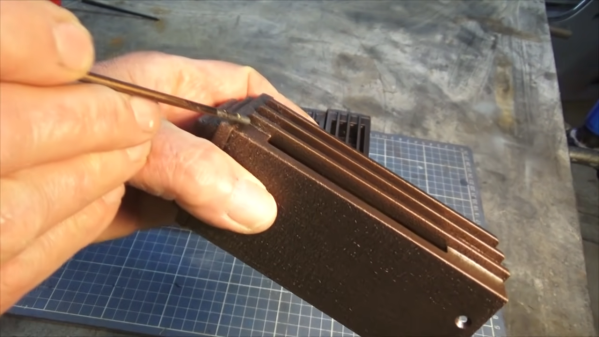
Powder coating might seem a bit overkill for something as mundane as garden lights, but [Mark] has a point — if you buy something and it fails after a few weeks in the sun, you might as well build it right yourself. And a proper finish is a big part of not only getting the right look, but to making these totally un-Tardis-like light fixtures last in the weather. The video series below covers the entire design and build process, which ended up having an aluminum grille with some deep grooves. Such features prove hard to reach with powder coating, where the tiny particles of the coating are attracted to the workpiece thanks to a high potential difference between them. After coating, the part is heated to melt the particles and form a tough, beautiful finish.

But for grooves and other high-aspect-ratio features, the particles tend to avoid collecting in the nooks and crannies, leading to an uneven finish. [Mark]’s solution was to turn to “hot flocking”, where the part is heated before applying uncharged coating to the deep features. This gets the corners and grooves well coated before the rest of the coating is applied in the standard way, leading to a much better finish.

We love [Presser]’s attention to detail on this build, as well as the excellent fabrication tips and tricks sprinkled throughout the series. You might want to check out some of his other builds, like this professional-looking spot welder.

Continue reading “Simple Tip Helps With Powder Coating Perfection On Difficult Parts”

Put The Perfect Point On Your Tungstens With This Die Grinder Attachment

Aspiring TIG welders very quickly learn the importance of good tungsten electrode grinding skills. All it takes is a moment’s distraction or a tiny tremor in the torch hand to plunge the electrode into the weld pool, causing it to ball up and stop performing its vital function. Add to that the fussy nature of the job — tungstens must only be ground parallel to the long axis, never perpendicular, and at a consistent angle — and electrode maintenance can become a significant barrier to the TIG beginner.

A custom tungsten grinder like this one might be just the thing to flatten that learning curve. It comes to us by way of [The Metalist], who turned an electric die grinder into a pencil sharpener for tungsten electrodes. What we find fascinating about this build is the fabrication methods used, as well as the simplicity of the toolkit needed to accomplish it. The housing of the attachment is built up from scraps of aluminum tubing and sheet stock, welded together and then shaped into a smooth, unibody form that almost looks like a casting. Highlights include the mechanism for adjusting the angle of the grind as well as the clever way to slit the body of the attachment so it can be clamped to the nosepiece of the die grinder. We also thought the inclusion of a filter to capture tungsten dust was a nice touch; most TIG electrodes contain a small amount of lanthanum or thorium, so their slight radioactivity is probably best not inhaled.

We love builds like this that make a tedious but necessary job a little quicker and easier to bear, and anything that stands to make us a better welder — from simple purpose-built fixtures to large-scale rotary tables — is OK in our book.

Continue reading “Put The Perfect Point On Your Tungstens With This Die Grinder Attachment”

Denim Sunglasses Frames Use A Wicked Set Of Jigs

An obligatory “Future’s so bright I gotta wear… denim” joke is the only way to kick off this article. Sorry!

Now that that’s out of the way, how would you turn your own blue jeans into sunglasses? Well you wouldn’t, unless you’ve built an intricate jig for assembling sunglasses frames like [Mosevic] has done. Boiled down, this is like making parts out of carbon fiber, except you swap in denim for the carbon fiber. Several layers of blue jean material are layered in a mold and impregnated with resin. Once hardened, parts can be milled or laser cut from this stock and then assembled into the frames all of the hipsters are after.

For us its the assembly jig that’s so interesting to see. [Mosevic] shared it in an unlisted video of an update to the Kickstarter campaign which ran at the end of 2019. The jig is used to align machined parts into stack ups that include brass reinforcement and pins to align layers, as well as the joining for the three parts of the frame via the metal hinges. Most of the jig is made from machined plywood. The plates that hold the three parts of the frame, the “frame front” and the two “temples” in eyeglass parlance, are interchangeable so that the same jig can be used to assemble several variants of the frame design. The most notable non-plywood part of the jig are two metal clamps that hold the hinge into the frame front as the glue dries, holding a couple of tiny chunks of denim/resin block in place.

Here you can see the jig with all clamps fully closed. There is not an insignificant amount of time just getting the parts into this jig. But parts still need quite a bit of cleanup after this process to sand, shape, and polish all edges and surfaces of the frames. And of course you have to figure in the time it took to make the parts that went into the jig in the first place. The finished frames are gorgeous, but we have a lot more respect having seen what it takes to pull it off.

Now if you like your glasses like George Washington liked his false teeth, here’s how you can pull a set of shades out of your woodshop.

Continue reading “Denim Sunglasses Frames Use A Wicked Set Of Jigs”

DIY Lambo That Made The Real Lamborghini Take Notice

When you start sharing your projects with the world, you never know who might take notice. [Sterling Backus] and his son [Xander] have been building a functional Lamborghini Aventador look alike in their garage, and the real Lamborghini company caught wind of it and decided to turn it into an awesome Christmas ad.

Named the AXAS Interceptor by its creators, the car is built from scratch around a custom tubular space frame chassis. Most of the body panels are 3D printed and then skinned with carbon fibre, with a few sheet metal panels mixed in. The interior is mix of parts from other cars and aftermarket components, with 3D printing to pull everything together. The drivetrain consists of an engine from a Corvette, a transaxle from a Porsche 996, with the rest of the chassis components being either aftermarket or custom-fabricated pieces.

[Sterling] got an unexpectedcall from Lamborghini, and they arranged to secretly sneak a real Aventador into the garage in the dead of night to surprise the rest of the family, and let them borrow it for a few weeks. Lamborghini got some marketing out of it, which most people would probably agree is a pretty good deal. We would admit that we’re quite envious.

The car is driveable, but still many hours from being complete. [Sterling] admits that he is no car building professional, but we’re impressed by what he has been able to achieve so far with this ambitious project, and we’re looking forward to the finished product.

If you want to get your feet wet with your first project car, here’s how you pick one.

Continue reading “DIY Lambo That Made The Real Lamborghini Take Notice”

A Self-Healing, Stretchable Electronic Skin

In a report published by Science Advances, a research team from the United States and Korea revealed a strain-sensitive, stretchable, and autonomous self-healing semiconductor film. In other words, they’ve created an electronic skin that’s capable of self-regulation. Time to cue the ending track from Ex Machina? Not quite.

Apart from the inevitable long timeline it will take to see the material in production, there are still challenges to improve sensing for active semiconductors. The methods used by the team – notably using a dynamically cross-linked blend of polymer semiconductor and self-healing elastomer – have created a film with a gauge factor of 5.75×10^5 at full strain. At room temperature, even with fracture strains, the material demonstrated self healing.

The technique mimics the self healing properties of human skin, accelerating the development of biomedical devices and soft robots. While active-matrix transistor array-based sensors can provide signals that reduce crosstalk between individual pixels in electronic skin, embedding these rigid sensors and transistors into stretchable systems causes mechanical mismatch between rigid and soft components. A strain-sensing transistor simplifies the process of fabrication, while also improving mechanical conformability and the lifetime of the electronic skin.

The synthetic skin was also shown to operate within a medically safe voltage and to be waterproof, which will prevent malfunctions when placed in contact with ionic human sweat.

[Thanks Qes for the tip!]

Jubilee: A Toolchanging Homage To 3D Printer Hackers Everywhere

I admit that I’m late to the 3D printing game. While I just picked up my first printer in 2018, the rest of us have been oozing out beautiful prints for over a decade. And in that time we’ve seen many people reimagine the hardware for mischief besides just printing plastic. That decade of hacks got me thinking: what if the killer-app of 3D printing isn’t the printing? What if it’s programmable motion? With that, I wondered: what if we had a machine that just offered us motion capabilities? What if extending those motion capabilities was a first class feature? What if we had a machine that was meant to be hacked?

One year later, I am thrilled to release an open-source multitool motion platform I call Jubilee. For a world that’s hungry for toolchanging 3D printers, Jubilee might be the best toolchanging 3D printer you can build yourself–with nothing more than a set of hand tools and some patience. But it doesn’t stop there. With a standardized tool pattern established by E3D and a kinematically coupled hot-swappable bed, Jubilee is rigged to be extended by anyone looking to harness its programmable motion capabilities for some ad hoc automation.

Jubilee is my homage to you, the 3D printer hacker; but it’s meant to serve the open-source community at large. Around the world, scientists, artists, and hackers alike use the precision of automated machines for their own personal exploration and expression. But the tools we use now are either expensive or cumbersome–often coupled with a hefty learning curve but no up-front promise that they’ll meet our needs. To that end, Jubilee is meant to shortcut the knowledge needed to get things moving, literally. Jubilee wants to be an API for motion.

Continue reading “Jubilee: A Toolchanging Homage To 3D Printer Hackers Everywhere”

A Simpler Method To Make Optical Fiber With 3D Printing

There are a lot of remarkable uses for optical fiber, chief among them being telecommunications and imaging. While fiber can be produced for a better price than copper wire equivalents, they’re still not easy or cheap to manufacture.

Silica fibers require spinning tubes on a lathe, which requires the fiber’s core to be precisely centered. A new method by researchers based at the University of Technology, Sydney offers a simpler method using additive manufacturing.

There are still challenges in producing silica fiber, however – unlike commonly drawn polymer materials, silica requires high temperatures, up to 1900 degrees Celsius, to 3D print. Past attempts at glass printing using fused deposition modeling with high-temperature nozzles to pump out molten silica have been slowed by the viscosity of molten glass.

In order to overcome the temperature problem, composite materials consisting of a polymer with a lower melting point and silica nanoparticles are used instead. In addition, the researchers opted to use a direct laser writing printer. The technique involves drawing the molten material and pulling out the optical fiber. After the polymer and impurities are debinded and removed, it’s only an issue of sintering the silica to fuse the forms back together.

The method has been used to fabricate a preform that can be used for multi- or single-node fibers. While the technique isn’t perfected quite yet, it holds promise for reduced fabrication and material costs, as well as eliminating labor risks from the lathe-based work.

[Thanks to Qes for the tip!]