Fail Of The Week: Flipped Cable Leads To Fried Radio

[Doug]’s newly-installed Yaesu FT-891 mobile transceiver failed to power up despite a careful installation, and it turns out to have ultimately been caused by a reversed cable. There’s a happy ending, however. Since the only real casualties were a blown resettable fuse and a badly-burned resistor that damaged the PCB, [Doug] was able to effect a repair. Things could have been worse, but they also could have been better. Damage could have been prevented entirely with some better design, which [Doug] explains during his analysis of what went wrong.

The destroyed SMT resistor and pads were easily replaced with a through-hole version, thanks to the schematics.

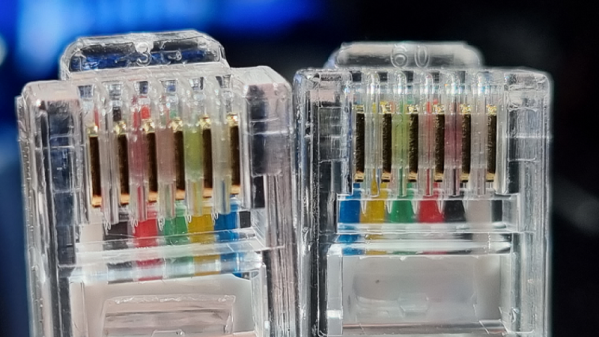
The main problem was that the generic RJ12 cable that [Doug] used to connect radio components had its connections reversed. This would not be a problem if it was used to connect a landline telephone to the wall, but it was a big problem when used to connect the radio components together. According to the radio schematics, the two center wires carry +13 V and GND, which meant that a reversed cable delivered power with reversed polarity; never an optimal outcome.

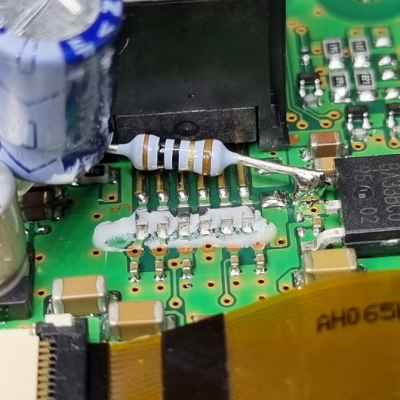
Once the reversed power arrived at the other end, [Doug] discovered something else. Diodes whose job would be to protect against reverse polarity were marked DO NOT INSTALL, probably to shave a few cents off the bill of materials. As a result, the full 13 V was soaked up by a 1/8 W surface mount resistor which smoldered and burned until a fuse eventually blew, but not before the resistor and pads were destroyed. Thankfully, things cleaned up well and after replacing the necessary parts and swapping for a correct cable, things powered up normally and the mobile radio was good to go.

Curious for a bit more details about mobile radio installations? Check out our own Dan Maloney’s rundown on installing a discontinued (but perfectly serviceable) Yaesu FT-8900R.

LED Brightness Adjustment Uses Itself As Sensor

This is a story about a successful system that nevertheless failed to make the cut. An experimental LED brightness adjustment is something [Mitxela] explored in a project for a high-precision clock; one that shows time down to the nearest millisecond, and won’t flicker or otherwise look weird when photographed with a high-speed camera. To pull this off means reinventing many things about a clock display, including how to handle brightness adjustment elegantly. Now, to be clear, the brightness adjustment idea described here is something that did not end up being used, but it’s interesting enough that [Mitxela] wrote it up and we’re very glad he did.

The idea was to have a smooth and seamless automatic brightness adjustment, ideally with no added components. Since LEDs can be used as light sensors, [Mitxela] saw an opportunity to use elements of the clock displays themselves as sensors. This is how it works: a charge in the p-n junction that makes up an LED will decay at a rate proportional to the amount of light hitting the junction. By measuring the speed of this decay, it’s therefore possible to tell how much light is hitting the LED. It’s effective and elegant, but there are a few practical issues to deal with.

The first failed idea was to employ as sensors the unused decimal points in the seven-segment LED modules, but that turned out to have issues. One was the common-cathode wiring of the display modules; this makes them very convenient to drive as displays, but made using the decimal point as a light sensor impractical. The other issue was that the built-in diffuser that makes the displays easier to read absorbs a lot of ambient light. A much better option was to use the LEDs in the colon separators between digits, since they’re independent. Naturally they still have to light up in addition to being used as sensors, but [Mitxela] made a successful prototype by performing the necessary measurements in between the LEDs being driven by PWM.

Despite how clever and efficient the solution was, in the end what sank it was the fact that the LEDs just don’t do a very good job of sensing ambient light for this purpose. The LEDs are simply too directional. Even after sanding away the top (lens) part of the LEDs, they still had a very narrow field of view. As [Mitxela] describes it, tilting the clock towards the ceiling could send it to full brightness, and the shadow of one’s head falling across the clock would plummet it into “night mode” dimness. In short, it responded to what was directly in front of it, rather than the ambient light level as a whole.

It’s a reminder that sometimes a solution simply won’t tick all the right boxes, and it can happen for unexpected reasons. Still, LEDs are versatile things. Not only can they sense light, but as the name implies they’re also diodes. As diodes can be used as temperature sensors that means LEDs can as well.

Fail Of The Week: Roboracer Meets Wall

There comes a moment when our project sees the light of day, publicly presented to people who are curious to see the results of all our hard work, only for it to fail in a spectacularly embarrassing way. This is the dreaded “Demo Curse” and it recently befell the SIT Acronis Autonomous team. Their Roborace car gained social media infamy as it was seen launching off the starting line and immediately into a wall. A team member explained what happened.

A few explanations had started circulating, but only in the vague terms of a “steering lock” without much technical detail until this emerged. Steering lock? You mean like The Club? Well, sort of. While there was no steering wheel immobilization steel bar on the car, a software equivalent did take hold within the car’s systems.  During initialization, while a human driver was at the controls, one of the modules sent out NaN (Not a Number) instead of a valid numeric value. This was never seen in testing, and it wreaked havoc at the worst possible time.

A module whose job was to ensure numbers stay within expected bounds said “not a number, not my problem!” That NaN value propagated through to the vehicle’s CAN data bus, which didn’t define the handling of NaN so it was arbitrarily translated into a very large number causing further problems. This cascade of events resulted in a steering control system locked to full right before the algorithm was given permission to start driving. It desperately tried to steer the car back on course, without effect, for the few short seconds until it met the wall.

While embarrassing and not the kind of publicity the Schaffhausen Institute of Technology or their sponsor Acronis was hoping for, the team dug through logs to understand what happened and taught their car to handle NaN properly. Driving a backup car, round two went very well and the team took second place. So they had a happy ending after all. Congratulations! We’re very happy this problem was found and fixed on a closed track and not on public roads.

[via Engadget]

Fail Of The Week: How Not To Watercool A PC

To those who choose to overclock their PCs, it’s often a “no expense spared” deal. Fancy heat sinks, complicated liquid cooling setups, and cool clear cases to show off all the expensive guts are all part of the charm. But not everyone’s pockets are deep enough for off-the-shelf parts, so experimentation with cheaper, alternatives, like using an automotive fuel pump to move the cooling liquid, seems like a good idea. In practice — not so much.

The first thing we thought of when we saw the title of [BoltzBrain]’s video was a long-ago warning from a mechanic to never run out of gas in a fuel-injected car. It turns out that the gasoline acts as a coolant and lubricant for the electric pump, and running the tank dry with the power still applied to the pump quickly burns it out. So while [BoltzBrain] expected to see corrosion on the brushes from his use of water as a working fluid, we expected to see seized bearings as the root cause failure. Looks like we were wrong: at about the 6:30 mark, you can see clear signs of corrosion on the copper wires connecting to the brushes. It almost looks like the Dremel tool cut the wire, but that green copper oxide is the giveaway. We suspect the bearings aren’t in great shape, either, but that’s probably secondary to the wires corroding.

Whatever the root cause, it’s an interesting tour inside a common part, and the level of engineering needed to build a brushed motor that runs bathed in a highly flammable fluid is pretty impressive. We liked the axial arrangement of the brushes and commutator especially. We wonder if fuel pumps could still serve as a PC cooler — perhaps changing to a dielectric fluid would do the trick.

Continue reading “Fail Of The Week: How Not To Watercool A PC”

Fail Of The Week: Bright Idea For LED Signs Goes Bad

Typically when we select a project for “Fail to the Week” honors, it’s because something went wrong with the technology of the project. But the tech of [Leo Fernekes]’ innovative LED sign system was never the problem; it was the realities of scaling up to production as well as the broken patent process that put a nail in this promising project’s coffin, which [Leo] sums up succinctly as “The Inventor’s Paradox” in the video below.

The idea [Leo] had a few years back was pretty smart. He noticed that there was no middle ground between cheap, pre-made LED signs and expensive programmable signboards, so he sought to fill the gap. The result was an ingenious “LED pin”, a tiny module with an RGB LED and a microcontroller along with a small number of support components. The big idea is that each pin would store its own part of a display-wide animation in flash memory. Each pin has two terminals that connect to metal cladding on either side of the board they attach to. These two conductors supply not only power but synchronization for all the pins with a low-frequency square wave. [Leo]’s method for programming the animations — using a light sensor on each pin to receive signals from a video projector — is perhaps even more ingenious than the pins themselves.

[Leo]’s idea seemed destined for greatness, but alas, the cruel realities of scaling up struck hard. Each prototype pin had a low part count, but to be manufactured economically, the entire BOM would have to be reduced to almost nothing. That means an ASIC, but the time and expense involved in tooling up for that were too much to bear. [Leo] has nothing good to say about the patent game, either, which his business partners in this venture insisted on playing. There’s plenty of detail in the video, but he sums it up with a pithy proclamation: “Patents suck.”

Watching this video, it’s hard not to feel sorry for [Leo] for all the time he spent getting the tech right only to have no feasible way to get a return on that investment. It’s a sobering tale for those of us who fancy ourselves to be inventors, and a cautionary tale about the perils of participating in a patent system that clearly operates for the benefit of the corporations rather than the solo inventor. It’s not impossible to win at this game, as our own [Bob Baddeley] shows us, but it is easy to fail.

Continue reading “Fail Of The Week: Bright Idea For LED Signs Goes Bad”

Fail Of The Week: How Not To Die Of Boredom During Isolation

They say you can’t actually die from boredom, but put a billion or so people into self-isolation, and someone is bound to say, “Hold my beer and watch this.” [Daniel Reardon]’s brush with failure, in the form of getting magnets stuck up his nose while trying to invent a facial touch reminder, probably wasn’t directly life-threatening, but it does underscore the need to be especially careful these days.

The story begins with good intentions and a small stack of neodymium magnets. [Daniel]’s idea for a sensor to warn one of impending face touches was solid: a necklace with magnetic sensors and wristbands studded with magnets. Sounds reasonable enough; one can easily see a compact system that sounds an alarm when a hand subconsciously crosses into the Danger Zone while going in for a scratch. Lacking any experience in circuits, though, [Daniel] was unable to get the thing working, so he started playing with the magnets instead. One thing led to another, and magnets were soon adorning his earlobes, and then his nostrils. Unfortunately, two magnets became locked on either side of his septum, as did two others meant to neutralize the pull of the first pair. So off [Daniel] went to the emergency department for a magnetectomy.

Of course it’s easy to laugh at someone’s misfortune, especially when self-inflicted. And the now-degaussed [Daniel] seems to be a good sport about the whole thing. But the important thing here is that we all do dumb things, and hackers need to be especially careful these days. We often work with sharp, pointy, sparky, toxic, or flammable things, and if we don’t keep our wits about us, we could easily end up in an ER somewhere. Not only does that risk unnecessary exposure to COVID-19, but it also takes medical resources away from people who need it more than you do.

By all means, we should be hacking away these idle hours. Even if it’s not in support of COVID-19 solutions, continuing to do what we do is key to our mental health and well-being. But we also need to be careful, to not stretch dangerously beyond our abilities, and to remember that the safety net that’s normally there to catch us is full of holes now.

Thanks to [gir.st] for the tip — you actually were the only one to send this in.

Fail Of The Week: In CAD, Remember To Model The Environment

What’s wrong with the above picture? Failure can be an excellent teacher, and [J. Peterson] reminds us all of this when he says to remember to model the environment when designing things in CAD. He contrasts a failure with a success to demonstrate what that means.

The failure was a stand for a screwdriver set, shown above. He modeled up a simple stand to hold a screwdriver handle and the bits in a nice, tight formation. He didn’t model any of parts, he just took some measurements and designed the holder. Everything fit just fine, but it had a major ergonomic problem: you can barely reach the handle because it is fenced in by the surrounding bits! Had he modeled all of the parts during the design phase, and not just the part he was making, this problem would have been immediately obvious during the design phase.

The contrasting success is an adapter he designed to mount an artistic glass marble to a lit display stand. The stand itself as well as the glass marble were modeled in CAD, then the adapter designed afterwards to fit them. With all of the involved objects modeled, he could be certain of how everything fit together and it worked the first time.

Now, to most people with a 3D printer of their own, discovering a part isn’t quite right is not a big (nor even a particularly expensive) problem to have, but that’s not the point. Waste and rework should be avoided if possible. To help do that, it can be good to remember to model the whole environment, not just the thing being made. Add it on to the pile of great design advice we’ve seen for designing things like enclosures and interfaces.