Fail Of The Week: Supercapacitor Spot Welder

[Julian] needed to weld a bit of nickel to some steel and decided to use a spot welding technique. Of course he didn’t have a spot welder sitting around. Since these are fairly simple machines so [Julian] set out to build a spot welder using a charged supercapacitor. The fundamentals all seem to be there — the supercap is a 100 Farad unit and with a charge of 2.6V, that works out to over 300 joules — yet it simply doesn’t work.

The problem is in how the discharge energy is being directed. Just using the capacitor would cause the charge to flow out as a spark when you got near the point to discharge. To combat this, [Julian] put a microswitch between the capacitor and the copper point he expected to use as the welding tip. The microswitch, of course, is probably not the best for carrying a large surge of current, so we suspect that may be part of why he didn’t get great results.

The other thing we noticed is that he used a single point and used the workpiece as a ground return. Most spot welders use two points near each other or on each side of the workpiece. The current from the capacitor is probably just absorbed by the relatively large piece of metal.

The second video below from [American Tech] shows a 500F capacitor doing spot welding with little more than two wires and it seems to work. Hackaday’s own [Sean Boyce] even made one out of some whopping 3000F caps. It did work, although he’s been pursuing improvements.

Continue reading “Fail Of The Week: Supercapacitor Spot Welder”

Fail Of The Week: EPROMs, Rats’ Nests, Tanning Lamps, And Cardboard On Fire

It all started when I bought a late-1990s synthesizer that needed a firmware upgrade. One could simply pull the ROM chip, ship it off to Yamaha for a free replacement, and swap in the new one — in 2003. Lacking a time machine, a sensible option is to buy a pre-programmed aftermarket EPROM on eBay for $10, and if you just want a single pre-flashed EPROM that’s probably the right way to go. But I wanted an adventure.

Spoiler alert: I did manage to flash a few EPROMs and the RM1X is happily running OS 1.13 and pumping out the jams. That’s not the adventure. The adventure is trying to erase UV-erasable EPROMS.

And that’s how I ended up with a small cardboard fire and a scorched tanning lamp, and why I bought a $5 LED, and why I left EPROMs out in the sun for four days. And why, in the end, I gave up and ordered a $15 EPROM eraser from China. Along the way, I learned a ton about old-school UV-erasable EPROMs, and now I have a stack of obsolete silicon that’s looking for a new project like a hammer looks for a nail — just as soon as that UV eraser arrives in the mail.

Continue reading “Fail Of The Week: EPROMs, Rats’ Nests, Tanning Lamps, And Cardboard On Fire”

How Not To Design A 3D Printed Belt Clamp

[Mark Rehorst] has been busy with his Ultra MegaMax Dominator (UMMD) design for a 3D printer, and one of the many things he learned in the process was how not to design a 3D printed belt clamp. In the past, we saw how the UMMD ditched the idea of a lead screw in favor of a belt-driven Z axis, but [Mark] discovered something was amiss when the belts were flopping around a little, as though they had lost tension. Re-tensioning them worked, but only for a few days. It turned out that the belt clamp design he had chosen led to an interesting failure.

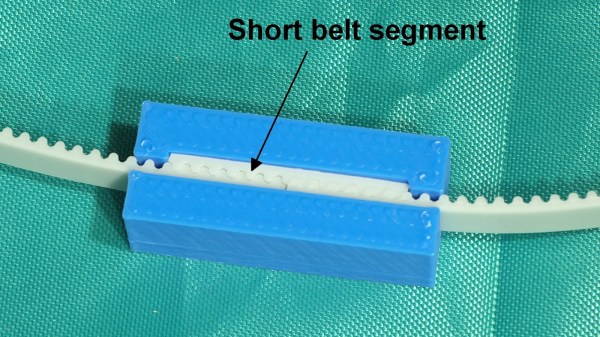
The belts used were common steel-core polyurethane GT2 belts, and the clamp design uses a short segment of the same belt to lock together both ends, as shown above. It’s a simple and effective design, but one that isn’t sustainable in the longer term.

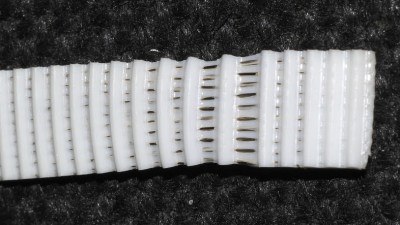
The problem was that this design led to the plastic portion of the belt stretching out and sliding over the internal steel wires. The stretching of the polyurethane is clear in the image shown here, but any belt would have had the same problem in the clamp as it was designed. [Mark] realized it was a much better idea to use a design in which the belts fold over themselves, so the strain is more evenly distributed.

[Mark] has been sharing his experiences and design process when it comes to building 3D printers, so if you’re interested be sure to check out the UMMD and its monstrous 695 mm of Z travel.

More Suspension Than Necessary

The triangular frame of a traditional mountain bike needs to be the most rigid structure, and a triangle can be a very sturdy shape. So [Colin Furze] throws a spanner in the works, or, in this case, a bunch of springs. The video is below the break, but please try to imagine you are at a party, eyeballing some delicious salsa, yet instead of a tortilla chip, someone hands you a slab of gelatin dessert. The bike is kind of like that.

Anyone who has purchased springs knows there are a lot of options and terminology, such as Newton meters of force, extension, compression, and buckling. There is a learning curve to springs so a simple statement, for example “I want to make a bicycle of springs,” doesn’t have any easy answers. It is a lot like saying, “I want to make a microprocessor out of transistors“. This project starts with springs roughly the diameter of the old bike tubes, and it is a colossal failure. Try using cooked spaghetti noodles to make a bridge.

The first set of custom springs are not up to the task, but the third round produces something rideable. The result seems to be a ridiculous way to exercise your abs and is approximately a training unicycle mated with a boat anchor.

What makes this a hack? The video is as entertaining as anything [Colin] has made, but that does not make it a hack by itself. The hack is that someone asked a ridiculous question, possibly within reach of alcohol, and the answer came by building the stupid thing. A spring-bicycle could have been simulated six ways from Sunday on an old Android phone, but the adventure extracted was worth the cost of doing it in real life.

Continue reading “More Suspension Than Necessary”

Fail Of The Week: Careful Case Mod Is All For Naught

Today’s entry comes to us from [Robert Tomsons], who was kind enough to document this crushing tale of woe so that we might all learn what true heartbreak is. If you’ve ever toiled away at getting that perfect surface finish with body filler, this one is going to hurt. In fact, you might just want to hit that “Back” button and head to safety now. There’s probably a pleasant story about some 3D printed thing being used with a Raspberry Pi of some sort that you can read instead.

For those of you brave enough to continue on, today we’ll be looking at what [Robert] thought would be a simple enough project. Seeing the board from a USB 3.0 external hard drive kicking around his parts bin, he had a rather unusual idea. Wanting to add an extra drive to his computer, but liking the idea of being able to independently control its power, he decided to integrate the external drive into machine’s front panel. This would not only allow him to power off the secondary drive when not in use, but it meant he could just plug his laptop into the front panel if he wanted to pull files off of it.

All [Robert] needed to do was make it look nice. He carefully squared off the edges of the external drive’s back panel to roughly the size of the computer’s 3.5 inch drive bay opening. He then glued the piece in place, and began the arduous task of using body filler to smooth everything out. It’s a dance that many a Hackaday reader will know all too well: filler, sand, primer, sand, filler, sand, primer, sand, so on and so on. In the end, the final result looked perfect; you’d never have thought the front panel wasn’t stock.

It should have been so easy. Just snap the case back together and be done with it. But when [Robert] finally got the machine buttoned back up and looked at the front, well, it’s safe to say his day couldn’t get much worse. Maybe the glue was not up to the task. Perhaps it was how excited he was to get the case put back together; a momentary loss of muscular coordination. A few extra foot-pounds of energy per second, per second. Who can say?

[Robert] says he’ll return to the project, but for now he needs a break. We agree. Interestingly, he mentions in his post that his body filler work was inspired by [Eric Strebel], a name that is well known around these parts. Considering how good it looked before it exploded, we’ll consider that high praise.

Ask Hackaday: Why Did Modular Smart Phones Fail?

Remember all the talk about modular smart phones? They sounded amazing! instead of upgrading your phone you would just upgrade the parts a bit like a computer but more simplistic. Well it seems modular phones are dead (video, embedded below) even after a lot of major phone manufacturers were jumping on the bandwagon. Even Google got on-board with Google Ara which was subsequently cancelled. LG released the G5 but it didn’t fare too well. The Moto Z from Motorola seemed to suffer from the same lack of interest. The buzz was there when the concept of these modular phones was announced, and people were genuinely exited about the possibilities. What went wrong?

For a start people expect their phones to have everything on board already, whether it be cameras, GPS, WiFi, high-capacity batteries or high-resolution screens. Consumers expect these things to come as standard. Why would they go out and buy a module when other phones on the market already have these things?

Sure you could get some weird and wonderful modules like extra loud speakers or perhaps a projector, but the demand for these items was small. And because these extras are already available as separate accessories not locked down to one device, it was a non starter from the beginning.

When we did our user studies. What we found is that most users don’t care about modularizing the core functions. They expect them all to be there, to always work and to be consistent. — Lead engineer Project Ara

The hackability of these phones would have been interesting to say the least, had they come to the mainstream. It just seems the public want thin sleek aluminum phones that they treat more as a status symbol than anything else. Modular phones have to be more bulky to accommodate the power/data rails and magnets for the modules, so they’ll lose out in pocketability. Still, we hope the idea is revisited in the future and not left on the scrap-heap of obsolescence.

Would you buy a modular smart phone? Even if it is bigger or more expensive? Is that really why they failed?
Continue reading “Ask Hackaday: Why Did Modular Smart Phones Fail?”

Half Baked IoT Stove Could Be Used As A Remote Controlled Arson Device

[Pen Test Partners] have found some really scary vulnerabilities in AGA range cookers. They are connected by SMS by which a mobile app sends an unauthenticated SMS to the AGA to give it commands for instance preheat the oven, You can also just tell your AGA to turn everything on at once.

The problem is with the web interface; it allows an attacker to check if a user’s cell phone is already registered, allowing for a slow but effective enumeration attack. Once the attacker finds a registered device, all they need to do is send an SMS, as messages are not authenticated by the cooker, neither is the SIM card set up to send the messages validated when registered.

This is quite disturbing, What if someone left a tea towel on the hob or some other flammable material before leaving for work, only to come back to a pile of ashes?  This is a six-gazillion BTU stove and oven, after all. It just seems the more connected we are in this digital age the more we end up vulnerable to attacks, companies seem too busy trying to push their products out the door to do simple security checks.

Before disclosing the vulnerability, [Pen Test Partners] tried to contact AGA through Twitter and ended up being blocked. They phoned around trying to get in contact with someone who even knew what IoT or security meant. This took some time but finally they managed to get through to someone from the technical support. Hopefully AGA will roll out some updates soon. The company’s reluctance to do something about this security issue does highlight how sometimes disclosure may not be enough.

[Via Pen Test Partners]