Sensor Filters For Coders

Anybody interested in building their own robot, sending spacecraft to the moon, or launching inter-continental ballistic missiles should have at least some basic filter options in their toolkit, otherwise the robot will likely wobble about erratically and the missile will miss it’s target.

What is a filter anyway? In practical terms, the filter should smooth out erratic sensor data with as little time lag, or ‘error lag’ as possible. In the case of the missile, it could travel nice and smoothly through the air, but miss it’s target because the positional data is getting processed ‘too late’. The simplest filter, that many of us will have already used, is to pause our code, take about 10 quick readings from our sensor and then calculate the mean by dividing by 10. Incredibly simple and effective as long as our machine or process is not time sensitive – perfect for a weather station temperature sensor, although wind direction is slightly more complicated. A wind vane is actually an example of a good sensor giving ‘noisy’ readings: not that the sensor itself is noisy, but that wind is inherently gusty and is constantly changing direction.

It’s a really good idea to try and model our data on some kind of computer running software that will print out graphs – I chose the Raspberry Pi and installed Jupyter Notebook running Python 3.

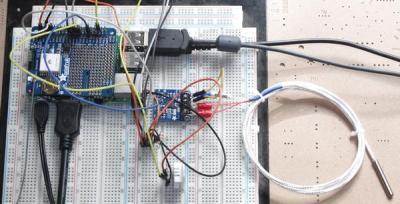
The photo on the left shows my test rig. There’s a PT100 probe with it’s MAX31865 break-out board, a Dallas DS18B20 and a DHT22. The shield on the Pi is a GPS shield which is currently not used. If you don’t want the hassle of setting up these probes there’s a Jupyter Notebook file that can also use the internal temp sensor in the Raspberry Pi. It’s incredibly quick and easy to get up and running.

It’s quite interesting to see the performance of the different sensors, but I quickly ended up completely mangling the data from the DS18B20 by artificially adding randomly generated noise and some very nasty data spikes to really punish the filters as much as possible. Getting the temperature data to change rapidly was effected by putting a small piece of frozen Bockwurst on top of the DS18B20 and then removing it again.

Continue reading “Sensor Filters For Coders”

I Love The Smell Of ABS Plastic In The Morning

One lesson we can learn from the Vietnam War documentary Apocalypse Now is that only crazy people like terrible smells just for fun. Surely Lt. Col. Kilgore would appreciate the smell of 3D printers as well, but for those among us who are a little less insane, we might want a way to eliminate the weird (and not particularly healthy) smell of melting ABS plastic.

While a simple solution would be a large fume hood or a filter to prevent inhaling the fumes, there are more elegant solutions to this problem. [Mark]’s latest project uses an electrostatic precipitator (ESP) to remove the volatile plastic particles from the air. Essentially it is a wire with a strong voltage applied to it enclosed in a vessel of some sort. The voltage charges particles, which then travel to a collecting electrode. Commercial offerings also include an X-ray generator to help clean the air, but [Mark] found this to be prohibitively expensive.

The ESP is built into a small tube through with the air can flow, and the entire device itself is housed in the printing enclosure. The pictures show the corona discharge in the device, and [Mark] plans to test it over the next few months to determine its effectiveness. He does note, however, that the electrostatic discharge creates ozone, which has its own set of problems, so he recommends against building one on your own. Ozone at least still smells like victory.

Fluorescence Microscope On A Hacker’s Budget

Some of biology’s most visually striking images come from fluorescence microscopes. Their brilliant colors on black look like a neon sign from an empty highway. A brand new fluorescence microscope is beyond a hacker’s budget and even beyond some labs’, but there are ways to upgrade an entry-level scope for the cost of a few cups of coffee. [Justin Atkin] of The Thought Emporium published a scope hacking video which can also be seen below. He is becoming a reputed scope modder.

This video assumes a couple of things for the $10 price tag. The first premise is that you already have a scope, a camera adapter, and a camera capable of shooting long exposures. The second premise is that you are willing to break the seals and open the scope to make some reversible mods. Since you are reading Hackaday, maybe that is a given.

The premise is simple compared to the build, which is not rocket surgery, the light source from below illuminates the subject like a raver, and the filter removes any light that isn’t spectacular before it gets to the camera.

Continue reading “Fluorescence Microscope On A Hacker’s Budget”

Musical Mod Lets MRI Scanner Soothe The Frazzled Patient

Hackers love to make music with things that aren’t normally considered musical instruments. We’ve all seen floppy drive orchestras, and the musical abilities of a Tesla coil can be ear-shatteringly impressive. Those are all just for fun, though. It would be nice if there were practical applications for making music from normally non-musical devices.

Thanks to a group of engineers at Case Western Reserve University in Cleveland, there is now: a magnetic resonance imaging machine that plays soothing music. And we don’t mean music piped into the MRI suite to distract patients from the notoriously noisy exam. The music is actually being played through the gradient coils of the MRI scanner. We covered the inner working of MRI scanners before and discussed why they’re so darn noisy. The noise basically amounts to Lorenz forces mechanically vibrating the gradient coils in the audio frequency range as the machine shapes the powerful magnetic field around the patient’s body. To turn these ear-hammering noises into music, the researchers converted an MP3 of [Yo Yo Ma] playing [Bach]’s “Cello Suite No. 1” into encoding data for the gradient coils. A low-pass filter keeps anything past 4 kHz from getting to the gradient coils, but that works fine for the cello. The video below shows the remarkable fidelity that the coils are capable of reproducing, but the most amazing fact is that the musical modification actually produces diagnostically useful scans.

Our tastes don’t generally run to classical music, but having suffered through more than one head-banging scan, a half-hour of cello music would be a more than welcome change. Here’s hoping the technique gets further refined.

Continue reading “Musical Mod Lets MRI Scanner Soothe The Frazzled Patient”

Daphne Oram And The Birth Of Electronic Music

For most of human history, musical instruments were strictly mechanical devices. The musician either plucked something, blew into or across something, or banged on something to produce the sounds the occasion called for. All musical instruments, the human voice included, worked by vibrating air more or less directly as a result of these mechanical manipulations.

But if one thing can be said of musicians at any point in history, it’s that they’ll use anything and everything to create just the right sound. The dawn of the electronic age presented opportunities galore for musicians by giving them new tools to create sounds that nobody had ever dreamed of before. No longer would musicians be constrained by the limitations of traditional instruments; sounds could now be synthesized, recorded, modified, filtered, and amplified to create something completely new.

Few composers took to the new opportunities offered by electronics like Daphne Oram. From earliest days, Daphne lived at the intersection of music and electronics, and her passion for pursuing “the sound” lead to one of the earliest and hackiest synthesizers, and a totally unique way of making music.

Continue reading “Daphne Oram And The Birth Of Electronic Music”

See Cells In A New Light With A DIY Fluorescence Microscope

Ever since a Dutch businessman peered into the microscopic world through his brass and glass contraption in the 1600s, microscopy has had a long, rich history of DIY innovation. This DIY fluorescence microscope is another step along that DIY path that might just open up a powerful imaging technique to amateur scientists and biohackers.

In fluorescence microscopy, cells are treated with various fluorescent dyes that can be excited with light at one wavelength and emit light at another. But as [Jonathan Bumstead] points out, fluorescence microscopes are generally priced out of the range of biohackers. His homebrew scope levels the playing field a bit. The trick is to use 3D-printed parts to kit out commonly available digital cameras – a USB microscope, a DSLR, or even a smartphone camera. Excitation is provided by a ring of Nexopixel LEDs, while a movable rack holds a filter that blocks the excitation wavelength but allows the emission wavelength to pass through to the camera. He demonstrates the technique by staining some threads with fluorescent ink from a highlighter marker and placing them on a sheet of tissue paper; in conventional bright-field mode, the threads all but disappear into the background, but jump right out under fluorescence.

Ith’s true that the optics are not exactly lab quality, and the microscope is currently only set up to do reflectance imaging as opposed to the more typical transmissive mode where the light passes through the sample. That’s an easy fix, though, and reflectance mode is still useful. We’ve seen fluorescence microscopy get quite complex before, but this simple scope might be enough to get a biohacker started.

Continue reading “See Cells In A New Light With A DIY Fluorescence Microscope”

Fail Of The Week: How Not To Design An RF Signal Generator

We usually reserve the honor of Fail of the Week for one of us – someone laboring at the bench who just couldn’t get it together, or perhaps someone who came perilously close to winning a Darwin Award. We generally don’t highlight commercial products in FotW, but in the case of this substandard RF signal generator, we’ll make an exception.

We suppose the fail-badge could be pinned on [electronupdate] for this one in a way; after all, he did shell out $200 for the RF Explorer signal generator, which touts coverage from 24 MHz to 6 GHz. But in true lemons-to-lemonade fashion, the video below he provides us with a thorough analysis of the unit’s performance and a teardown of the unit.

The first step is a look at the signal with a spectrum analyzer, which was not encouraging. Were the unit generating a pure sine wave as it should, we wouldn’t see the forest of spikes indicating harmonics across the band. The oscilloscope isn’t much better; the waveform is closer to a square wave than a sine. Under the hood, he found a PIC microcontroller and a MAX2870 frequency synthesizer, but a conspicuous absence of any RF filtering components, which explains how the output got so crusty. Granted, $200 is not a lot to spend compared to what a lab-grade signal generator with such a wide frequency range would cost. And sure, external filters could help. But for $200, it seems reasonable to expect at least some filtering.

We applaud [electronupdate] for taking one for the team here and providing some valuable tips on RF design dos and don’ts. We’re used to seeing him do teardowns of components, like this peek inside surface-mount inductors, but we like thoughtful reviews like this too.

Continue reading “Fail Of The Week: How Not To Design An RF Signal Generator”