Hackaday Prize Entry: Watching Out For Forest Fires

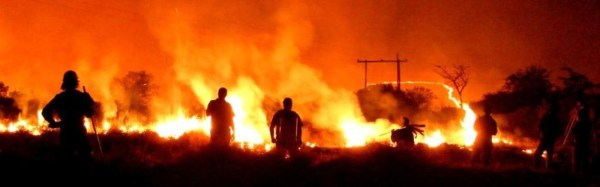
Hackaday Prize entrant [Danie Copnradie] lives in South Africa where wildfires are a major problem. Every year, humans and animals are killed, crops are destroyed, and property is lost. The FireBreakNet project aims to deploy wireless environmental sensors that alert farmers, park rangers, and emergency personnel when fires break out.

According to [Danie], firefighting services are underfunded in South Africa, with farmers and their employees having to do a lot of the work involved in firefighting with their own equipment. Having access to a network of early warning sensors would allow for faster response times, saving money and lives.

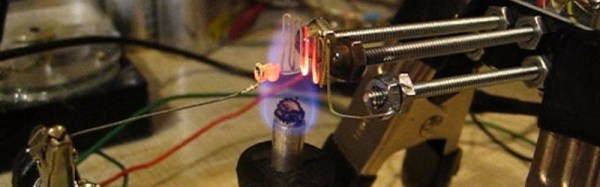
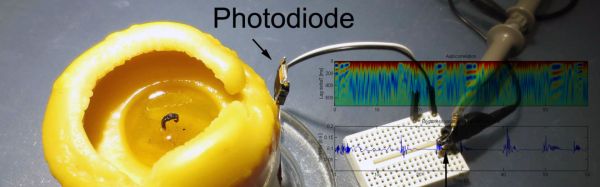
The goals of the project include a low price, easy deployment, low power consumption, physical ruggedness, and scalability. Currently, [Danie] is testing Adafruit Feather as well as Texas Instruments LaunchPad for the brains of each node, taking readings from CO2 and temperature sensors, optical air quality sensors as well as optical flame sensors.

Flame Triodes Don’t Need Any Vacuum

There is a rich history surrounding the improvisation of electronic components. From cats-whisker foxhole radio detectors using razor blades through radio amateurs trying antique quartz lenses as crystal resonators and 1950s experimenters making their own point-contact transistors, whenever desirable components have been unavailable the ingenuity of hackers and makers has always sought to provide.

In an age when any component you might wish for is only a web browser and a courier package away, you might think there would be no need for such experiments. But it is in our curious nature to push the boundaries of what can be made without a factory at our disposal, so there are still plenty of ingenious home-made components under construction.

One such experiment came our way recently. It’s a few years old, but it’s a good one. [Nyle Steiner, K7NS] made a working triode without any form of vacuum, instead its medium is a flame. He’s demonstrated it as a rectifier, amplifier, and oscillator, and while it might not be the best triode ever it’s certainly one of the simplest.

In a traditional vacuum triode the current flows as electrons released from a hot cathode and are able to cross the space because there are no gas molecules for them to collide with. The flame triode has an abundance of gas, but the gasses within it and its immediate surroundings are also strongly ionized, and thus electrically conductive. Flame ionization detectors have exploited this phenomenon in scientific instruments for a very long time.

A roaring flame might not be the most practical thing to keep in your electronic equipment, but [Nyle]’s experiment is nonetheless an impressive one. He’s posted a video showing it in action, which you can see below the break.

Continue reading “Flame Triodes Don’t Need Any Vacuum”

“Reverse engineering” a real candle

Reverse Engineering A Real Candle

[cpldcpu] just can’t leave the mysteries of candles alone. We’ve covered his explorations of candle flicker LEDs before, but this time he’s set his sensors on the real thing. [cpldcpu] hooked a photodiode to his oscilloscope, pointed it at a candle flame, and recorded the result.

The first interesting observation was the candle slowly changed brightness, whether it was interacted with or not. Next he measured the effect when the flame was disturbed by small gusts of air. This produced a bright flicker with an oscillation at 5Hz before returning to steady state, which as [stygiansonic] mentioned in a the Hacker News comment, is a known phenomenon used in flame detectors. Neat! There’s even an equation:

Under normal gravity conditions, the flames have a well defined oscillation frequency which is inversely proportional to the square root of the burner diameter, D, and to a good approximation can be written as f » 1.5/D½, with D given in meters.

[cpldcpu] then compiled his measurements into a series of graphs and ultimately an animated gif comparing the candle steady state, a real candle’s flicker, and the flicker he recorded from a candle flickr LED. It’s surprising how different the fake is from the real thing. You can look at his measurements and code at his github.

[via Hacker News]

Hackaday Links: Sunday, July 28th, 2013

hackaday-links-chain

[Chris Gammell] tipped us off that he’s building an online training program for learning electronics. The ten session course will cost money to take but you can get the goods for free if you’re one of the beta testers. We love to listen to The Amp Hour podcast which is just one of [Chris’] many endeavors.

Did you buy a Chromecast this week? We did, but we don’t have it in hand yet (ordered through Amazon). You can still get a look inside from the iFixit teardown.

Practice your Processing skills by using it to code a game of Pong.

A bit of lighter fluid and a hacked insert will get you a flaming wallet. We guess this is a different type of an anti-pickpocket device. [Thanks Stephen]

[Brain] used a $1.50 magnifying lens to help his Raspberry Pi camera module read QR codes better.

We really like [Aaron Christophel’s] LED matrix clock (translated). He started from a marquee that must be at least a decade old. He stripped it down and figured out how to drive it using a Sanguino as a controller.

Generating Electricity From Alcohol

thermoelectric-generator-lamp

Here’s a thermoelectric generator which [x2Jiggy] built. The concept uses heat from a flame, biased against cooler temperatures produced by that huge heat sink making up the top portion of the build to produce electricity via the Peltier effect.

The build is passively cooled, using a sync assembly that takes advantage of heat pipes to help increase the heat dissipation. A nearly flat heat sink makes up the mounting surface for the hot side, which faces down toward a flame driving the generator. [x2Jiggy] started the project by using a can, wick, and olive oil as the heat source. He managed to get about 2V out of the system with this method. What you see here is the second version. It swaps out the olive oil lamp for an alcohol stove. The cans with holes punched in them act as a wind screen while also providing a stable base. This rendition produces about 3V, but it doesn’t sound like there are any precise measurements of what it can do under load.

Scavenging From Consumer Electronics To Make A Flame-powered Phone Charger

[Gigafide] just finished building this flame-powered phone charger. The concept is not new. He grabbed a Peltier cooler and used the temperature differential between a flame and a heat sink to produce electricity used by the charger. If you search around here enough you’ll find plenty of candle-powered devices, and a few hacks that use a Peltier device in a bit more interesting way. But we really like his high-production value video, straightforward explanation of the concepts, and ability to source the components in consumer devices. We don’t think you’ll be disappointed by his video found after the break.

The Peltier device comes out of a USB drink chiller. It is supported by a metal stand made from electrical box covers and threaded rod. Underneath he’s using a gel fuel can used by the food industry, and above he’s got  CPU heat sink and fan. This setup puts out around 1.5V but he’ll need a boost converter to charge a phone with that. A single AA battery charger meant to power your phone in a pinch is perfect for this application.

Continue reading “Scavenging From Consumer Electronics To Make A Flame-powered Phone Charger”

Forget That Boring Old Fire Pit, Build A Flame Tree Instead!

maker_faire_bay_area_2011_fire_tree

Maker Faire is a great event to attend not only because you get to see all sorts of cool designs and machinations, but because you can participate as well. At Maker Faire Bay Area 2011, maker [Brett Levine] put together a fun and interactive display he likes to call the DIY Flame Tree.

The concept is pretty simple, and he says everyone who participated got a pretty good kick out of lending a hand. Each participant was given a piece of copper tubing and allowed to bend, twist, and sculpt it to their liking before using a drill to add holes wherever they pleased. They were then allowed to choose where their portion of the project would be mounted on the existing tree.

With everyone standing a safe distance away from the display, [Brett] pumped it full of propane and lit the various sections on fire. In the video below, you can see that the display was blown around a bit by the wind, but we imagine it would look pretty awesome on a still summer evening.

Even if you’re not into this sort of art, you have to admit that it certainly beats a boring old fire pit!

Continue reading “Forget That Boring Old Fire Pit, Build A Flame Tree Instead!”