USB Flash Drive Reveals Strange SD Card Heart

Many a hacker has dug an old flash drive out of the bottom of a backpack, and peeled apart the damaged plastic case to look inside. More often then not, you’d expect to see some SMD chips on a PCB along with a few passives, an LED and a USB port. [Gough] found something else entirely, and documented it for the interested public.

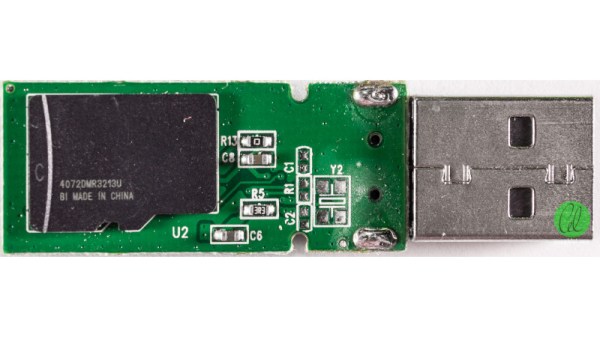
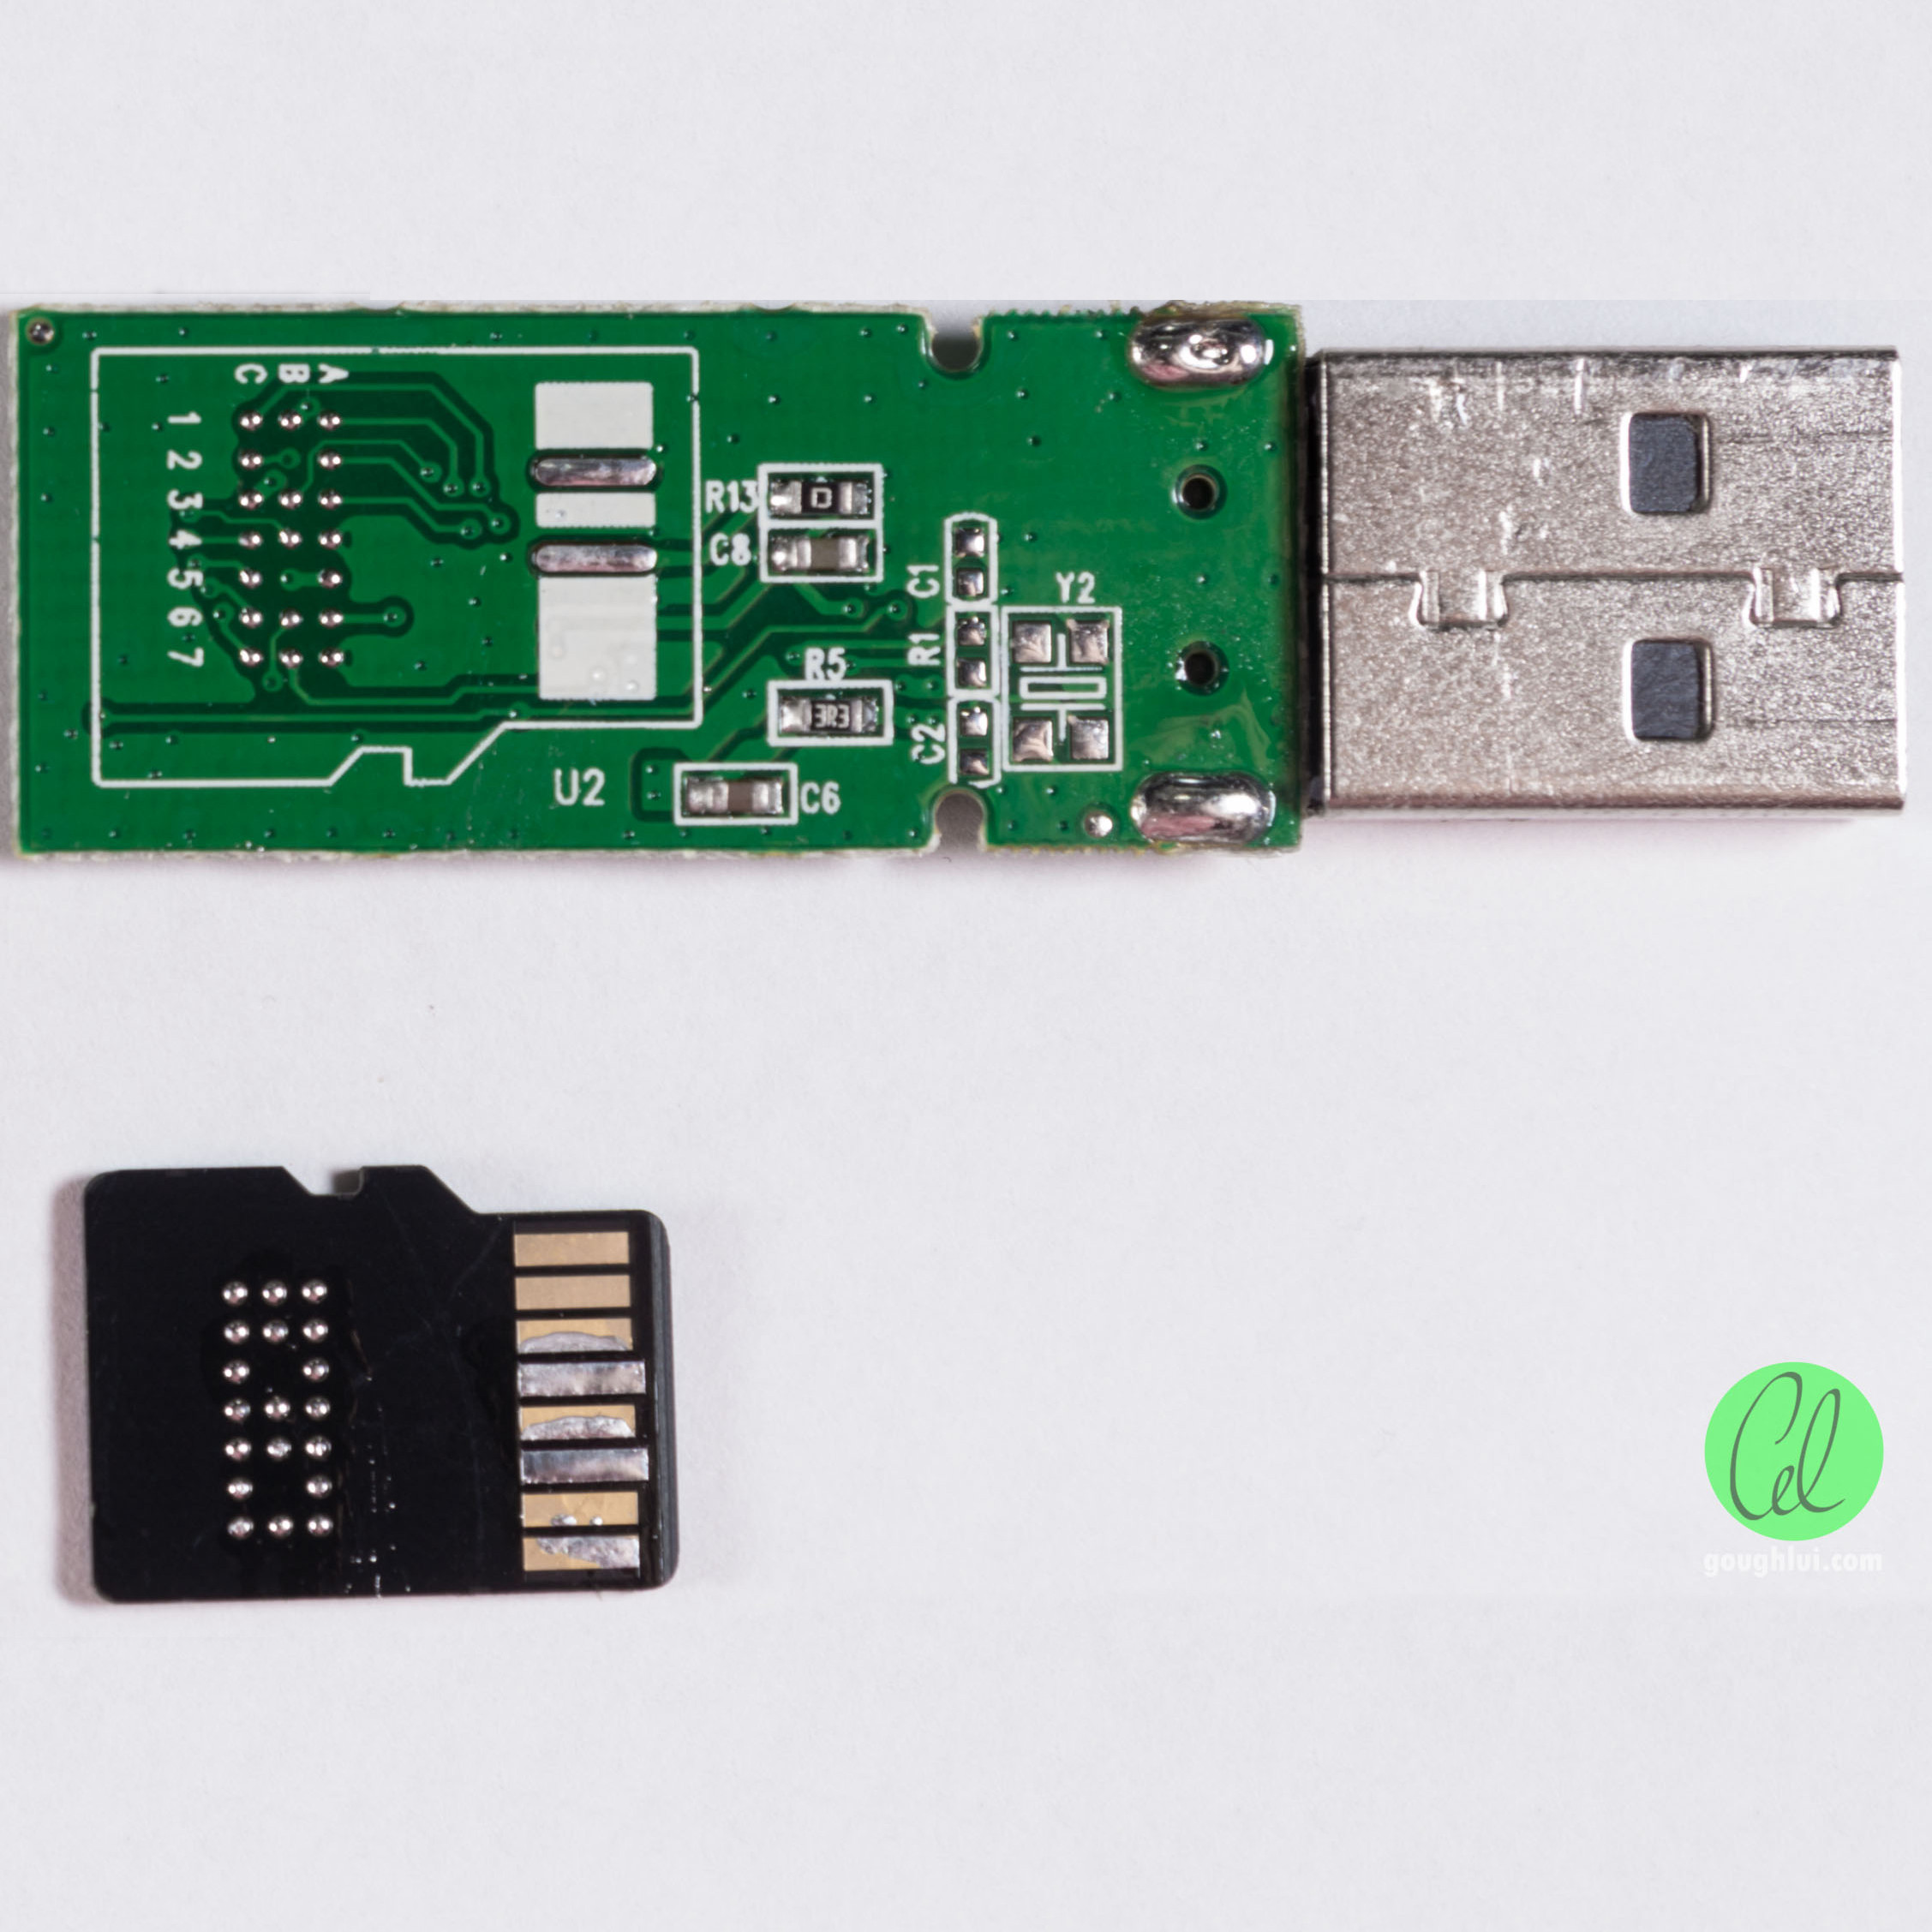
Inside the Comsol 8GB USB stick, [Gough] found an entire microSD card. One might be led to think this is a card reader and microSD masquerading as a normal flash drive, but the reality is far different. Instead, the drive contains a Flash memory controller which addresses the microSD card as raw NAND, through test points normally covered up on consumer-grade cards. The drive appears to be manufactured from factory second microSD cards that don’t pass the normal tests to be onsold to the public.

Armed with software obtained through spurious channels, [Gough] is able to dive deeper into the guts of the flash drive. The engineering tools allow the card to be optimised for capacity or speed, and different levels of error correction. It’s even possible to have the flash drive emulate a U3 CD ROM drive for OS installs and other purposes.

It’s a great dive into how USB drives work on a low level, and how the firmware and hardware work together. We’ve seen other flash drive hacks before too – like this simple recovery trick!

The Newbie’s Guide To JTAG

Do you even snarf?

If not, it might be because you haven’t mastered the basics of JTAG and learned how to dump, or snarf, the firmware of an embedded device. This JTAG primer will get you up to snuff on snarfing, and help you build your reverse engineering skills.

Whatever your motivation for diving into reverse engineering devices with microcontrollers, JTAG skills are a must, and [Sergio Prado]’s guide will get you going. He starts with a description and brief history of the Joint Test Action Group interface, from its humble beginnings as a PCB testing standard to the de facto standard for testing, debugging, and flashing firmware onto devices. He covers how to locate the JTAG pads – even when they’ve been purposely obfuscated – including the use of brute-force tools like the JTAGulator. Once you’ve got a connection, his tutorial helps you find the firmware in flash memory and snarf it up to a file for inspection, modification, or whatever else you have planned.

We always appreciate guides like these that cover the basics, since not everyone is in the same place in their hardware hacking journey. This puts us in the mood to crack something open and start looking for pins, if for no other reason than to get some practice.

[Thumbnail image source: LufSec]

Swapping The ROMs In Mini Arcade Cabinets

You’ve probably seen a few of these miniature arcade games online or in big box retailers: for $20 USD or so you get scaled-down version of a classic arcade cabinet, perfect for a desk toy or to throw up on a shelf as part of your gaming collection. Like any good Hackaday reader, you were probably curious about what makes them tick. Thanks to [wrongbaud], we don’t have to wonder anymore.

Over the course of several blog posts, [wrongbaud] walks readers through the hardware and software used in a few of these miniature games. For example, the Rampage cabinet is using a so-called “NES on a Chip” along with a SPI flash chip to hold the ROM, while Mortal Kombat is using a Genesis emulation solution and parallel flash. It wouldn’t be interesting if they didn’t throw you a few curves now and again, right?

But these are more than simple teardowns. Once [wrongbaud] gives an overview of the hardware, the next step is reading the respective flash storage and trying to make sense of the dumped data. These sort of games generally reuse the hardware among a number of titles, so by isolating where the game ROM is and replacing it, they can be made to play other games without hardware modification. Here, this capability is demonstrated by replacing the ROM data for Rampage with Yoshi’s Cookie. Naturally it’s one of those things that’s easier said than done, but it’s an interesting proof of concept.

The Mortal Kombat cabinet is a newer addition to the collection, so [wrongbaud] hasn’t progressed quite as far with that one. The parallel flash chip has been dumped with the help of an ESP32 and a MCP23017 I/O expander, and some Genesis ROM headers are identifiable in the data, but there’s still some sifting to be done before the firmware structure can be fully understood.

Even if you’re not in the market for a diminutive arcade experience, the information that [wrongbaud] has collected here is really phenomenal. From understanding protocols such as I2C and SPI to navigating firmware dumps with a hex editor, these posts are an invaluable resource for anyone looking to get started with reverse engineering.

Blend Your Last Frogs. Google Turns A Blind Eye To Flash.

Google has announced that it will no longer index Flash files.

Journey with me to a time in a faraway internet; a time before we had monetized social media. A time when the page you shared with your friends was your page and not a page on someone’s network. Way back when Visual Basic was what Python is now and JavaScript was a hack mostly used for cool effects. A hero arose. Macromedia Flash opened the gates to the interactive web, and for a chunk of time it consumed more than a decent portion of humanity’s attention and artistic output.

Computer art was growing, but was it public? How many grandmothers would see a demo?

New grounds were paved and anyone who wanted to become an animator or a web designer could manage it in a few tutorials. Only a few years before Flash took off, people had started talking about computers as a source for art in mostly theoretical terms. There were demoscenes, university studies, and professional communities, of course, but were they truly public? Suddenly Flash made computer art an everyday thing. How could computers not be used for art? In schools and offices all over the world people of varying technical skill would get links to games, animation, and clever sites sent by their friends and colleagues.

For 23 years Flash has had this incredible creative legacy. Yet it’s not perfect by any means. It’s a constant headache for our friendly neighborhood super-conglomerates. Apple hates how it drains the battery on their mobile devices, and that it’s a little village outside of their walled garden. Microsoft sees it as another endless security violation. They all saw it as a competitor product eating their proprietary code bases. Continue reading “Blend Your Last Frogs. Google Turns A Blind Eye To Flash.”

Vintage Camera Flash Turned OLED Desk Clock

After covering a few of his builds at this point, we think it’s abundantly clear that [Igor Afanasyev] has a keen eye for turning random pieces of antiquated hardware into something that’s equal parts functional and gorgeous. He retains the aspects of the original which give it that unmistakable vintage look, while very slickly integrating modern components and features. His work is getting awfully close to becoming some kind of new art form, but we’re certainly not complaining.

His latest creation takes an old-school “Monopak” electronic flash module and turns it into a desk clock that somehow also manages to look like a vintage television set. The OLED displays glowing behind the original flash diffuser create an awesome visual effect which really sells the whole look; as if the display is some hitherto undiscovered nixie variant.

On the technical side of things, there’s really not much to this particular build. Utilizing two extremely common SSD1306 OLED displays in a 3D printed holder along with an Arduino to drive them, the electronics are quite simple. There’s a rotary encoder on the side to set the time, though it would have been nice to see an RTC module added into the mix for better accuracy. Or perhaps even switch over to the ESP8266 so the clock could update itself from the Internet. But on this build we get the impression [Igor] was more interested in playing with the aesthetics of the final piece than fiddling with the internals, which is hard to argue with when it looks this cool.

Noticing the flash had a sort of classic TV set feel to it, [Igor] took the time to 3D print some detail pieces which really complete the look. The feet on the bottom not only hold the clock at a comfortable viewing angle, but perfectly echo the retro-futuristic look of 50s and 60s consumer electronics. He even went through the trouble of printing a little antenna to fit into the top hot shoe, complete with a metal ring salvaged from a key-chain.

Late last year we were impressed with the effort [Igor] put into creating a retro Raspberry Pi terminal from a legitimate piece of 1970’s laboratory equipment, and more recently his modern take on the lowly cassette player got plenty of debate going. We can’t wait to see what he comes up with next.

Continue reading “Vintage Camera Flash Turned OLED Desk Clock”

Give Your Raspberry Pi SD Card A Break: Log To RAM

The fragility of SD cards is the weak link in the Raspberry Pi ecosystem. Most of us seem to have at least one Pi tucked away somewhere, running a Magic Mirror, driving security cameras, or even taking care of a media library. But chances are, that Pi is writing lots and lots of log files. Logging is good — it helps when tracking down issues — but uncontrolled logging can lead to problems down the road with the Pi’s SD card.

[Erich Styger] has a neat way to avoid SD card logging issues on Raspberry Pi, he calls it a solution to reduce “thrashing” of the SD card. The problem is that flash memory segments wear out after a fairly low number of erase cycles, and the SD card’s wear-leveling algorithm will eventually cordon off enough of the card to cause file system issues. His “Log2Ram” is a simple Unix shell script that sets up a mount point for logging in RAM rather than on the SD card.

The idea is that any application or service sending log entries to /var/log will actually be writing them to virtual log files, which won’t rack up any activity on the SD card. Every hour, a cron job sweeps the virtual logs out to the SD card, greatly reducing its wear. There’s still a chance to lose logging data before it’s swept to disk, but if you have relatively stable system it’s a small price to pay for the long-term health of a Pi that’s out of sight and out of mind.

One thing we really like about [Erich]’s project is that it’s a great example of shell scripting and Linux admin concepts. If you need more information on such things, check out [Al Williams’] Linux-Fu series. It goes back quite a way, so settle in for some good binge reading.

ESP8266 Wi-Fi Instant Camera Is A Simple Shooter

If a camera that combines the immediate gratification of a Polaroid with cloud hosting sounds like something that tickles your fancy, look no farther than this ESP-powered point and shoot camera created by [Martin Fasani]. There’s no screen or complicated configuration on this camera; just press the button and the raw picture pops up on the online gallery. Somehow it’s simultaneously one of the most simplistic and complex implementations of the classic “instant camera” concept, and we love it.

The electronics in the camera itself, which [Martin] calls the FS2, is quite simple. At the core, it’s nothing more than the ESP board, an ArduCAM camera module, and a momentary button for the shutter. To make it portable he added a 2000 mAh Li-ion battery and an Adafruit Micro Micro USB charger. [Martin] added support for an optional 128×64 OLED display for user feedback. Everything is housed in a relatively spacious 3D printed enclosure, leaving some room for possible future hardware.

There are firmware versions for both the ESP8266 and ESP32, so fans of either generation of the popular microcontroller are invited to the party. Processing images is obviously a bit faster if you go with the more powerful 32-bit chip, but on the flip side the ESP8266 uses 3MB of SPI flash as a local buffer for the images during upload, which helps prevent lost images if there’s a problem pushing them to the cloud. The camera is intended to be as simple as possible so right now the only option other than taking still images is a time-lapse mode. [Martin] hopes to implement some additional filters and effects in the future. He’s also hoping others might lend a hand with his firmware. He’s specifically looking for assistance getting autofocus working and implementing more robust error correction for image uploads.

We’ve seen some impressive DIY camera builds using everything from a salvaged thermal sensor to film and molten aluminum. But the quaint simplicity of what [Martin] has put together here really puts his project in a whole new category.

Continue reading “ESP8266 Wi-Fi Instant Camera Is A Simple Shooter”