The Game Boy Camera, Or: How I Learned To Stop Worrying And Love The Pixels

Never underestimate the power of nostalgia. In an age when there are more megapixels stuffed in the sensor of a smartphone camera than the average computer display can even represent, why would jagged images from a 20-year-old grayscale camera with pixels numbering in the thousands still grab attention? Maybe what’s old is new again, and the coolness factor of novelty is something that can’t be quantified.

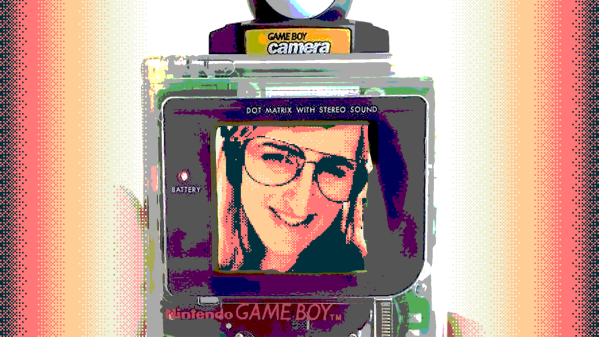
The surprise I had last Monday when I saw my Twitter notifications is maybe only second to the feeling I had when I was invited to become a Hackaday contributor. I’d made a very simple web app which mimics a Game Boy Camera using the camera from your phone or desktop, and it got picked up by people so much that I’m amazed my web host is still holding. Let’s look at why something seemingly so simple gained so much traction.

Continue reading “The Game Boy Camera, Or: How I Learned To Stop Worrying And Love The Pixels”

Game Boy Camera mounted to Canon Lens using EF Mount

A Canon Lens Adapter For The Game Boy Camera

Released in 1998, the Game Boy camera was a bit ahead of its time. This specialized Game Boy cartridge featured a 128×128 pixel CMOS sensor and took 4-color greyscale photos. The camera even rotated, allowing for selfies years before that word existed.

The fixed lens on this camera meant no zoom was possible. [Bastiaan] decided to address this shortcoming by building a Canon EF Lens Mount. The resulting build looks hilarious, but actually takes some interesting photos.

[Bastiaan] designed the mount using Rhino 3D, and printed it out on a Monoprice 3D printer. After some light disassembly, the mount can be screwed onto the Game Boy Camera. With the massive 70-200 f4 lens and 1.4x extender shown here, the camera gets a max focal distance of just over 3000 mm.

One issue with the Game Boy Camera was the limited options for doing anything with the photos. They could be transferred to other Game Boy Camera cartridges, or printed using the Game Boy Printer. Fortunately, [Brian Khuu] has a modern day solution that emulates the Game Boy Printer using an Arduino. This lets you get PNG files out of the device.

Morse Code Transceiver Based On Gameboy Color Camera

Morse Code IR Transceivers

For their final project in a microcontrollers course, [Trudy] and [Josh] designed a pair of morse code transceivers. To send the message, they used an array of IR LEDs. The message is received using a Gameboy Color Camera, which takes care of basic image processing. This allows a 8-bit ATMega1284p microcontroller to handle transmitting and receiving messages.

The transmission LEDs form a square pattern with one LED in the center. The four outside LEDs are used to help the receiver locate the center LED, and the center LED is used for transmitting the message.

The Gameboy Color Camera is based on a M64282FP image sensor. This sensor uses an SPI-like protocol, which they implemented on the ATMega. It allows them to grab frames from the camera, and get the value of specific pixels. From this data they find the center LED and process the message.

The result can transmit messages of 200 letters at a time, but the speed is limited by the frame rate of the camera. If you have a Gameboy Color Camera lying around, their detailed write up might provide some inspiration and information on how to use it in a hack.