Crystal structure of Cr2Te3 thin films. (Credit: Hang Chi et al. 2023)

Chromium(III) Telluride As Ferromagnetic Material With Tunable Anomalous Hall Effect

Chromium(III) Telluride (Cr2Te3) is an interesting material for (ferro)magnetic applications, with Yao Wen and colleagues reporting in a 2020 Nano Letters paper that they confirmed it to show spontaneous magnetization at a thickness of less than fifty nanometers, at room temperature. Such a 2D ferromagnet could be very useful for spintronics and other applications. The confirmation of magnetization is performed using a variety of methods, including measuring the Hall Effect (HE) and the Anomalous Hall Effect (AHE), the latter of which is directly dependent on the magnetization of the material, rather than an externally applied field.

More recently, in a June 2023 article by Hang Chi and colleagues in Nature Communications, it is described how such epitaxially obtained Cr2Te3 films show a distinct change in the AHE (in the form of sign reversal) depending on the strain induced by the interface with the various types of substrates (Al2O3, SrTiO3) and the temperature, likely owing to the different thermal expansion rates of the film and substrate. Underlying this change in the observed AHE is the Berry phase and the related curvature. This is a phenomenon that was also noted by Quentin Guillet and colleagues in their 2023 article in Physical  Review Materials, effectively independently confirming the AHE

Using Cr2Te3 in combination with the appropriate substrate might ultimately lead to spintronics-based memory and other devices, even if such applications will still take considerable R&D.

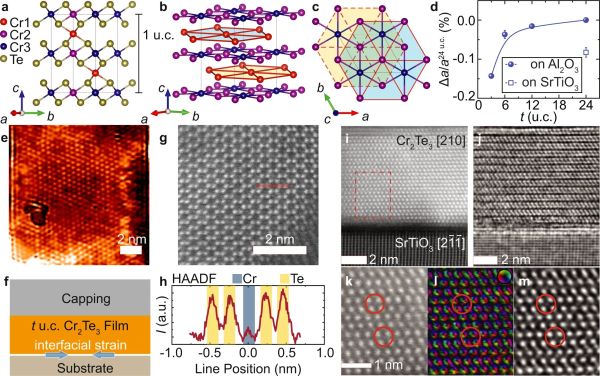
Top image: Crystal structure of Cr2Te3 thin films. (Credit: Hang Chi et al. 2023)

Bigfoot Turns Classic Sewing Machine Into A Leather-Eating Monster

If you try to sew leather on a standard consumer-grade machine, more often than not you’ll quickly learn its limits. Most machines are built for speed, and trying to get them to punch through heavy material at the low motor speeds often needed for leather work is a lesson in frustration.

How frustrating? Enough so that [Joseph Eoff] expended considerable effort to create this sewing machine speed controller for his nearly century-old Adler sewing machine. The machine was once powered by a foot treadle, which is probably why the project is dubbed “Bigfoot,” but now uses a 230 V universal motor. Such motors don’t deliver much torque when run at low speeds with the standard foot-pedal rheostat control, so [Joseph] worked up an Arduino-based controller with a tachometer for feedback and a high-power PWM driver for the motor.

There are a ton of details in [Joseph]’s post and even more in the original blog article, which is well worth a read, but a couple really stand out. The first is with the tachometer, which uses an off-the-shelf photointerrupter and slotted disc. [Joseph] was displeased with the sensor’s asymmetrical and unreliable output, so he made some modifications to the onboard comparator to square up the signal. Also interesting is the PID loop auto-tuning function he programmed into Bigfoot; press a button and the controller automatically ramps the motor speed up and down and stores the coefficients in memory. Nice!

The short video below shows Bigfoot in action with varying thicknesses of faux leather; there are also some clips in the original article that show the machine dealing with a triple thickness of leather at slow speed and not even breaking a sweat. Hats off to [Joseph] on a solid build that keeps a classic machine in the game. And if you want to get into the textile arts but don’t know where to start, we’ve got you covered.

Continue reading “Bigfoot Turns Classic Sewing Machine Into A Leather-Eating Monster”

TMD-3: Clever Hall Sensor Hack Leads To Better Turing Demo

We’ll beat everyone to the punch: yes, actually building a working Turing machine, especially one that uses a Raspberry Pi, is probably something that would have pushed [Alan Turing]’s buttons, and not in a good way. The Turing machine is, above all else, a thought experiment, an abstraction of how a mechanical computing machine could work. Building a working one seems to be missing the point.

Thankfully, [Michael Gardi] has ignored that message three times now, and with good reason: some people just grok abstract concepts better when they can lay their hands on something and manipulate it. His TMD-1 was based on 3D printed tiles with embedded magnets — arranging the tiles on a matrix containing Hall effect sensors programmed the finite state machine, with the “tape” concept represented by a strip of eight servo-controlled flip cards. While TMD-1 worked fine, it had some limitations, which [Mike] quickly remedied with TMD-2, a decidedly more complicated affair that used a Raspberry Pi, a camera, and OpenCV to read an expanded state machine with six symbols and six states, without breaking the budget on all the Hall sensors required.

TMD-3 refines the previous design, eschewing the machine vision approach and returning to the Hall effect roots of the original. But instead of using three sensors per tile, [Mike] determined that one sensor would suffice as long as he could mount the magnet at different depths within each tile. That way, the magnetic field for each symbol could be discerned by a single Hall sensor, greatly reducing complexity and expense. An LCD screen and a Raspberry Pi run a console app that shows the tape status, the state machine, and the state transitions.

[Mike] put a ton of work into this one — there are nineteen project logs — and he includes a lot of useful tips and tricks, like designing PCBs directly in KiCAD before even having a schematic. Of course, with a track record like his, we’d expect nothing less.

Continue reading “TMD-3: Clever Hall Sensor Hack Leads To Better Turing Demo”

Hall Sensors Offer Drop-In Replacement For Drifting Game Console Joysticks

No bananas were harmed in the making of this Hall effect drift-proof joystick replacement. OK, not really — two bananas were turned to mush. But it’s OK, they’re just bananas, after all.

Why bananas, you ask? Because [Marius Heier] uses them to demonstrate what we all intuitively know — that rubbing something over and over again tends to wear it away — but engineers seem to have forgotten. Wear such as this, with resistance material rather than fruits, is what causes the dreaded drift, a problem that the world collectively spends $20 billion a year dealing with, according to [Marius].

While numbers like that seem to be firmly in class-action lawsuit territory, sometimes it’s best to take matters into your own hands and not wait for the courts. The fix [Marius] shows here is to yank the potentiometers off a PS4 joystick and replace them with contactless Hall effect sensors. The end of the shaft for each axis gets a diametral neodymium magnet attached to it, while a 3D printed bracket holds a tiny custom PCB in close proximity. The PCB has an AS5600 Hall sensor, which translates the shaft angle to an analog voltage output. After programming the chip over its I2C bus, the sensor outputs a voltage proportional to the angle of each shaft, just like the original pots, but without all the wear and tear.

While [Marius] is selling these as drop-in replacements for PS4 controllers, he plans to release all the design files so you can build one yourself. He also has his sights set on replacements for PS5 and Xbox controllers, so watch for those. This isn’t his first foray into joystick hacking, having shared his 3D Hall effect and haptic feedback joysticks with us previously.

Continue reading “Hall Sensors Offer Drop-In Replacement For Drifting Game Console Joysticks”

Exploring The Hall Effect For Haptic Feedback PS4 Joysticks

Modern gaming console controllers aren’t without their annoyances — Joy-Con drift, anyone? The problems might stem from design deficiencies, but we suspect that user enthusiasm and the mechanical stress it can introduce might play a significant role as well. Either way, [Marius Heier] decided to take a look at what would be required to build a better joystick and came up with some interesting results.

The first video below lays the basic groundwork, with a bunch of experiments with 3-axis Hall effect sensors, specifically the Texas Instruments TMAG5273 and TMAG5170. They’re essentially the same sensor with different interfaces — SPI for the 5170 and I2C for the 5273. Using just one of these sensors, he was able to build a joystick with the usual X- and Y- axis control, but also with a rotary axis. What’s more, he built a motorized version using two NEMA 17 steppers to mechanically drive the stick back to center.

The joystick is bulky, but it looks like he’s got plans for a much smaller one with [Carl Bugeja]-style PCB motors that should fit into a PS4 controller. That’s the subject of the second video below, which uses a different Hall sensor — an Allegro A1304 — and is mainly concerned with getting the output of a non-motorized but considerably miniaturized joystick stick talking the language that the controller expects. It’s not a simple process, but it seems to be coming along nicely, and we’ll be watching progress closely.

Continue reading “Exploring The Hall Effect For Haptic Feedback PS4 Joysticks”

Clever Mechanism Makes A Linear Control From A Rotary Hall Sensor

Every once in a while we stumble across something so simple yet so clever that we just have to call it out. This custom linear Hall effect sensor is a perfect example of this.

By way of backstory, [Nixieguy], aka [The Electronic Mercenary], offers up a relatable tale — in the market for suitable hardware to make the game Star Citizen more enjoyable, and finding the current commercial joystick offerings somewhat wanting, he decided to roll his own controllers. This resulted in the need for a linear sensor 100 mm in length, the specs for which — absolute sensing, no brushes or encoders, easily sourced parts — precluded most of the available commercial options, like linear pots. What to do?

The solution [Nixieguy] settled on was to use a Hall effect sensor and a diametrally magnetized neodymium ring magnet. The magnet is rotated through 180 degrees by a twisted aluminum bar, which is supported in a frame by bearings. A low-friction slider with a slot captures the bar; moving the slider along the length of the control rotates the bar, which rotates the magnet, which allows the Hall sensor to measure the angle of the magnetic field. Genius!

The parts for the prototype sensor are all made from 0.8-mm aluminum sheet stock and bent to shape. The video below shows the action better than words can describe it, and judging by the oscilloscope trace, the output of the sensor is pretty smooth. There’s clearly a long way to go to tighten things up, but the basic mechanism looks like a clear win to us.

Hats off to [Nixieguy] for this one, which we’ll surely be following for more developments. In the meantime, if you need to brush up on the Hall effect, [Al Williams] did a nice piece on that a while back.

Continue reading “Clever Mechanism Makes A Linear Control From A Rotary Hall Sensor”

The Seven-Segment Display That’s Also An Input Device

We’re used to seeing all manner of seven-segment displays, be they mechanical, electronic, or something in between. But what all these displays have in common is that they’re, you know, displays. Using them as inputs would just be crazy talk, right?

Perhaps, but we like where [Dave Ehnebuske] is going with “InSlide,” the seven-segment input device. The idea for this comes from the “DigiTag” display, which we covered back in October, and divides a standard seven-segment character into three vertical strips — two skinny ones for the outside vertical segments, and one wide strip holding the horizontal elements. By sliding these strips up and down relative to each other, the standard nine digits, plus a few other characters, can be composed.

[Dave]’s take on this theme started by building his display from laser-cut plywood pieces, which is a nice choice because of the good contrast between the white wood and the engraver segments. Next, he embedded rare earth magnets in the slides and installed seven Hall effect sensors in the frame. The sensors are connected to an Arduino Nano via a 74HC165 parallel-load shift register, which lets multiple modules be daisy-chained together. He also built an Arduino library to read the current state of the segments; it supports the full hexadecimal character set, or even duodecimal if you like.

[Dave] has shared the library, and it looks like you can get the build files for the mechanism from the original project. That’s good, because this looks ripe for hacking. It looks like it would be pretty easy to motorize a display like this by adding rack-and-pinion gearing and steppers — something like that could make an interesting clock.