The bottom half of a MacBook Air on a purple and pink background has severed wires drawn out of its back to indicate its lack of a screen.

Are Slabtops The Future Of Computing?

The most popular computer ever was the Commodore 64 with its computer-in-a-keyboard form factor. If you have a longing for a keyboard computer with more modern internals, one of the easiest solutions today is to pull the screen off a laptop.

[Umar Shakir] wanted to see what the fuss was about regarding a recent Apple patent and took the top lid off of his M1 Macbook Air and turned it into a “slabtop.” The computer works great wired to a monitor but can also be used wirelessly via AirPlay. The approach doesn’t come without its downsides, of course. Newer MacBooks can’t access recovery mode without the built-in screen, and some older models had their WiFi antennas in the top lid, so making one into a slabtop will leave you desk-bound.

While [Shakir] focuses on MacBooks, this approach should work with any laptop. Apparently, it’s a cottage industry in China already. Back in the day, my own daily driver was a Pentium-powered laptop with its broken LCD (and lid) removed. It worked great with whatever CRT was nearby.

If you’re looking for an off-the-shelf keyboard computer of your own, you might want to check out the Raspberry Pi 400.

FreeBSD Experiment Rethinks The OS Install

While the medium may have evolved from floppy disks to DVDs and USB flash drives, the overall process of installing an operating system onto a desktop computer has been more or less the same since the 1980s. In a broad sense you could say most OS installers require more clicking than typing these days, but on the whole, not a lot has really changed. Of course, that doesn’t mean there isn’t room for improvement.

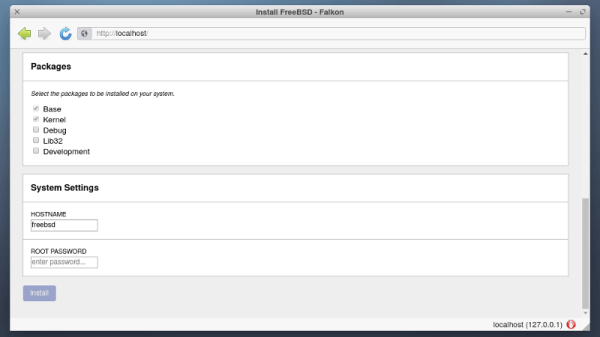
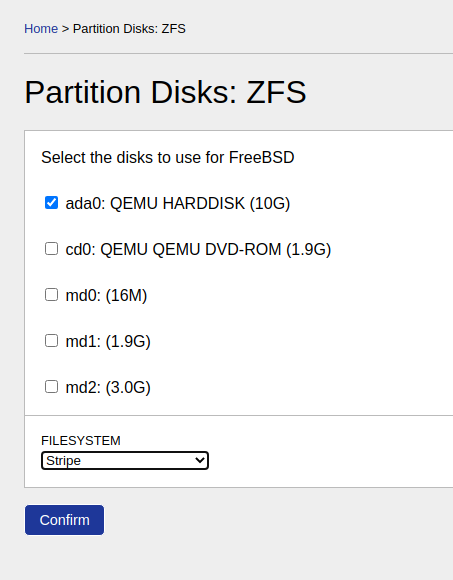
Among the long list of projects detailed in FreeBSD’s April to June 2021 Status Report is a brief update on an experimental installer developed by [Yang Zhong]. In an effort to make the installation of FreeBSD a bit more user friendly, the new installer does away with the classic terminal interface and fully embraces the modern web-centric design paradigm. Once the user has booted into the live OS, they simply need to point the browser to the loopback address at any time to access the installer’s GUI.

Now that alone wouldn’t be particularly groundbreaking. After all, Google has implemented an entire operating system with web frameworks in Chrome OS, so is making the installer a web app really that much of a stretch? But what makes [Yang]’s installer so interesting is that the web interface isn’t limited to just the local machine, it can be accessed by any browser on the network.

That means you can put the install disc for FreeBSD into a headless machine on your network, and use the browser on your laptop or even smartphone to access the installer. The Graybeards will point out that savvy users have always been able to access the text installer from another computer over SSH, but even the most staunch Luddite has to admit that simply opening a browser on whatever device you have handy and pointing it to the target machine’s IP address is a big usability improvement.

While the software appears complete enough to get through a basic installation, we should remind readers these are still early days. There’s currently no authentication in place, so once you’re booted into the live environment, anyone on the network can format your drives and start the install process.

Some sections of the GUI aren’t fully functional either, with the occasional note from [Yang] popping up to explain what does and doesn’t work. For example, the manual network configuration panel currently only works with WiFi interfaces, as that’s all he personally has to test with. Quite a modern installer, indeed.

Some would argue that part of what makes alternative operating systems like Linux and BSD appealing is the fact that they can happily run on older hardware, so we imagine the idea of an installer using a memory-hungry web browser to present its interface won’t go over well with many users. In our testing, the experimental installer ISO won’t even boot unless it detected at least 4 GB of RAM onboard. But it’s certainly an interesting experiment, and something to keep an eye on as it matures.

[Thanks to Michael for the tip.]

TinyPilot Provides KVM-over-IP, With Low Cost And Even Lower Latency

Remote access is great, but if the machine stops booting, ceases to connect to the network, or needs low-level interaction like BIOS settings or boot management, remote access is worthless because it’s only available once the host computer is up and running. The usual solution is to drag a keyboard and monitor to the machine in question for physical access.

Ubuntu laptop (right) being accessed over IP, via web browser on the left.

For most people, swapping cables in this way is an infrequent task at best. But for those who work more closely with managing hardware or developing software, the need to plug and unplug a keyboard and monitor into machines that otherwise run headless can get tiresome. The modern solution is KVM (keyboard, video, mouse) over IP, but commercial options are expensive. [Michael Lynch]’s TinyPilot on the other hand clocks in at roughly $100 of parts, including a Raspberry Pi and USB HDMI capture device. It does have to drop the ‘M’ from KVM (meaning it does not support a mouse yet) but the rest of it hits all the bases, and does it all from a web browser.

What exactly does TinyPilot do? It provides remote access via web browser, but the device is an independent piece of hardware that — from the host computer’s point of view — is no different from a physical keyboard and monitor. That means keyboard and video access works before the host machine even boots, so even changing something like BIOS settings is no problem.

[Michael] demonstrates his design in the video embedded below, but we encourage you to check out the project page for a fascinating exploration of all the challenges that were part of TinyPilot’s development.

Continue reading “TinyPilot Provides KVM-over-IP, With Low Cost And Even Lower Latency”

Set Up A Headless Raspberry Pi, All From Another Computer’s Command Line

There are differences between setting up a Raspberry Pi and installing an OS on any other computer, but one thing in common is that if you do enough of them, you seek to automate the process any way you can. That is the situation [Peter Lorenzen] found himself in, and his solution is a shell script to install and configure the Raspberry Pi for headless operation, with no need to connect either a keyboard or monitor in the process.

[Peter]’s tool is a script called rpido, and with it the process for setting up a new Raspberry Pi for headless operation is super streamlined. To set up a new Pi, all [Peter] needs to do is:

  1. Plug an SD card into his laptop (which happens to be running Ubuntu.)
  2. Run: rpido -w -h myhostname -s which downloads and installs the newest version of Raspbian lite, does some basic setup (such as setting the hostname), configures for headless operation, and launches a root shell.
  3. Use the root shell to do any further tweaks or checks (like launching raspi-config for additional changes.)
  4. Exit the shell, remove the SD card from his laptop, and install the card into the Raspberry Pi.

There are clear benefits to [Peter]’s script compared to stepping through a checklist of OS install and setup tasks, not to mention the advantage of not needing to plug in a keyboard and monitor. Part of the magic is that [Peter] is mounting the SD card’s filesystem in a chroot environment. Given the right tools, the ARM binaries intended for the Pi run on his (Intel) Ubuntu laptop. It’s far more convenient to make changes to the contents of the SD card in this way, before it goes to its new home in a Pi.

Not everything has to revolve around an SD card, however. [Jonathan Bennet] showed that it’s possible to run a Raspberry Pi without an SD card by using the PXE boot feature, allowing it to boot and load its file system from a server on the same network, instead of a memory card.

Minimalist User Interface For Headless Raspberry Pi Applications

minimial-ui-for-headless-rpi

[Jason Birch] just finished building a beautifully simple user interface for the Raspberry Pi. The goal was to keep it small and intuitive while still providing a range of functionality. His add-on hardware gives feedback using several LEDs and a four-line character LCD screen. It provides control using just four momentary press switches.

The base for the add-on hardware is a chunk of protoboard the same size as the Pi itself. This is just slightly wider than the LCD screen, leaving room along the top for the row of buttons with different colors of LEDs in between them. Look closely in that nest of point-to-point wiring and you’ll find the dual pin-socket which mates with the RPi GPIO header. One important note from [Jason] mentions that the LCD screen R/W pin must be tied to ground. This keeps it from going into read mode, which would push 5V over the I/O pins, potentially damaging the 3.3V tolerant header on the RPi.

Throw in a battery and that pretty much covers the hardware. To see how he’s using it you’ll want to view the video clip after the break.

Continue reading “Minimalist User Interface For Headless Raspberry Pi Applications”