Do You Have An Old Hitachi Computer? You Might Just Have BeOS Without Realizing It

There was a moment in the years spanning the move from 16-bit platforms to 32-bit, during which it looked for a moment as though there might be a few new operating system contenders making a mark on the desktop.

A 1990s Hitachi Flora Prius PC, from the Hitachi press release.
Does this PC look familiar to you?

This was the period that gave rise to the “Year of Linux on the desktop” meme as the open source contender just wasn’t ready for the general public, but we all know what happened. The various commercial contenders slipped by the wayside or survived by the skin of their teeth as enthusiast or niche platforms, while Microsoft Windows steamrollered all before it except for the walled garden of Apple users.

One of the players was BeOS, a powerful multimedia OS that might have had a chance if it could have persuaded OEMs to ship it on some PCs, but in that endeavour it had no luck. Or so everyone thought, but [Thom Holwerda] reports on the fascinating tale of a PC that shipped with BeOS, but not in a way anyone could easily use.

It seems that even being seen to talk to the folks from Be was enough to ensure an OEM received a visit from Microsoft goons sales representatives so even though the rival OS was offered for free it received no PC takers. This was the received opinion, but it turns out that the one manufacturer which did include BeOS was Hitachi, in Japan. Their Flora Prius PC was a Pentium II equipped white box typical of late-90s multimedia hardware, and though it booted into Windows it also had a BeOS installation on board that probably very few owners would have even realised existed. It seems Hitachi did the deal with Be but didn’t install the required bootloader to use the Be partition. A Flora Prius owner could run the software if they were prepared to follow some instructions on the Be website and download a floppy image, but it seems very few did so.

All this leads to a fascinating challenge for today’s BeOS enthusiasts, to locate a surviving Flora Prius PC if any can still be found with an intact BeOS partition, and activate the only factory PC BeOS install. We know we have readers in Japan who almost certainly have an eye for an old computer, can any of you help them in this quest?

We’ve touched on BeOS in the past on its own BeBox platform and the elusive Sony eVilla internet appliance.

Upgrading Old Synths To OLED

Roland’s Alpha Juno 2 is an analog, polyphonic synth made in the mid-80s. While it isn’t as capable as the massive synths made around that time, it was very influential synth for the techno scenes of the late 80s and early 90s.

[Jeroen] is lucky enough to have one of these synths, but like all equipment of this era, it’s showing its age. He wanted to replace the character LCD in his Alpha Juno 2 with an OLED display. The original character LCD was compatible with the Hitachi HD44780 protocol, and still today OLEDs can speak this format. What should have been an easy mod turned into editing hex values on the EEPROM, but he still got it to work.

While the original character LCD could display one line of 16 characters, the ROM in the synth didn’t know this. Instead, the display was organized as a 2×8 display in software, with line one starting at address 0h, and line two starting at 40h. For a drop-in replacement, [Jeroen] would need a display the characters organized in this weird 2×8 format. None exist, but he does have a hex editor and an EEPROM burner.

With the Alpha Juno’s firmware in hand thanks to someone who does a few firmware hacks to this synth, [Jeroen] had everything he needed. All that was left to do was going through the code and replace all the references to the second line of the character LCD.

After burning and installing the new ROM, the OLED display was a drop-in replacement. That meant getting rid of the whiney EL backlight in the original display, and making everything nice and glowy for a few nights on a dark stage.

A Scanning Electron Microscope For The Living Room

There are hackers who have soldering setups on the dining room table, and then there are hackers who have scanning electron microscopes in their living room. [Macona] is part of the latter group, with a Hitachi S-450 SEM he’s repaired and modified himself. [Macona] has documented the whole thing on Hackaday.io. The Hitachi came to him and a friend as a derelict. First it was broken, then stored for 10 years. It turned out the problem was a high voltage cable cut and spliced with electrical tape. The tape eventually broke down and shorted out the 500V supply. Thankfully the rectifier diodes were the only parts that needed to be replaced.

analog1
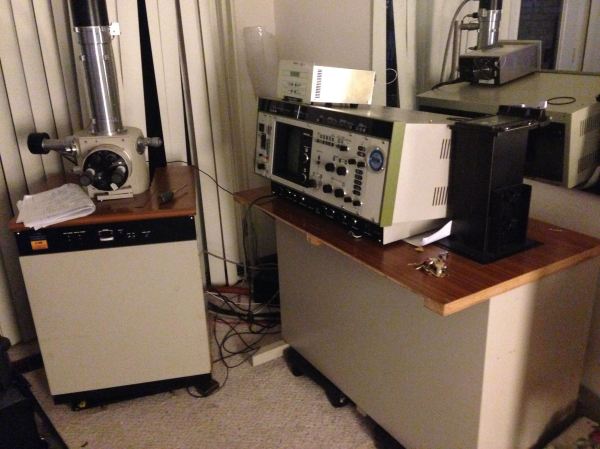
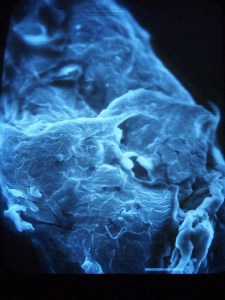
The SEM sprang to life and gave [Macona] and a friend their first images. However, SEMs are finicky beasts. Eventually the filament burned out and needed to be replaced. New filaments are $500 US for a box of 10, which is more than [Macona] wanted to spend. It turns out filaments can be built at home. A bit of .089mm tungsten wire and a spot welder were all it took to fix the issue. Next to go bad was the scan amplifier. While SEMs use many exotic parts, the Hitachi used relatively common Sanyo STK070 audio amplifiers for the purpose – an easy fix!

One thing that makes this SEM unique is the is Energy Dispersive X-Ray Spectroscopy (EDX) unit attached to it. The fragile liquid nitrogen cooled sensor was working, but the 1980’s era signal processing computer was a bit too old to bring up. A friend and fellow SEM hobbiest gave [Macona] a slightly newer Kevex Sigma Gold signal processor, which was nearly a plug and play upgrade for his machine. The new processor processor also gave him digital beam controls and a digital output which could be used to capture images with a PC.

Once all the connections were made, the EDX worked surprisingly well, even finding gold in a uranium ore sample placed in the microscope.

Now that old scanning electron microscopes being retired, it’s only a matter of time before more us get a chance to join the ranks of [Jeri Ellsworth], [Ben Krasnow] and [Macona] with our own personal SEMs!

Teach An Old LCD New Tricks

pic-lcd

[Art] has done some amazing work with character LCDs. He started with a classic character LCD. These LCDs are typically controlled by Hitachi HD447XXX compatible controllers. Hitachi’s controllers allow several custom characters to be defined. We’ve used those characters in the past for applications like spinners and bar graphs. [Art] took things to a whole new level. He created a double buffered LCD graphics library which allows these old LCDs to perform tricks usually reserved for graphical LCDs. Even more impressive is the fact the whole thing runs on a Microchip PIC16F628A programmed mostly in PICBASIC.

According to [Art’s] thread on the PICBASIC forum, he is using the custom character memory as a framebuffer. The LCD is set to display all 8 custom characters. Each frame is then in the PIC’s RAM. The completed frames are then pushed to the custom character memory of the Hitachi LCD controller. The result is a very smooth update rate on the LCD. [Art] wrapped the whole example up in a video reminiscent of the C64 demoscene.

Continue reading “Teach An Old LCD New Tricks”

Breathing Life Into An Old LCD

panel

Out of the depths of a junk drawer, [Alex]’s friend pulled out an old monochrome LCD display. This is an older low-resolution display from ancient electronics that unfortunately doesn’t have its own controller chip. No worries, though, because with the help of an FPGA [Alex] figured out how to drive this display.

On the back of this display are eight Hitachi LCD drivers, six column shifters and two row shifters, allowing the LCD to display a 256×128 pixel image. Without an LCD controller, though, [Alex] couldn’t just send a static image to the LCD. Instead, he had to continuously refresh the display just like a VGA monitor.

With the help of a 1500-page PDF titled Hitachi LCD Controller/Driver LSI Data Book, [Alex] was able to dump pixels into the ICs on the display with the help of a Papilio One FPGA board. A lot of work just to display the beautiful [Lena], but she wouldn’t have it any other way.

Slot Loading Xbox 360

slot360

File this one under: “Wow, that’s even possible?” xbox-scene hacker [RDC] has been hard at work converting his Xbox 360 to slot loading. To start, He removed the slot loading drive from a blueberry iMac G3. The loading mechanism is the top half of the drive. He split this off and married it to the reading mechanism in the Xbox’s Hitachi drive. The difficult part came with getting the drive to properly signal when it had a disc. He put together a custom circuit to do the detection and has a thorough description of how he solved the problem.

[Thanks, bic]