Smart Occupancy Sensor Knows All

In the last few decades, building engineers and architects have made tremendous strides in improving the efficiency of various buildings and the devices that keep them safe and comfortable to live in. The addition of new technology like heat pumps is a major factor, as well as improvements on existing things like insulation methods and building materials. But after the low-hanging fruit is picked, technology like this smart occupancy sensor created by [Sina Moshksar] might be necessary to help drive further efficiency gains.

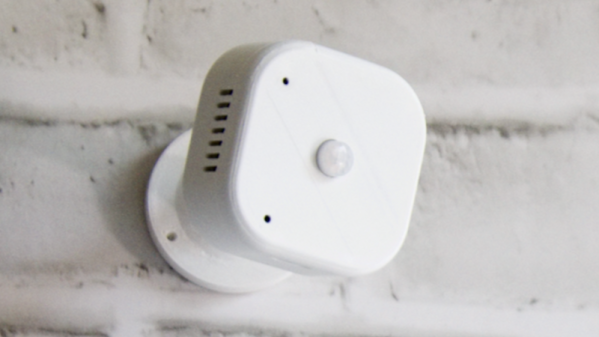
Known as RoomSense IQ, the small device mounts somewhere within a small room and uses a number of different technologies to keep track of the number of occupants in a room. The primary method is mmWave radar which can sense the presence of a person up to five meters away, but it also includes a PIR sensor to help prevent false positives and distinguish human activity from non-human activity. The device integrates with home automation systems to feed them occupancy data to use to further improve the performance of those types of systems. It’s also designed to be low-cost and easy to install, so it should be relatively straightforward to add a few to any existing system as well.

The project is also documented on this GitHub page, for anyone looking to build a little more data into their home automation system or even augment their home security systems. We imagine that devices like this could be used with great effect paired with a heating device like this, and we’ve also seen some other interesting methods of determining occupancy as well.

Continue reading “Smart Occupancy Sensor Knows All”

A Smart Home That CAN Do It All

In an ideal smart home, the explosion of cheap WiFi and Bluetooth chips has allowed hundreds of small wireless devices to control the switches, lights, and everything else required for a “smart home” at a relatively low price. But what if you don’t want hundreds of internet-connected devices in your home polluting the wireless spectrum and allowing potential security holes into your network? If you’re like [Lucas Teske], you might reach for something wired and use cheap and (currently) available Raspberry Pi Picos to create PicoHome.

The unique twist of PicoHome is that it uses a CAN bus for communication. One of [Lucas’] goals was to make the boards easily swappable when hardware failed. This meant board-to-board communication and protocols like I2C were susceptible to noise (every time a relay triggered, the bus would lock up briefly). The CAN bus is designed to work in an electrically noisy environment.

There are two parts to the system: pico-relay and pico-input. The first connects to a 16 relay board and can control 16 different 24v relays. The second has 16 optoisolators to read from 12v-24v switches and various buttons throughout the house. These can be placed in a giant metal box in a central wiring location and not worry about it.

The firmware and board files are all released under an Apache 2.0 license, but the CAN2040 library this project relies on is under GPL. We covered the CAN2040 library when it was first released, and it’s lovely to see it being used for something entirely unexpected.

Continue reading “A Smart Home That CAN Do It All”

Arduino Library Brings Rtl_433 To The ESP32

If you have an RTL-SDR compatible radio there’s an excellent chance you’ve heard of the rtl_433 project, which lets you receive and decode signals from an ever-expanding list of supported devices in the ISM radio bands. It’s an incredibly useful piece of software, but the fact that it requires an external software defined radio and a full-fledged computer to run dictated the sort of projects it could realistically be used for.

But thanks to the rtl_433_ESP Arduino library developed by [NorthernMan54], we’re now able to pack that functionality into a much smaller package. All you need is an ESP32 microcontroller and a CC1101 or SX127X transceiver module. If you’re looking for a turn-key hardware platform, the documentation notes the LILYGO LoRa32 V2 board includes the required hardware, plus adds a handy OLED display and microSD slot. It should be noted that the range of these radios don’t compare particularly well to a full-size RTL-SDR device, but that probably won’t come as much of a surprise. Continue reading “Arduino Library Brings Rtl_433 To The ESP32”

When Pi Supply Falls Short, Thin Clients Stand Tall For Home Automation And Low Power Computing

Do you need a cheap, small computer for a low power computing project? Historically, many of us would reach straight for a Raspberry Pi, even if we didn’t absolutely need the GPIO. But with prices elevated and supplies in the dumps, [Andreas Spiess] decided that it was time to look for alternatives to now-expensive Pi’s which you can see in the video below the break.

Setting up Debian for IOTstack

Many simply use the Pi for its software ecosystem, its lower power requirements, and diminutive size. [Andreas] has searched eBay, looking for thin PC clients that can be had for as little as $10-15. A few slightly more expensive units were also chosen, and in the video some comparisons are made. How do these thin clients compare to a Pi for power consumption, computing power, and cost? The results may surprise you!

Software is another issue, since many Pi projects rely on Raspbian, a Pi-specific ARM64 Linux distribution. Since Raspbian is based on Debian, [Andreas] chose it as a basis for experimentation. He thoughtfully included such powerful software as Proxmox for virtualization, IOTstack, and Home Assistant, walking the viewer through each step of running Home Assistant on x86-64 hardware and noting the differences between the Linux distributions.

All in all, if you’ve ever considered stepping out of the Pi ecosystem and into general Linux computing, this tutorial will be an excellent starting point. Of course [Andreas] isn’t the first to bark up this tree, and we featured another thin client running Klipper for your 3D printer earlier this month. Have you found your own perfect Pi replacement in these Pi-less times? Let us know in the comments below.

Continue reading “When Pi Supply Falls Short, Thin Clients Stand Tall For Home Automation And Low Power Computing”

Trigger Your Home Automation Routines With Home Buttons

Home automation systems are all well and good, so long as the person who built it all is around to drive it. Let’s face it, they’re quite often a complex web of interconnected systems, all tied to the specifics of one’s home — and someone less familiar with it all could get a little irritated if, on a chilly day, the interface to the boiler is via a Python script, and something won’t work. Just saying. Home Buttons by [Matej Planinšek] over on Hackaday.IO is a nicely polished project, which aims to take some of the hackiness out of such automation by providing a sleek front end to those automation routines, enabling anyone to rock on over and set one in action without hassle.

Internal PCB shown in the foreground, with the complete unit behind.The PCB is based around the ESP32-S2-mini which deals with WiFi connectivity and integration with Home Assistant using the usual MQTT protocol. We expect integration with other flavors of home automation would not be difficult to achieve. The center of the unit holds a simple E-Ink display, for that low-standby power. Specifically, the unit chosen is a Good Display GDEY029T94 2.9″ which this scribe can confirm is easy to interface and pretty cheap to purchase from the usual Chinese online vendors. This was matched up with six clicky Alps SKRB-series low-profile tact switches, which sit on either side of the display, and corresponds to a flexure-type affair on the 3D printed front casing. Neat and simple.

The PCB design was provided in Altium format, which you can find on the project GitHub page. This shows a straightforward design, with a few nice little details here and there. The internally mounted 18650 cell is reportedly good for at least a year of operation, but when time, it can be charged via USB. A Xysemi XB8608AF (PDF) protection chip provides appropriate limiting for the 18650 cell, shielding it from the perils of overcharging, discharging, and whatnot. Not that that is likely in this current setup. A Sensiron SHTC3 humidity and temperature sensor is also in there, hanging off the I2C bus, which makes sense for this application.

Home Automation hacks are plenty on these pages, like this scroll-wheel interface, for instance. If all this stuff is looking quite overbearingly complicated to get into, how about starting with a Pico W?

Scroll Through ESPHome With IPod-style Click Wheel

While you’d be hard pressed to find a Hackaday writer that feels any nostalgia for the DRM nonsense the iPod helped to introduce, we’ve got to admit that we miss that click wheel. Spinning your way through long lists was a breeze, and the tactile response made it easy to stop exactly where you wanted. These days, we’re stuck fumbling our way through touch screen interfaces that make simple tasks like seeking to a particular spot in a song or video all but impossible to do with any kind of accuracy.

If you too yearn to once again feel that subtle thumping under your thumb, then check out this project from [landonr]. Technically the handheld gadget is intended to be used as a wireless remote for a home automation system powered by ESPHome, but that’s only one possible application for this particular combination of off-the-shelf components.

If you must, there’s a version with buttons.

Building your own version of the handheld device is a simple as mounting a LILYGO ESP32 T-Display TTGO, an ANO Rotary Navigation Encoder from Adafruit, and a battery pack to a scrap of perfboard. We’d probably look into 3D printing a case to make it a bit less…pokey, but that’s up to you. The result actually bears quite a resemblance to Apple’s iconic media player, but without that pesky walled garden to hold you back.

As mentioned previously, [landonr] wrote the firmware with the intention of controlling a home automation system. So there’s a lot of stuff in there about turning on lights and such. But there are also functions for media playback that look very promising. Whatever software you end up running on it, one thing is for sure: running through the menus is going to feel like a dream.

We’ve covered several other home automation remotes over the years. This handsome wooden model kept things simple with just a few physical buttons, while this somewhat more whimsical approach repurposed Nintendo’s Zapper light gun.

Continue reading “Scroll Through ESPHome With IPod-style Click Wheel”

This Pico-W IoT Starter Project Gets You Into Home Assistant Quick As A Flash

Many of us hacker types with some hardware knowledge and a smattering of embedded experience would like to get into home automation, but there can be quite a learning curve. If you’re looking for a hackable starting point; something to deploy, learn about and then later expand upon, then look no further than the PicoW Home Assistant Starter project from [Danilo Campos].

The project is based upon the arduino-pico core, which supports a whole pile of RP2040-based boards, so you don’t need to restrict yourself to the “official” Pico-W, so long as you have working networking, Wi-Fi or otherwise. Integration is provided by the arduino-home-assistant library, which acts as the bridge between your sensors and other widgets, MQTT, and thence the network beyond. Events and sensor data on the end-point are packaged up with MQTT and published out to the broker via the network provided, all for minimal initial effort. Once you’ve got the basic connectivity to your Home Assistant instance working, there are many code examples in the arduino-home-assistant GitHub page to give you a helping start to connect whatever tickles your fancy.

It turns out we’ve covered HA quite a bit on these fair pages, like for example, these sweet automated window blinds. Another hack uses load cells under the bed legs to detect if someone is in bed or not, and if this isn’t your thing, maybe your idea of a home assistant is a bit more like this one?