Custom Firmware For IKEA’s ORSALA Lamp

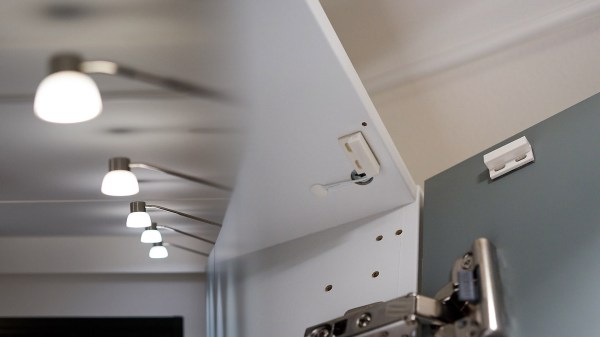
These days, home appliances are equally as likely to have soft buttons and rotary encoders as they are to have a simple old clunk/clunk power switch and an analog knob for controls. This is all well and good if the device aligns with your personal philosophy about how such controls should work; otherwise, it’s absolutely maddening. [j-zero] ran into this problem with their ORSALA lamp from IKEA, and set about rectifying the problem with some custom firmware.

The ORSALA lamp uses a rotary encoder for setting both brightness and color temperature, with a button to toggle modes. A long press is required to switch the lamp off. The custom firmware modifies this behaviour, such that the lamp can be switched on and off with a simple button press. Turning the encoder modifies brightness, and turning it to minimum switches the lamp off too. Meanwhile, the less commonly used color temperature setting can be modified by using the button while adjusting the encoder.

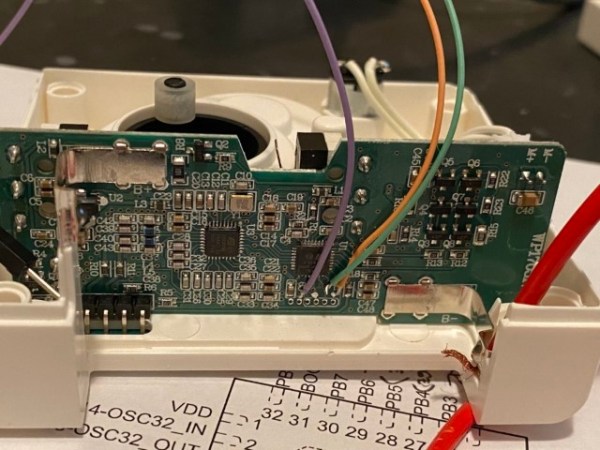
The hack was executed by reprogramming the ORSALA’s onboard microcontroller, the STM8S003F3P6, via its SWIM interface. The pads for the interface are easily located on the board, making the hack easy. Other than the inputs, the lamp packs separate TTP932 LED drivers for the warm white and cool white LEDs, making it easy to code a custom firmware to handle all the necessary functions.

It’s a great example of a hacker taking control of their own device and remaking it to suit their needs. Of course, if you want to go for another hacker trope, just stuff a Raspberry Pi in there instead!

More 3D Printed IKEA Hacks Make Life Better

There’s an old joke that the CEO of IKEA is running to be Prime Minister of Sweden. He says he’ll be able to put together his cabinet in no time. We don’t speak Swedish, but [Adam Miklosi] tells us that the word “uppgradera” means “upgrade” in Swedish. His website, uppgradera.co has several IKEA upgrade designs you can 3D print.

There are currently six designs that all appear to be simple prints that have some real value. These are all meant to attach to some IKEA product and solve some consumer problem.

For example, the KL01 is a cup holder with a clip that snaps into the groove of a KLIPSK bed tray. Without it, apparently, your coffee mug will tend to slide around the surface of the tray. The CH01 adds a ring around a cheese grater. There are drains for a soap dish and a toothbrush holder, shoulder pads for coat hangers, and a lampshade.

We worry a little about the safety of the cheese grater and the toothbrush because you will presumably put the cheese and the toothbrush into your mouth. Food safe 3D printing is not trivial. However, the other ones look handy enough, and we know a lot of people feel that PLA is safe enough for things that don’t make a lot of contact with food.

Honestly, none of these are going to change your life, but they are great examples of how simple things you can 3D print can make products better. People new to 3D printing often seem to have unrealistic expectations about what they can print and are disappointed that they can’t easily print a complete robot or whatever. However, these examples show that even simple designs that are easily printed can be quite useful.

If you don’t have a printer, it looks like as though site will also sell you the pieces and they aren’t terribly expensive. We don’t know why IKEA invites so many hacks, but even they provide 3D printer files to improve the accessibility of some products.

Making Smart Bulbs Smarter With The Power Of MQTT

What’s the point of smart home automation? To make every day tasks easier, of course! According to [Tomasz Cybulski], that wasn’t the case when he installed IKEA smart lights in his closet. It’s handy to have them in a common switch, in this case a remote control, but having to look for it every time he needed the lights could use some improvement. Enter his project to make smart bulbs smarter, through the use of a simple ESP8266.

While hooking a door switch to the lights’ power supply could provide a quick solution, [Tomasz]’s wife wanted to keep the functionality of the remote control, so he had to look elsewhere. These light bulbs use the simple Zigbee protocol, so arranging for other devices was rather trivial. A USB dongle to interface with the protocol was configured for his existing Raspberry Pi automation controller, while an ESP8266 served as the real-world sensor by connecting it to reed switches installed in the closet doors.

With all the hardware sorted out, it’s a simple matter of making it all talk to each other. The ESP8266, using the Tasmota firmware, sends a signal to an MQTT server running on the Raspberry Pi, which in turn translates it to a remote trigger on the Zigbee frequency with the dongle. The lights turn on when the door opens, and off again once it closes. And since there were no further modifications to the lights themselves, the original IKEA controller still works as expected, which we’re sure [Tomasz]’s wife appreciates!

MQTT can be an interesting piece of software that goes beyond just home automation though, and if you already have a server in your home you can use it to transfer your clipboard’s contents to another device. If you are using it for home automation though, here’s an inspiration for a rather unusual dashboard to keep things interesting. Check out this hack in action after the break.

Continue reading “Making Smart Bulbs Smarter With The Power Of MQTT”

A Different Kind Of IKEA Hack: Javascript Price Comparison By Location

When looking for the best deal, it pays to shop around. When it comes to chain stores, of course, one expects the price to be the same across their retail network. However, where international companies are concerned, occasionally a better deal is just a border crossing away. To investigate the best possible price on IKEA’s flatpacked goods, [Sn0w5t0rm] whipped up a scirpt to make comparisons easy.

The hack consists of a small piece of Javascript that runs in a browser extension like Greasemonkey (Firefox) or Tampermonkey (Chrome). When visiting an IKEA product page, it shows the price of the same item in the alternative country of your choice. Often, significant savings can be had – the SKOGSTA table is €176 cheaper in the Netherlands compared to Belgium.

While the script does require some customization to suit your location, it could nonetheless save you a bundle on some home furnishings if your live near enough to a border. We’d love to see the concept taken further to tease out best prices in a given region for goods from all stores. Similar techniques can net you cheap airfares, too!

Son Of Rothult

We are continuously inspired by our readers which is why we share what we love, and that inspiration flows both ways. [jetpilot305] connected a Rothult unit to the Arduino IDE in response to Ripping up a Rothult. Consider us flattered. There are several factors at play here. One, the Arduino banner covers a lot of programmable hardware, and it is a powerful tool in a hardware hacker’s belt. Two, someone saw a tool they wanted to control and made it happen. Three, it’s a piece of (minimal) security hardware, but who knows where that can scale. The secure is made accessible.

The Github upload instructions are illustrated, and you know we appreciate documentation. There are a couple of tables for the controller pins and header for your convenience. You will be compiling your sketch in Arduino’s IDE, but uploading through ST-Link across some wires you will have to solder. We are in advanced territory now, but keep this inspiration train going and drop us a tip to share something you make with this miniature deadbolt.

Locks and security are our bread and butter, so enjoy some physical key appreciation and digital lock love.

Microphone Isolation Shield Is A Great IKEA Hack; Definitely Not A Xenomorph Egg

As any content creator knows, good audio is the key to maintaining an audience. Having a high quality microphone is a start, but it’s also necessary to reduce echoes and other unwanted noise. An isolation shield is key here, and [phico] has the low down on making your own.

The build starts with an IKEA lampshade, so it’s a great excuse to head down to the flatpack store and grab yourself some Köttbullar for lunch while you’re at it (that’s meatballs for those less versed in IKEA’s cafeteria fare). This is really more of a powder-coated steel frame than a shade, perfect as the bones of an enclosure. [Phico] hacks it open with a Dremel to make room for the microphone. Cardboard soaked in wallpaper paste is then used to create a papier-mache-like shell, which is then stuffed with acoustic foam. A small opening is left to allow the narrator’s voice to reach the microphone, while blocking sound from other directions. Finally, a stocking is wrapped around the whole assembly to act as an integral anti-pop filter.

It’s a tidy build, and while it looks a bit like a boulder to some, if you encounter a room full of ovomorphs that look just like this, tiptoe right out of there. IKEA hacks are always popular, and this laser projector lamp is a great example. If you’ve got your own nifty Swedish-inspired build, make sure you let us know!

Tearing Down IKEA’S Sonos Speaker

There’s little better way to learn about a piece of electronics than by tearing it down. Taking a peek under the hood can reveal all manner of things about a device’s design, manufacturing, and origins. [This Does Not Compute] does a great job of doing just that, digging into the guts of IKEA’s Symfonisk speaker.

Symfonisk is a WiFi-enabled speaker, working with the Sonos ecosystem. Tearing down the device reveals some similarities to IKEA’s earlier Eneby speaker, with both devices sharing similar speaker drivers, apparently sourced from GGEC. However, upon digging deeper, it’s revealed that the Symfonisk has more in common with a speaker from another manufacturer entirely.

The video does a great job of not only investigating the manufacturing origins of the device, but breaking down the way it all works. This shows how the speaker relies on an Atheros WiFi-only chipset, thus explaining the lack of Bluetooth functionality, as well as discussing things like the neat solutions for cable management. Interestingly, the speaker uses a two-channel DAC and Class-D amplifier, but only operates in mono. Instead, the two channels are instead used to separately drive the tweeter and woofer, allowing EQ to be done in software on the main CPU, negating the need for analog crossover electronics.

It’s a teardown that would serve as a great primer for anyone considering building a piece of consumer electronics, but particularly those involved in the hi-fi space. To see how it was done way back when, perhaps try this 8-track teardown instead. Video after the break.

Continue reading “Tearing Down IKEA’S Sonos Speaker”