SLR To DSLR Conversion Becomes Full Camera

At least as far as the inner workings are concerned, there’s not a whole lot of difference between an single-lens reflex (SLR) camera that uses film and a digital SLR (DSLR) camera that uses an electronic sensor except the method for capturing the image. So adding the digital image sensor to a formerly analog camera like this seemed like an interesting project for [Wenting Zhang]. But this camera ballooned a little further than that as he found himself instead building a complete, full-frame digital camera nearly from scratch.

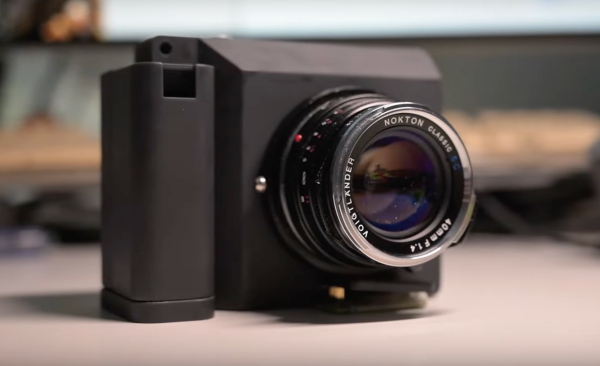
The camera uses a full-frame design and even though the project originally began around the SLR mechanism, in the end [Wenting] decided not to keep this complex system in place. Instead, to keep the design simple and more accessible a mirrorless design is used with an electronic viewfinder system. It’s also passive M lens mount, meaning that plenty of manual lenses will be available for this camera without having to completely re-invent the wheel.

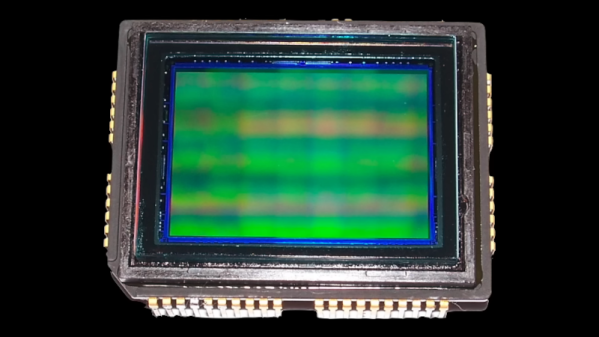
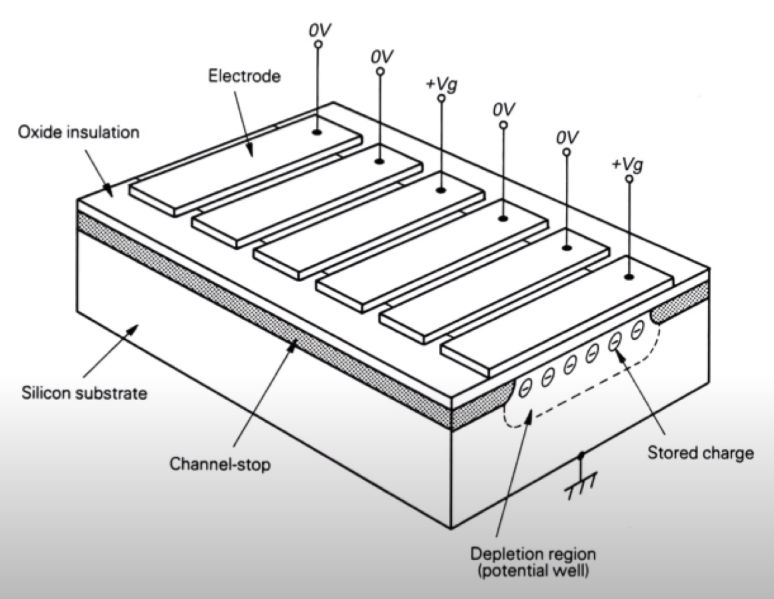
As far as the sensor goes, [Wenting] wanted something relatively user-friendly with datasheets available so he turned to industrial cameras to find something suitable, settling on a Kodak charge-coupled device (CCD) for the sensor paired with an i.MX processor. All of the electronics have publicly-available datasheets which is important for this open-source design. There’s a lot more work that went into this build than just picking parts and 3D printing a case, though, and we’d definitely recommend anyone interested to check out the video below for how this was all done. And, for those who want to go back to the beginnings of this project and take a different path, it’s definitely possible to convert an analog SLR to a digital one.

Continue reading “SLR To DSLR Conversion Becomes Full Camera”

Inside Digital Image Chips

Have you ever thought how amazing it is that every bit of DRAM in your computer requires a teeny tiny capacitor? A 16 GB DRAM has 128 billion little capacitors, one for each bit. However, that’s not the only densely-packed IC you probably use daily. The other one is the image sensor in your camera, which is probably in your phone. The ICs have a tremendous number of tiny silicon photosensors, and [Asianometry] explains how they work in the video you can see below.

The story starts way back in the 1800s when Hertz noticed that light could knock electrons out of their normal orbits. He couldn’t explain exactly what was happening, especially since the light intensity didn’t correlate to the energy of the electrons, only the number of them. It took Einstein to figure out what was going on, and early devices that used the principle were photomultiplier tubes, which are extremely sensitive. However, they were bulky, and an array of even dozens of them would be gigantic.

Semiconductor devices use silicon. Bell Labs was working on bubble memory, which was a way of creating memory that was never very popular. However, as a byproduct, the researchers realized that moving charges around for memory could also move around charges from photosensitive diodes. The key idea was that it was harder to connect many photodiodes than it was to create the photodiodes. Using the charge-coupled device or CCD method, the chip could manipulate the charges to reduce the number of connections to the chip.

CCDs opened up the digital image market, but it has some problems. The next stage was CMOS chips. They’d been around for a while since IBM produced the scanistor, but the sensitivity of these CMOS image chips was poor. Since most people were happy with CCD, there wasn’t as much research on CMOS. However, CMOS sensors would eventually become more capable, and the video explains how it works.

We’ve looked at image sensors before, too. The way you read them can make a big difference in your images.

Continue reading “Inside Digital Image Chips”

Laser And Webcam Team Up For Micron-Resolution Flatness Measurements

When you want to measure the length, breadth, or depth of an object, there are plenty of instruments for the job. You can start with a tape measure, move up to calipers if you need more precision, or maybe even a micrometer if it’s a really critical dimension. But what if you want to know how flat something is? Is there something other than a straightedge and an eyeball for assessing the flatness of a surface?

As it turns out, there is: a $15 webcam and a cheap laser level will do the job, along with some homebrew software and a little bit of patience. At least that’s what [Bryan Howard] came up with to help him assess the flatness of the gantry he fabricated for a large CNC machine he’s working on.

The gantry arm is built from steel tubing, a commodity product with plenty of dimensional variability. To measure the microscopic hills and valleys over the length of the beam, [Bryan] mounted a lens-less webcam to a block of metal. A cheap laser level is set up to skim over the top of the beam and shine across the camera’s image sensor.

On a laptop, images of the beam are converted into an intensity profile whose peak is located by a Gaussian curve fit. The location of the peak on the sensor is recorded at various points along the surface, leading to a map of the microscopic hills and valleys along the beam.

As seen in the video after the break, [Bryan]’s results from such a quick-and-dirty setup are impressive. Despite some wobblies in the laser beam thanks to its auto-leveling mechanism, he was able to scan the entire length of the beam, which looks like it’s more than a meter long, and measure the flatness with a resolution of a couple of microns. Spoiler alert: the beam needs some work. But now [Bryan] knows just where to scrape and shim the surface and by how much, which is a whole lot better than guessing.   Continue reading “Laser And Webcam Team Up For Micron-Resolution Flatness Measurements”

Image Sensor From Discrete Parts Delivers Glorious 1-Kilopixel Images

Chances are pretty good that you have at least one digital image sensor somewhere close to you at this moment, likely within arm’s reach. The ubiquity of digital cameras is due to how cheap these sensors have become, and how easy they are to integrate into all sorts of devices. So why in the world would someone want to build an image sensor from discrete parts that’s 12,000 times worse than the average smartphone camera? Because, why not?

[Sean Hodgins] originally started this project as a digital pinhole camera, which is why it was called “digiObscura.” The idea was to build a 32×32 array of photosensors and focus light on it using only a pinhole, but that proved optically difficult as the small aperture greatly reduced the amount of light striking the array. The sensor, though, is where the interesting stuff is. [Sean] soldered 1,024 ALS-PT19 surface-mount phototransistors to the custom PCB along with two 32-bit analog multiplexers. The multiplexers are driven by a microcontroller to select each pixel in turn, one row and one column at a time. It takes a full five seconds to scan the array, so taking a picture hearkens back to the long exposures common in the early days of photography. And sure, it’s only a 1-kilopixel image, but it works.

[Sean] has had this project cooking for a while – in fact, the multiplexers he used for the camera came up as a separate project back in 2018. We’re glad to see that he got the rest built, even with the recycled lens he used. One wonders how a 3D-printed lens would work in front of that sensor.

Continue reading “Image Sensor From Discrete Parts Delivers Glorious 1-Kilopixel Images”

Camera Uses Algorithms Instead Of Lenses

A normal camera uses a lens to bend light so that it hits a sensor. A pinhole camera doesn’t have a lens, but the tiny hole serves the same function. Now two researchers from the University of Utah. have used software to recreate images from scattered unfocused light. The quality isn’t great, but there’s no lens — not even a pinhole — involved. You can see a video, below.

The camera has a sensor on the edge of a piece of a transparent window. The images could resolve .1 line-pairs/mm at a distance of 150 mm and had a depth of field of about 10 mm. This may seem like a solution that needs a problem, but think about the applications where a camera could see through a windshield or a pair of glasses without having a conventional camera in the way.

Continue reading “Camera Uses Algorithms Instead Of Lenses”

Flat Camera Uses No Lens

Early cameras and modern cameras work pretty much the same way. A lens (or a pinhole acting as a lens) focuses an image onto a sensor. Of course, sensor, in this case, is a broad term and could include a piece of film that–after all–does sense light via a chemical reaction. Sure, lenses and sensors get better or, at least, different, but the basic design has remained the same since the Chinese built the camera obscura around 400BC (and the Greeks not long after that).

Of course, the lens/sensor arrangement works well, but it does limit how thin you can make a camera. Cell phone cameras are pretty skinny, but there are applications where even they are too thick. That’s why researchers at Rice University are working on a new concept design for a flat camera that uses no lens. You can see a video about the new type of camera below.

Continue reading “Flat Camera Uses No Lens”

Image Sensor For Filling Wine Bottles

wine

A wine bottling company in New Zealand got in touch with [Boz] to solve a problem. They needed a way to automatically determine if a wine bottle was filled or not. What he came up with is a very simple yet very effective fill level sensor that can scan thousands of bottles an hour.

There were a few design decisions that went into the construction of this wine bottle sensor. [Boz] could have used a VGA camera sensor, but given the speed of the bottling line (half a meter per second), pushing all those pixels to a computer and doing real-time image analysis would be difficult. [Boz] settled on a much simpler solution – a 1×128 linear CCD analog image sensor. With a PIC microcontroller, this allows the device to check multiple bottles per second, calculate if the bottle is full or not (or overfilled), and send a ‘pass’ or ‘reject’ signal to the rest of the line.

The rest of the assembly is fairly straightforward with an LED backlight providing the illumination for the CCD and a Bluetooth transmitter for checking out the machine’s settings. On the bottling line, the device has 99% accuracy for both red wines in dark bottles and whites in green bottles. You can take a gander of this device in action on a New Zealand bottling line below.

Continue reading “Image Sensor For Filling Wine Bottles”