Control An IRL Home From Minecraft

Minecraft seems to be a game in which anything is possible, both in the virtual world and in the real one. As a sandbox-style game, we’ve seen all kinds of things implemented in it including arithmetic logic units and microcontroller emulators. On the other end of reality we’ve also seen a lot of projects in which real-world interfaces impact the virtual world in some way. As a game, the lines between these two worlds often seem to blur, and that’s no different for this project that allows for control of a smart home from within the game itself.

The project is called HomeAssistantMC and is built with Forge. The mod interfaces directly with a Minecraft game. From within the game, players can create a model of their home complete with light switches and other control interfaces. A WebSocket API listens to the game for changes to these devices, and interfaces with real-world controllers which control the home in real life. The game uses special state blocks to handle the control, and the entire control system can be configured in-game once all of the appropriate software has been installed.

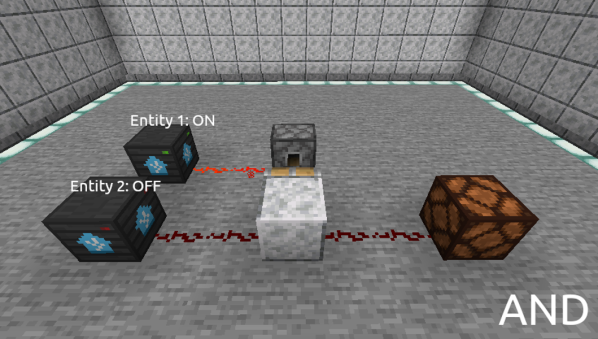
For anyone willing to experiment with this software, all of the code for this project is available on its GitHub page. One of the other interesting things about this project is the ability to use other creations within Minecraft for home automation. For example, building logic gates allows for nuanced control of the home automation setup with creations we’ve already seen in Minecraft before. And, if you really want to go deep into the weeds, you could even build a complete 6502 processor from within the game as well.

Understanding Custom Signal Protocols With Old Nintendos

For retro gaming, there’s really no substitute for original hardware. As it ages, though, a lot of us need to find something passable since antique hardware won’t last forever. If a console isn’t working properly an emulator can get us some of the way there, but using an original controller is still preferred even when using emulators. To that end, [All Parts Combined] shows us how to build custom interfaces between original Nintendo controllers and a PC.

The build starts by mapping out the controller behavior. Buttons on a SNES controller don’t correspond directly to pins, rather a clock latches all of the button presses at a particular moment all at once during each timing event and sends that information to the console. To implement this protocol an Adafruit Trinket is used, and a thorough explanation of the code is given in the video linked below. From there it was a simple matter of building the device itself, for which [All Parts Combined] scavenged controller ports from broken Super Nintendos and housed everything into a tidy box where it can be attached via USB to his PC.

While it might seem like a lot of work to get a custom Nintendo controller interface running just because he had lost his Mega Man cartridge, this build goes a long way to understanding a custom controller protocol. Plus, there’s a lot more utility here than just playing Mega Man; a method like this could easily be used to interface other controllers as well. We’ve even seen the reverse process where USB devices were made to work on a Nintendo 64.

Continue reading “Understanding Custom Signal Protocols With Old Nintendos”

Diving Into The Details Of Keyboard Interfaces At The Gate-Level

Never doubt the value of a good teacher. Even if you know — or think you know — the material being presented, a good teacher can open your eyes to new ways of looking at things that will pay dividends you never expected.

That’s the feeling we got while watching [Ben Eater]’s latest video on building a keyboard interface (embedded below) for his breadboard 6502 computer. On the face of it, getting a keyboard to talk to a computer should be a simple job. [Ben] had previously looked at the serial protocol used by the old PS/2 keyboard and even built a wildly complex circuit out of discrete shift register chips to visualize the data being sent by the keyboard. The video below continues that work, this time concentrating on using the keyboard with his 6502 breadboard computer.

After some instructive preliminaries on interrupt programming, [Ben] dives into the logic-level details of teasing useful signals from the keyboard. His signal processing starts with some inverters and an RC network to turn multiple clock pulses into one logic level transition. Walking through this circuit step by step was the really interesting bit; even if you know that the answer is eventually going to be “Schmitt trigger,” getting to that point was really instructive.

Of course, what [Ben]’s videos mainly accomplish is making us want to follow along with him and build a breadboard computer of our own. From a low-rez VGA card to a reliable UART, following along with his discrete chip builds is always educational.

Continue reading “Diving Into The Details Of Keyboard Interfaces At The Gate-Level”

Guitar Effects With No (Unwanted) Delay

MIDI has been a great tool for musicians and artists since its invention in the 1980s. It allows a standard way to interface musical instruments to computers for easy recording, editing, and production of music. It does have a few weaknesses though, namely that without some specialized equipment the latency of the signals through the various connected devices can easily get too high to be useful in live performances. It’s not an impossible problem to surmount with the right equipment, as illustrated by [Philip Karlsson Gisslow].

The low-latency MIDI interface that he created is built around a Raspberry Pi Pico. It runs a custom library created by [Philip] called MiGiC which specifically built as a MIDI to Guitar interface. The entire setup consists of a preamp to boost the guitar’s signal up to 3.3V where it is then fed to the Pi. This is where the MIDI sampling is done. From there it sends the information to a PC which is able to play the sound back quickly with no noticeable delay.

[Philip] also had to do a lot of extra work to port the software to the Pi which lacks a lot of the features of its original intended hardware on a Mac or Windows machine, and the results are impressive, especially at the end of the video where he uses the interface to play a drum machine via his guitar. And, while MIDI is certainly a powerful application for a guitarist, we have also seen the Pi put to other uses in this musical realm as well.

Continue reading “Guitar Effects With No (Unwanted) Delay”

Custom Dummy Load With Data Logging

While it might seem counterintuitive on the surface, there are a number of cases where dumping a large amount of energy into a resistor simply to turn it into heat is necessary to the operation of a circuit. Most of these cases involve testing electronic equipment such as power supplies or radio transmitters and while a simple resistor bank can be used in some situations, this active dummy load is comprised of different internals has some extra features to boot.

The load bank built by [Debraj] is actually an electronic load, which opens it up for a wider set of use cases than a simple passive dummy load like a resistor bank. It’s specifically designed for DC and also includes voltage measurement, current control, and temperature measurement and speed control of the fans on the heat sinks. It also includes a Bluetooth module that allows it to communicate to a computer using python via a custom protocol and GUI.

While this one does use a case and some other parts from another product and was specifically built to use them, the PCB schematics and code are all available to build your own or expand on this design. It’s intended for DC applications, but there are other dummy loads available for things such radio antenna design, and it turns out that you can learn a lot from them too.

Continue reading “Custom Dummy Load With Data Logging”

Tracking Boats And Ships In Real Time At The Same Time

Software-defined radio came on the hacker scene in a big way less than a decade ago thanks to the discovery that a small USB-based TV tuner dongle could be used for receiving all kinds of radio transmissions. Two popular projects from that era are tracking nearby airplanes and boats in real time. Of course, these projects rely on different frequencies and protocols, but if you live in a major port city like [Ian] then his project that combines both into a single user interface might be of interest.

This project uses an RTL-SDR dongle for the marine traffic portion of the project, but steps up to a FlightAware Pro dongle for receiving telemetry from airplanes. Two separate antennas are needed for this, and all of the information is gathered and handled by a pair of Raspberry Pis. The Pis communicate with various marine and air traffic databases as well as handles the custom user interface that knits both sets of information together. This interface was custom-built from a previous project of his and was repurposed slightly to fit the needs of this one.

This is a great project that goes into a lot of interesting detail about how the web traffic moves and how the UI works, so even if you’re not into software-defined radio it might be worth a look. However, it’s also worth noting that it hasn’t been easier to set up a system like this thanks to the abundance and low price of RTL-SDR dongles and the software tools that make setting them up a breeze.

Modern Network Adapter For Retro Computers

Universal Serial Bus, or USB, is so ingrained in modern computing that it’s hard to imagine a time without it. That time did exist, though, and it was a wild west of connector types, standards, and interfacing methods. One of the more interesting interfaces of the time was the SIO system found in 8-bit Atari computers which ended up sharing a lot of the features of modern USB, and its adaptability is displayed in this modern project which brings WiFi, Bluetooth, USB, and SD card slots to any old Atari with an SIO port.

The project is called FujiNet and it uses the lightweight protocol of SIO to add a number of modern features to the 8-bit machine. It’s based on an ESP32, and the chip performs the functions of a network adapter by bridging WiFi and Bluetooth to the Atari. It does this by simulating drives that would have potentially been used on the Atari in its time, such as a floppy disk drive, an RS232 interface, or a modem, and translating them to the modern wireless communication protocols. It even has the ability to emulate a printer by taking the output of the print job from the Atari and converting it to PDF within the device itself.

Not only does this bring a lot of functionality to the Atari, which you may be able to use to view sites like retro.hackaday.com, but the FujiNet is housed in a period-appropriate 3D-printed case that matches the look and feel of the original Atari. If you need a more generic solution for your retrocomputing networking adventures that isn’t limited to SIO, we recommend grabbing a Raspberry Pi to handle that.

Thanks to [Gavin] for the tip!