How To MIDI Interface Your Toys

There’s a great number toys in the world, many of which make all manner of pleasant or annoying noises for the entertainment of children. If you’re a musician, these toys may be of interest due to their unique or interesting sounds. However, due to their design being aimed at play rather than performance, it may be difficult to actually use the toy as a musical instrument. One way around this is to record the sounds of the toy into a sampler, but it’s not the only way. [little-scale] is here to demonstrate how to MIDI interface your toys. 

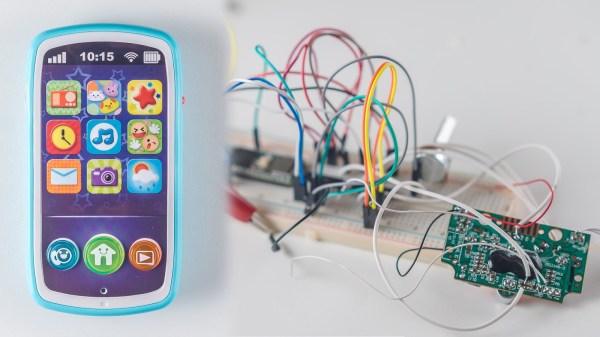
[little-scale] starts out by discussing the many ways in which one can interface with a toy. The article discusses how a simple button can be replaced with a relay, or a multiplexer, and be interfaced to all manner of other devices to control the toy. This is demonstrated by using a mobile phone toy which makes sounds when buttons are pressed.

A Teensy 3.6 is used to run the show, acting as a USB-MIDI interface so the toy can be controlled by music software like Abelton. It’s connected to the toy’s buttons through a multiplexer. The toy’s speaker is cut off and used as an audio output instead, allowing the toy to be easily connected to other audio hardware for performance or recording. It’s also fed through a digital pot so MIDI commands can control the volume. A resistor is used to control pitch in the toy, so this too was replaced with a digital pot as well, to allow sample pitch to be controlled.

The project is incredibly well documented, with [little-scale] first tearing down the toy and highlighting the points of interest, before stepping through each stage of interfacing the toy to the digital world. We’ve seen some of [little-scale]’s work before, too – namely, this MIDI DAC for controlling vintage synthesizers. Video after the break. Continue reading “How To MIDI Interface Your Toys”

Restoring A Retro 747 Control Display Unit

Anyone who’s into retro aviation gear falls in love with those mysterious displays, dials, keypads, banks of knife switches. There’s a lot of sexy in those devices, built with high standards in a time when a lot of it was assembled by hand.

[Jeremy Gilbert] bought a 747-200’s Control Display Unit (CDU)– the interface with the late ’70s in-flight computer–and is bringing it back to life in a Hackaday.io project. His goal is to get it to light up and operate just as if it were installed in a 747.

Of particular interest is the display, which turned out to consist of a series of 5×7 matrices (seen on the right) controlled by chips no one uses any more. However, [Jeremy] found a blog post where someone had hacked out Arduino code for a cousin of the chip, saving him a lot of time. However, he’s got a lot more sleuthing yet to do.

If you’re into retro displays, we’ve mentioned a number of good ones, including the legendary Apollo DSKY and an awesome retrocomputer.


Wherein The Mechanical Keyboard Community Discovers Motorized Linear Potentiometers

Deep in the bowels of the Digikey and Mouser databases, you’ll find the coolest component ever. Motorized linear potentiometers are a rare, exotic, and just plain neat input device most commonly found on gigantic audio mixing boards and other equipment that costs as much as a car. They’re slider potentiometers with a trick up their sleeve: there’s a motor inside that can set the slider to any position.

The mechanical keyboard community has been pushing the boundaries of input devices for the last few years, and it looks like they just discovered motorized linear pots. [Jack] created a motorized sliding keycap for his keyboard. It’s like a scroll wheel, but for a keyboard. It’s beautiful, functional, and awesome.

The hardware for this build is just about what you would expect. A 60 mm motorized linear pot for the side-mount, or 100 mm mounted to the top of the keyboard, is controlled by an Arduino clone and a small motor driver. That’s just the hardware; the real trick here is the software. So far, [Jack] has implemented a plugin system, configuration software, and force feedback. Now, messing with the timeline in any Adobe product is easy and intuitive. This device also has a ‘not quite vibration’ mode for whenever [Jack] gets a notification on his desktop.

Right now, [Jack] is running a group buy for this in a reddit thread, with the cost somewhere between $55 and $75, depending on how many people want one. This is a really awesome product, and we can’t wait for Corsair to come out with a version sporting innumerable RGB LEDs. Until then, we’ll just have to drool over the video [Jack] posted below.

Continue reading “Wherein The Mechanical Keyboard Community Discovers Motorized Linear Potentiometers”

Touchless MIDI: The Secret’s In The Mitten

MIDI is a great tool for virtually any musician. Unless you’re a keyboard player, though, it might be hard to use it live. [Evan] recently came up with a great solution for all of the wistful guitar players out there who have been dreaming of having a MIDI interface as useful as their pianist brethren, though. He created a touchless MIDI controller that interfaces directly with a guitar.

Continue reading “Touchless MIDI: The Secret’s In The Mitten”

New Hard Drives For Old Computers

After a certain age, computers start to show signs that they might need to be replaced or upgraded. After even more time, it starts getting hard to find parts to replace the failing components. And, as the sands slip through the hourglass, the standards used to design and build the computer start going obsolete. That’s the situation that [Drygol] found himself in when he was asked to build a SD-card hard drive for an Atari.

The 8-bit Atari in question was a fixture of home computing in the 80s. In fact, if you weren’t on the Commodore train, it’s likely that your computer of choice was an Atari. For the nostalgic among us, a new hard drive for these pieces of history is a great way to relive some of the past. Working off of information from the SIO2SD Wiki page, [Drygol] used the toner transfer method to build a PCB, 3D printed a case, and got to work on his decades-old computer.

Resurrecting old hardware is a great way to get into retrocomputing. Old protocols and standards are worth investigating because they’re from a time where programmers had to make every bit count, and there are some gems of genius hidden everywhere. Whether you’re reworking SIO from an old Atari, or building a disk emulator for an Apple ][, there are lots of options.

The Newest Graphing Calculator Game

Certainly everyone remembers passing time in a boring high school class playing games on a graphing calculator. Whether it was a Mario-esque game, Tetris, or BlockDude, there are plenty of games out there for pretty much all of the graphing calculators that exist. [Christopher], [Tim], and their colleagues from Cemetech took their calculator game a little bit farther than we did, and built something that’ll almost surely disrupt whatever class you’re attempting to pay attention in: They built a graphing calculator whac-a-mole game.

This game isn’t the standard whac-a-mole game, though, and it isn’t played on the calculator’s screen. Instead of phyiscal “moles” the game uses LEDs and light sensors enclosed in a box to emulate the function of the moles. In order to whack a mole, the player only needs to interrupt the light beam which can be done with any physical object. The team made extensive use of the ArTICL library which allows graphing calculators to interface with microcontrollers like the MSP432 that they used, and drove the whole thing with a classic TI-84.

This project is a fun way to show what can be done with a graphing calculator and embedded electronics, and it was a big hit at this past year’s World Maker Faire. Calculators are versatile in other ways as well. We’ve seen them built with open hardware and free software, And we’ve even seen them get their own Wi-Fi.

Continue reading “The Newest Graphing Calculator Game”

Scratching Vinyl Straddles Physical And Digital Realms

The life of a modern DJ is hard. [Gergely] loves his apps, but the MIDI controller that works with the app feels wrong when he’s scratching, and the best physical interfaces for scratching only work with their dedicated machines. [Gergely]’s blog documents his adventures in building an interface to drive his iPad apps from a physical turntable. But be warned, there’s a lot here and your best bet is to start at the beginning of the blog (scroll down) and work your way up. Or just let us guide you through it.

In one of his earliest posts he lays out his ideal solution: a black box that interprets time-code vinyl records and emulates the MIDI output of the sub-par MIDI controller. Sounds easy, right? [Gergely] gets the MIDI side working fairly early on, because it’s comparatively simple to sniff USB traffic and emulate it. So now he’s got control over the MIDI-driven app, and the hard part of interfacing with the real world began.

After experimenting a lot with timecode vinyl, [Gergely] gives up on that and looks for an easier alternative. He also considers using an optical mouse, but that turns out to be a dead-end as well. Finally, [Gergely] settled on using a Tascam TT-M1, which is basically an optical encoder that sits on top of the record, and that makes the microcontroller’s job a lot easier. You can see the result in the video below the break.

And then in a surprise ending worthy of M. Night (“I see dead people”) Shyamalan  he pulls timecode vinyl out of the grave, builds up a small hardware translator, and gets his original plan working. But we have the feeling that he’s not done yet: he also made a 3D printed optical-mouse holder.

Continue reading “Scratching Vinyl Straddles Physical And Digital Realms”