KeyMouSerial Solves Your Raspberry Pi Keyboard Problems

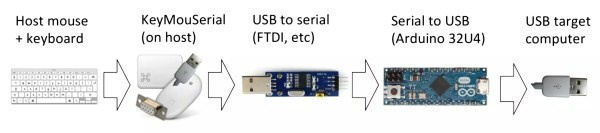
All laptops have a working keyboard and mouse built into them, the only problem is that you can’t use these tools on other computers that don’t have them. At least, until now. [Peter] has created the KeyMouSerial in order to use his laptop’s keyboard and mouse as physical devices on his Raspberry Pi, finally freeing the bonds holding our laptops’ human interface devices back.

The software for KeyMouSerial copies keystroke and mouse information and sends this out via a serial port on his laptop (using a USB to serial adapter). From there the information is translated by an Arduino into HID commands which are sent via USB to the target computer, in this case a Raspberry Pi. It’s a pretty elegant solution to carrying a bulky keyboard and mouse along just for a Raspberry Pi, or for any computer that might not have access to a network and SSH.

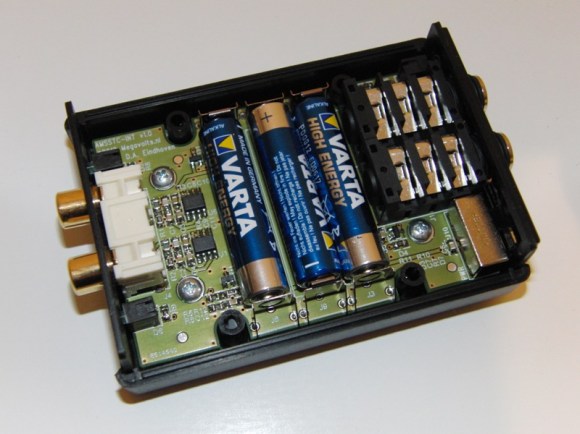
[Peter] has also been working on using his iPod as a serial-to-USB converter, so if you’re a Rockbox developer and want to help out then drop him a line. All of the software is available (for Windows, Mac, or Linux) including the Arduino sketch if you want to try this software out for yourself. And, if you don’t want to turn a computer into a keyboard and want to go the other direction and turn a keyboard into a computer, that is also an option.

Laminated iPod Dock Speaker

Solid Plywood Enclosure IPod Speaker Dock

Portable Media Players are great for listening to music on the go. At home though, using headphones may not be the most convenient or comfortable option. [decpower] didn’t have a stereo to connect his iPod to. Since he didn’t want to shell out a bunch of money to buy one, he decided to build his own iPod dock and powered speaker combo.

Laminated iPod Dock Speaker 
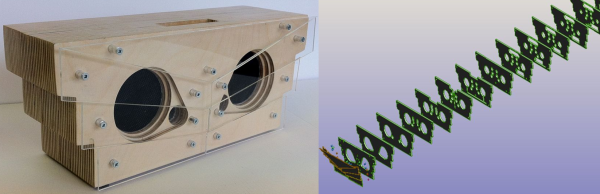
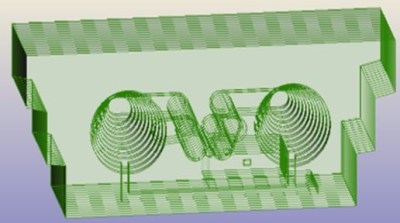
The case is made out of plywood: many, many layers of plywood. Each layer of plywood was cut out using a laser cutter. Unlike most speaker cabinets that have a distinct boxy enclosure, this unit is mostly solid with cutouts in each layer only where voids were designed to be. [decpower] tried to replicate the Bose Wave Radio internal sound passages. Up top a dock slot complete with a 30-pin connector makes connecting an iPod super simple.

Unfortunately, [decpower] doesn’t say what he’s using for an amplifier or where his speakers came from. He does indicate that there is an internal battery for powering the setup and it appears there is a volume knob out back. Regardless, the final project looks pretty good and [decpower] deserves some kudos for the unique construction method.

DIY Custom Molded Earbud Roundup

Headphones have become ubiquitous these days. Thanks to the iPod and the smartphone, it’s become commonplace to see someone wearing a pair of earbud style headphones. Earbuds aren’t always comfortable though. On some people they are too loose. On others, the fit is so tight that they cause pain.To that end, we’ve found a few great solutions for this problem.

[cptnpiccard] has documented his custom molded Sugru earbuds in an Imgur gallery. He’s molded a pair of standard earbuds into a cast of his ear. He uses them both for hearing protection and tunes while skydiving. Sugru’s FAQ states that while the cured material is safe for skin contact (and in ear use) some people are sensitive to the uncured material.

While discussing his project on Reddit, a few users chimed in and mentioned they’ve made custom molded earbuds using Radians custom earplug kits. The Radians material hardens up in only 10 minutes, which beats waiting an hour for Sugru.

The absolute top of the food chain has to be building your own triple driver in ear monitors, which is exactly what [marozie] has done. Professional custom molded monitors can cost over $1000, which puts them in the realm of professional musicians and audiophiles. [marozie] discovered that mouser stocks quite a few transducers from Knowles. These tiny speakers don’t come cheap, though; you can spend upwards of $70 just for a single driver.

[marozie] took a cast of his ear using an earmold impression kit. He used this cast to create a mold. From there it was a matter of pouring resin over his carefully constructed driver circuits and audio tubes. The resulting monitors look and sound incredible.

It goes without saying that making custom in ear monitors involves putting chemicals into you ears. The custom earmold kits come with tiny dams to keep the mold material from going in too far and causing damage. This is one of those few places where we recommend following the instructions. Click past the break to see a demo video of the ear molding process.

Continue reading “DIY Custom Molded Earbud Roundup”

The Bluetooth IPod Controller For Android

iDuinoid

By now, just about everyone in the industrialized world has a broken iPod with a cracked screen, a battery that won’t charge, or one that’s simply sitting in a drawer somewhere. The iPod is still a great way to store music, though, and [Trevor] came up with a way to control its playback with an Android device, showing the song name, playlists, and everything else with an Arduino and a cheap Bluetooth adapter

With the right resistance on a specific pin on the 30-pin dock connector, iPods will send the track name, and playlists over a serial connection, as well as respond to play, pause, skip, and volume commands. There hasn’t been much work towards implementing the copious amount of documentation of this iPod accessory mode in small microcontroller projects, but with a little bit of work, [Trevor] managed to replicate the usual iPod dock commands with an Arduino.

Using an HC-05 Bluetooth module, it’s possible to get this iPod-connected Arduino to relay data to and from an Android device with a small app. The circuit is simple, the app is free, and if you have an iPod with an old battery or cracked screen, it can still work as a music storage device. Not bad, [Trevor].

AuPod, The Solid Gold IPod Nano Watch

aupod


The 6th generation iPod nano makes a wonderful watch, but something milled out of aluminum doesn’t lend itself to more formal events. [Ted] liked the idea of an iPod nano watch, but wanted to kick things up a notch and fabricate an 18k gold iPod nano. It took 500 hours and $2500 in materials, but we’d say it’s worth it.

The new 18k gold enclosure for the watch was fabricated using the lost wax casting method. First, all the electronics and buttons were removed from the iPod, then a negative mold was made in silicone rubber. A positive wax mold was made with the silicon mold, and finally another negative mold – this time in plaster – was made by vaporizing the positive wax mold in a furnace.

[Ted] used two one-ounce coins as the source of gold for his nano enclosure, spun into the plaster mold. From there, it’s just a simple but tedious matter of cutting the sprues off, shaping, filing, buffing, and polishing. With a new leather strap, the iPod is reassembled in its new enclosure.

Wonderful work, and amazingly impressive from someone who doesn’t consider himself a jeweler.

Modulator Box Connects IPod To Tesla Coil

tesla-coil-modulator

This pass through audio modulator lets you playback stereo audio on two Tesla coils. But don’t fret, you can just use mono files if you only have one coil on hand. On one side there are inputs that connect to the audio source. The other side drives the Tesla coil, switching it on and off based on the relationship between a reference voltage and the audio signal. As you can hear in the video after the break this sounds great as long as you have the right kind of source audio.

The song played in that clip is the Duke Nukem 3D theme. [Daniel] started with a MIDI file and removed the chimes and drums to make the playback a little cleaner. The demo uses just one coil because the other was destroyed during testing when feedback between the two became a problem.

For some reason this reminds us of that singing Tesla coil hat. If you’re already on our mailing list (sign up in the sidebar) you know we’re getting pretty close to unveiling our own awesome Tesla coil project. It doesn’t sing… yet.

Continue reading “Modulator Box Connects IPod To Tesla Coil”

Adding Charging Back To Old Apple Accessories

From time-to-time we’ve been frustrated by the lack of backwards compatibility for Apple accessories. We have a great Monster FM transmitter that used the screen of the original iPod to select a channel. That was a feature we just loved which it never worked with any future hardware. We may not be able to get that back, but perhaps this hack can help us implement the ability to charge newer Apple devices using older accessories.

Seen above is the mounting dock from the iPod Hi-Fi speakers released back in 2006. Apparently the sound out of this set of speakers is just great, but you won’t be able to charge your modern device while it’s playing music. That is unless you’re not afraid to solder on a few simple components and roll in a switching regulator which can source at least one Amp of current. As we’ve seen in the past, Apple uses a couple of voltage dividers to identify modern chargers. These are installed on the D+ and D- lines of the USB connector and are pretty easy to recreate if you know the voltage levels the device is looking for. In this case a 39K, two 51k, and one 75k surface mount resistors are free-formed right next to the connector on the Hi-Fi’s dock PCB. The regulator on the right supplies the juice for charging. It’ll charge modern devices now, and even work with the iPhone five if you use a simple dock connector adapter.