Solving ISP Problem With A Homebrew LTE Yagi

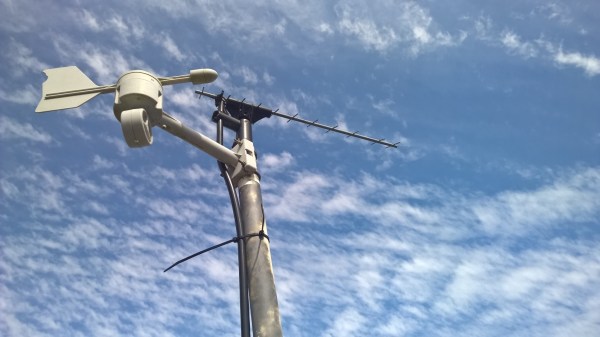
We’ve heard reports that internet connectivity in Australia can be an iffy proposition, and [deandob] seems to back that up. At the limit of a decent DSL connection and on the fringe of LTE, [deandob] decided to optimize the wireless connection with this homebrew Yagi antenna.

Officially known as the Yagi-Uda after its two Japanese inventors from the 1920s, but generally shortened to the name of its less involved but quicker to patent inventor, the Yagi is an antenna that provides high gain in one direction. That a homebrew antenna was even necessary at all is due to [deandob]’s ISP using the 2300MHz band rather than the more popular 2400MHz – plenty of cheap 2.4GHz antennas out there, but not so much with 2.3GHz. With multiple parallel and precisely sized and spaced parasitic elements, a Yagi can be a complicated design, but luckily for [deandob] the ham radio community has a good selection of Yagi design tools available. His final design uses an aluminum rod for a boom, 2mm steel wire for reflectors and directors, and a length of coax as the driven element. The result? Better connectivity that pushes his ISP throttling limit, and no more need to mount the modem high enough in his house to use the internal antenna.

People on the fringes of internet coverage go to great lengths to get connections, like this off-grid network bridge. Or if you’d rather use a homebrew Yagi to listen to meteors, that’s possible too.

Local Hacker Discovers Card Edge Connectors

When [turingbirds] was looking around for the absolute minimum connector for a JTAG adapter, he wanted something small, that didn’t require expensive adapters, and that could easily and reliably connect a few JTAG pins to a programmer. This, unsurprisingly, is a problem that’s been solved many times over, but that doesn’t mean there isn’t room for improvement. [turingbirds] found his better solution by looking at some old card edge connectors.

Instead of 0.1″ pitch pin headers, weirder and more expensive connectors, the Tag Connect, or even pogo pins, [turingbirds] came up with a JTAG adapter that required no additional parts, had a small footprint, and could be constructed out of trash usually found behind any busy hackerspace or garage. The connector is based on the venerable PCI connector, chopped up with a Dremel and soldered to a JTAG or ISP programmer.

This is simply a card edge connector, something the younglings seem to have forgotten. Back in the day, card edge connectors were a great way to connect peripherals, ports, and anything else to the outside world. They were keyed, and you could only put them in one way. They were relatively cheap, and with a big coil of ribbon cable, you could make custom adapters easily. For low-speed connections that will only be used a few times, it’s very hard to beat a card edge connector.

Of course the connector itself is only half of the actual build. To turn a chopped up PCI connector into a JTAG adapter, [turingbirds] made footprint and part files for his favorite PCB design tool. In this case it’s Eagle, and the libraries that will plop one of these connectors down are available on GitHub.

Is this the latest and greatest way to plug a programmer into a board? No, because this has been around for 30 or 40 years. It does, however, put a programming port on a PCB with zero dollars in components, a minimum of board footprint, and uses parts that can be salvaged from any pile of old computers.

High Voltage AVR Programmer

The most common way of programming AVR microcontrollers is the In System Programming port. That little six-pin header with MOSIs and MISOs coming out of it will program every AVR you’ll ever come across. The ISP does have a downside – fuses. Set your fuses wrong, and without a High Voltage Serial Programmer, your chip is bricked. [Dilshan] designed his own HVSP that’s less expensive than the Atmel STK500 and has a nice GUI app.

Instead of following in the footsteps of the USBtinyISP, [Dilshan] is using a PIC18F as the main microcontroller in the programmer. This chip was chosen because of its built-in USB functionality. Because the High Voltage part of a HVSP operates at 12V, actually providing that voltage needed to be taken into consideration. For this, [Dilshan] is using standard 78xx regulators with an 18V input.

The app to control this programmer does everything you would expect, including all the usual AVRdude commands. A great build, and just what we need to reset the fuses on a few dozen chips we have sitting around.

Flashing Chips With A CNC

[Eberhard] needed to flash several hundred ATMegas for a project he was working on. This was a problem, but the task did have a few things going for it that made automation easy. The boards the ‘Megas were soldered to weren’t depanelized yet, and he had a neat and weird bed of nails programming connector. There was also a CNC machine close by. This sounds like the ideal situation for automation, and it turns out the setup was pretty easy.

The boards in question were for FPV/radio control telemetry adapter and thankfully the assembly house didn’t depanelize the 40 PCBs on each board before shipping them out. A very cool ATMega flashing tool handled the electrical connections between the computer and the microcontroller, but a real, live human being was still required to move this flashing tool from one chip to the next, upload the firmware, and repeat the process all over again.

The solution came by putting a few metal pins in the bed of a CNC mill, 3D print an adapter for the flashing tool, and writing a little code to move the flashing tool from one chip to the next. An extremely simple app takes care of moving the programmer to an unflashed chip, uploading the firmware, and continuing on to the next chip.

There’s still some work to be done that would basically tie together the Gcode and AVRdude commands into a single interface, but even now a complete panel of 40 PCBs can be programmed in a little over 10 minutes. You can check out a video of that below.

Continue reading “Flashing Chips With A CNC”

Chaos Computer Club (and Hackaday) Blocked By British Porn Filters

The Chaos Computer Club, Europe’s largest association of hackers and hackerspaces, has been blocked by several UK ISPs as part of a government filter to block adult content.

Since July, 2013, large UK ISPs have been tasked with implementing what has been dubbed the Great Firewall of Britain, a filter that blocks adult content, content related to alcohol, drugs, and smoking, and opinions deemed ‘extremist’ by the government. This is an opt-out filter; while it does filter out content deemed ‘unacceptable’, Internet subscribers are able to opt out of the filter by contacting their ISP.

Originally envisioned as a porn filter, and recently updated with list of banned sexual acts including spanking, aggressive whipping, role-playing as non-adults, and humiliation, the British Internet filter has seen more esoteric content blocked from British shores. Objectionable material such as, “anorexia and eating disorder websites,” “web forums,” “web blocking circumvention tools”, and the oddly categorized, “esoteric material” are also included in the filter.

A site built by the Open Rights Group is currently tracking which ISPs blocking which domains. http://ccc.de is currently blocked by ISPs Three and Vodafone. Interestingly, this site – Hackaday – is blocked by the ‘Moderate’ British Telecom filter. The ‘Light’ BT filter – and all other British ISPs – still somehow let Hackaday through, despite posts about building shotguns cropping up from time to time.

UPDATE: Upon reflection, it comes to my attention that Brits have a choice of ISP.

ISPnub – A Stand-Alone AVR In-System-Programmer Module

[Thomas] tipped us about his latest project: a stand-alone AVR programmer module named ISPnub. As you can see in the picture above, it is a simple circuit board composed of a main microcontroller (ATmega1284p), one button and two LEDs. Programming a target is a simple as connecting the ISPnub and pressing the button. The flashing operation success status is then shown using the green/red LED.

ISPnub gets its power from the target circuit so no external power supply is needed. It works over a wide voltage range: 1.8V to 5.5V. The module also features a programming counter which can be used to limit the number of programming cycles. A multi-platform Java tool is in charge of embedding the target flash contents with the ISPnub main firmware. The complete project is open source so you may want to check out the official GitHub repository for the firmware and the project’s page for the schematics.

Programming The XMEGA With An ISP

Atmel’s XMEGA series of microcontrollers are neat little pieces of hardware; with a very fast clock, a ton of IO, USB, and up to 8 UART ports, these neat little chips serve as a nice bridge between AVRs and PICs and the very powerful ARM chips coming out on the market. Unfortunately, the XMEGAs don’t use the extremely common ISP programming header found on just about every AVR dev board making them a bear to program. [Szu] over in Poland came up with a very easy way to program these chips, all while using the programming hardware you already have on hand.

[Szu]’s build uses a few resistors and diodes to break out a USBASP connection to the XMEGA’s PDI interface. On the software side of things, [Szu] wrote an update to the USBASP firmware to allow it to program PDI devices, and also has a patch for AVRdude to allow uploading firmware from the command line.

A very cool build, and one that allows for very, very powerful devices that build on the AVR code you’ve already written.