Two chillers side-by-side - the fake chiller on the left and the water fountain chiller (lid-less) on the right

Gutting And Upgrading Laser “Chiller” With No Chill

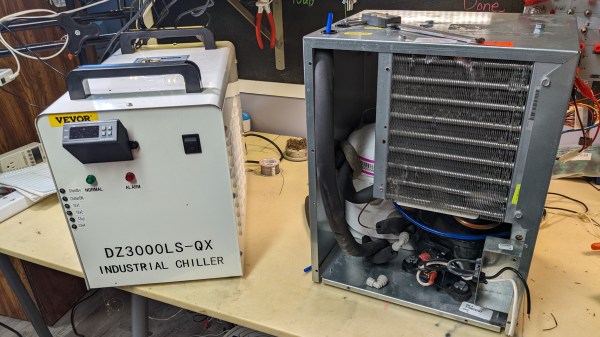
Getting a cheap CO2 laser cutter is great for your workshop needs, and while you might get a weaker-than-declared laser tube, it’s still going to cut whatever you need to be cut. That might not be the case for the cooling equipment you’re getting alongside it, however, as [RealTimeKodi] shows in a post-project blogpost. They bought a CX3000 “chiller” and found out it had no chiller components (Nitter), only equipped with a radiator, a fan, and a pump.

Having your laser tube water be somewhat close to ambient temperature is something you can already achieve with an aquarium pump and a bucket of water — and it isn’t worth paying $100 for. Left with the sunk cost and an unfulfilled need for a proper chiller, [RealTimeKodi] started looking for paths to take – first one was using TEC elements. The upgrade process was fun, but the result was subpar, as the elements gobbled power with hardly any useful output to show for it.

[RealTimeKodi] didn’t give up, and eventually found an old water fountain chiller with chiller-like components inside, sold for $200. They could’ve used the water fountain as-is, but a few design issues and thirst for adventure got in the way, indisputably forcing them to stuff the fountain’s guts into the CX3000’s case.

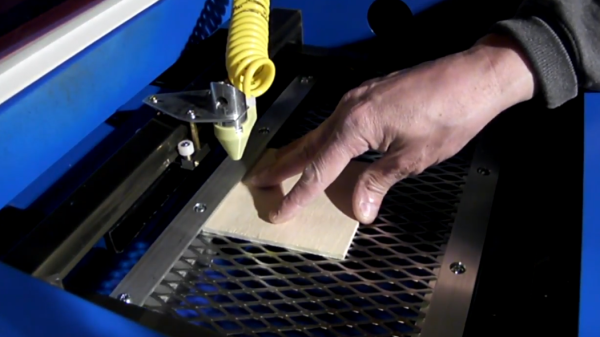
Buying a laser cutter can sometimes feel like buying a 3D printer a decade ago — you get a K40, learn to use it, add the missing safety features, mod in autofocus, upgrade the control board, expand the work surface… That said, our experience shows that you don’t need any of those if A4-sized 3 mm wood cutting suit you, but a proper chiller is still worth its weight in gold-plated acrylic.

Continue reading “Gutting And Upgrading Laser “Chiller” With No Chill”

Putting The Finishing Touches On A 60W Laser

At this point if you’re even remotely interested in home laser cutters, you know about the K40. These imported machines are very impressive considering they only cost around $400 USD, but naturally, quite a few corners had to be cut to get the price down. If you’re looking for something with a bit more punch and much higher build quality, a new breed of 60 watt lasers have started popping up on the usual import sites for around $2,000 USD.

While these more expensive machines are certainly much higher quality than the K40, [Jeremy Cook] found there was still plenty of room for improvement. For example, the machine didn’t have any switch cut off the laser when somebody opens the lid. While we don’t doubt some readers will consider this more of a feature than a bug, it’s hard to believe that a tool that costs this much wouldn’t at least offer such a thing as an option.

Drilling a hole for the ammeter.

[Jeremy] also decided to add his own ammeter so he could see how much power the laser is drawing. While not strictly required for day to day operation, it turns out that the controller in many of these machines has a tendency to push the laser tubes beyond their design limits on the higher power settings. With the spec sheet for your tube and a permanent in-line ammeter, you can verify you aren’t unwittingly shortening the life of your new cutter.

Even if you ignore the modifications [Jeremy] makes in his video, it’s still a very illuminating look at what it takes to get one of these lasers ready for operation. Not only do you have to get the thing out of its shipping crate safely, but you need to come up with some way to deal with the fumes produced and get the water cooling system hooked up. It’s a decent amount of work, but the end results certainly look impressive.

While the K40 is still probably the better bet for new players, it’s good to see that there are some viable upgrades for anyone who’s outgrown their entry level machine but isn’t in a position to spend the money on an Epilog.

Continue reading “Putting The Finishing Touches On A 60W Laser”

K40 Gets A Leg Up With Open Source Z Table

If you’ve done even the most cursory research into buying a laser cutter, you’ve certainly heard of the K40. Usually selling for around $400 USD online, the K40 is not so much a single machine as a class of very similar 40 watt CO2 lasers from various Chinese manufacturers. As you might expect, it takes considerable corner cutting to drive the cost down that low, but the K40 is still arguably the most cost-effective way to get a “real” laser cutter into your shop. If you’re willing to do some modifications on the thing, even better.

One of the shortcomings of the K40 is that it lacks a Z axis, and with thick material that needs multiple cuts at increasingly deeper depths, this can be a hassle. [Aaron Peterson] decided to take it upon himself to design and build an adjustable Z table for the K40 at his local makerspace (River City Labs), and being the swell guy that he is, has made it available under an open source license so the rest of the K40-owning world can benefit from his work.

[Aaron] started the design with a number of goals which really helped elevate the project from a one-off hack to a sustainable community project. For one, he only wanted to use easily available commodity hardware to keep the cost down. The most complex components should all be 3D printable so the design would be easy to replicate by others, and finally, he wanted the user to have the ability to scale it in all dimensions. The end result is a electronically controlled lifting platform that anyone can build, for any laser cutter. It doesn’t even have to be limited to laser cutters; if you have a need for precisely raising or lowering something, this design might be exactly what you’re looking for.

The table is primarily constructed out of 15×15 aluminum extrusion, and uses standard hardware store expanded wire mesh as a top surface. Height is adjusted by rotating the four 95 mm T8 leadscrews with a GT2 belt and pulleys, which prevents any corner from getting out of sync with the others. Connected to a standard NEMA 17 stepper motor, this arrangement should easily be capable of sub-millimeter accuracy. It looks as though [Aaron] has left controlling the stepper motor as an exercise for the reader, but an Arduino with a CNC shield would likely be the easiest route.

We’ve seen a lot of hacking around the K40 over the last couple of years, from spring loaded beds to complete rebuilds which are hardly recognizable. If you’re looking for a cheap laser with a huge catalog of possible hacks and modifications, you could do a lot worse than starting with this inexpensive Chinese machine.

Spring-Loaded Bed For K40 Laser Acts As An Auto-Focus

Laser engraving and cutting has something in common with focusing the sun’s rays with a magnifying glass: good focus is critical to results. If materials of varying thicknesses are used, focus needs to be re-set every time the material changes, and manual focusing quickly becomes a chore. [Scorch Works] has a clever solution to avoid constant re-focusing that doesn’t involve sensors or motors of any sort. The result is a self-adjusting bed that compensates for material height changes, ensuring that the top surface of the material is always a fixed distance from the laser’s head.

The way [Scorch Works] has done this is to make two spring-loaded clamps from angle aluminum and a few pieces of hardware. When a sheet of material is placed into the machine, the edges get tucked underneath the aluminum “lips” while being pushed upward from beneath. By fixing the height of the top layer of angle aluminum, any sheet stock always ends up the same distance from the laser head regardless of the material’s thickness.

[Scorch Works] shows the assembly in action in the video embedded below, along with a few different ways to accommodate different materials and special cases, so be sure to check it out.

Continue reading “Spring-Loaded Bed For K40 Laser Acts As An Auto-Focus”

Fail Of The Week: Did My Laser Cutter Tube Really Burn Out?

All the cool kids are doing it these days, or more like for many years now: you can get a laser cutter for a song if you don’t mind doing your own repairs and upgrades — you know, being a hacker. The downside is that some failures can really ruin your day. This is what [Erich Styger] encountered with his cutter that is just a bit more than a year old. This Fail of the Week looks at the mysterious death of a CO2 laser tube.

This is the infamous K40 laser cutter. Our own [Adam Fabio] just took one on a couple of months back and [Erich] even references Hackaday coverage of the K40 Whisperer project as what pushed him over the edge to make the purchase. We’ve followed his blog as he acquired the cutter and made upgrades along the way, but after an estimated 500 hours of use, a horrible teeth-gnashing screech sprung forth from the machine. [Erich’s] reaction was to hit the e-stop; that’s certainly why it’s there.

Chasing down the problem is a story well-told, but as is often the case with these FotW articles, in the end what caused the failure is not entirely known. We’d love to hear what you think about it in the comments below.

The investigation began at the power supply for the laser, but that didn’t yield any answers. Next he moved to the tube itself, noticing that the wire connection to the tube’s anode wasn’t soldered. The anode is an unknown material he suspects to be graphite and he found a video showing the “soldering” process for connecting a wire. (We added quotes to that as the video he linked doesn’t actually solder anything but the wrapped wire strands themselves.) The solution he found is a great tip to take away from the story. It’s a socket by TE Connectivity to which he soldered the wire. Assuming it’s power rated for the task, and won’t fall off during normal operation, this is a great way to do it.

But we digress. Even with the connection made, the old tube had to be replaced with a new one. It’s also notable that the portion of that anode inside the bad tube is orange in color when a new tube would be black like the part on the outside. Does this hint at why that tube died, and could this have been avoided? If you have insight, help us learn from this failure by leaving a comment below.

The How And Why Of Laser Cutter Aiming

Laser aficionado [Martin Raynsford] has built up experience with various laser cutters over the years and felt he should write up a blog post detailing his first-hand findings with an often overlooked aspect of the machines: aiming them. Cheap diode laser cutters and engravers operate in the visible part of the spectrum, but when you get into more powerful carbon dioxide lasers such as the one used in the popular K40 machines, the infrared beam is invisible to the naked eye. A secondary low-power laser helps to visualize the main laser’s alignment without actually cutting the target. There are a couple of ways to install an aiming system like this, but which way works better?

[Martin] explains that there are basically two schools of thought: a head-mounted laser, or a beam combiner. In both cases, a small red diode laser (the kind used in laser pointers) is used to indicate where the primary laser will hit. This allows the user to see exactly what the laser cutter will do when activated, critically important if you’re doing something like engraving a device and only have one chance to get it right. Running a “simulation” with the red laser removes any doubt before firing up the primary laser.

That’s the idea, anyway. In his experience, both methods have their issues. Head-mounted lasers are easier to install and maintain, but their accuracy changes with movement of the machine’s Z-axis: as the head goes up and down, the red laser dot moves horizontally and quickly comes out of alignment. Using the beam combiner method should, in theory, be more accurate, but [Martin] notes he’s had quite a bit of trouble getting both the red and IR lasers to follow the same course through the machine’s mirrors. Not only is it tricky to adjust, but it’s also much more complex to implement and may even rob the laser of power due to the additional optics involved.

In the end, [Martin] doesn’t think there is really a clear winner. Neither method gives 100% accurate results, and both are finicky, though in different scenarios. He suggests you just use whatever method your laser cutter comes with from the factory, as trying to change it probably isn’t worth the effort. But if your machine doesn’t have anything currently, the head-mounted laser is certainly the easier one to retrofit.

In the past, we’ve covered a third and slightly unconventional way of aiming the K40, as well as a general primer for anyone looking to pick up eBay’s favorite laser cutter.

Laser Noob: Getting Started With The K40 Laser

Why spend thousands on a laser cutter/engraver when you can spend as little as $350 shipped to your door? Sure it’s not as nice as those fancy domestic machines, but the plucky K40 is the little laser that can. Just head on down to Al’s Laser Emporium and pick one up.  Yes, it sounds like a used car dealership ad, but how far is it from the truth? Read on to find out!

Laser cutting and engraving machines have been around for decades. Much like 3D printers, they were originally impossibly expensive for someone working at home. The closest you could get to a hobbyist laser was Epilog laser, which would still cost somewhere between $10,000 and $20,000 for a small laser system. A few companies made a go with the Epilog and did quite well – notably Adafruit used to offer laptop laser engraving services.

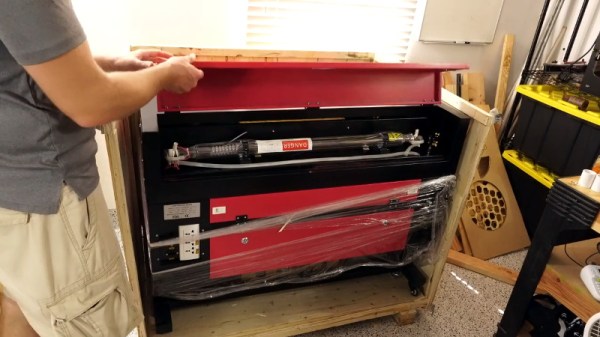
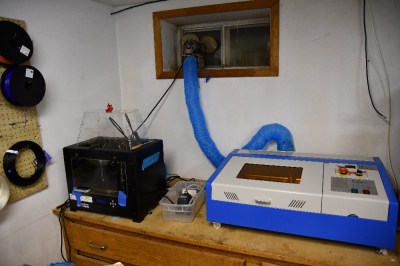
Over the last decade or so things have changed. China got involved, and suddenly there were cheap lasers on the market. Currently, there are several low-cost laser models available in various power levels. The most popular is the smallest – a 40-watt model, dubbed the K40. There are numerous manufacturers and there have been many versions over the years. They all look about the same though: A blue sheet metal box with the laser tube mounted along the back. The cutting compartment is on the left and the electronics are on the right. Earlier versions came with Moshidraw software and a parallel interface.

Continue reading “Laser Noob: Getting Started With The K40 Laser”