This RC Fortnite Rocket Is A Victory Royale

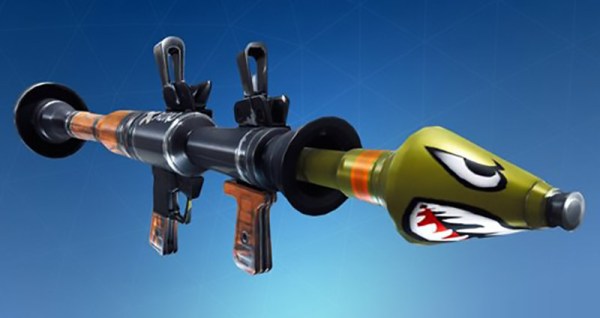
Minecraft is over and Red Dead Redemption II has barely even started yet. The biggest thing on the planet right now is Fortnite, and oh man, is it awesome. It’s the best game ever, and we wish every day was a Battle Royale. But what if Fortnite was real life? That’s exactly what [Giaco] and [David] did when they made an RC Fortnite Foam Rocket. It’s Fortnite, in the real world! If you don’t mind, we’re going to go T-pose in the corner.

The core of this build was done with the Maker Knife, first introduced as a Kickstarter by [Giaco] as an everyday carry utility knife that features ceramic blades. It’s impressive for a box cutter, but what’s even more impressive is that this fantastic tool can be used to make a real-life Fortnite rocket.

This rocket, like so many other RC planes we see these days, was constructed out of foam board, a technique that was popularized by the folks at Flite Test, and uses all the construction techniques you would usually see in a foam board model airplane. The hinges for the control surfaces are chamfered and reinforced with packing tape, servos are just hot glued to the body, and the control horns are just bits of cardboard.

What makes this really impressive is that this Fortnite rocket actually flies. [Giaco] took this plane out with [David] of rcexplorer fame, and even though this ‘plane’ didn’t really have any lifting surfaces, despite indiscernible center of gravity, and the fact that the paint weighed more than the plane itself, this thing can fly. Fairly well, too, until it gets stuck in a tree. There are prices to pay for producing content that’s this attractive to 12-year-olds, I guess.

Continue reading “This RC Fortnite Rocket Is A Victory Royale”

Custom ATTiny85 Board Powers Kids’ Light Show

We’ve often said that kids with hackers and makers for parents must be some of the luckiest kids in the world. While all the other children have to settle for some mass produced drivel from Toys“R”Us Amazon, they’ve got some of the most thoughtfully engineered and built toys and gadgets on the planet. After all, there’s no way any hacker worth their salt is going to give anything less than 110% for their own child.

A case in point is this RGB star nightlight that [Unexpected Maker] built for his children. The star itself is simple enough, just a basic shape printed in transparent PLA on his Prusa i3. The impressive part is how he lights it up. Rather than stick an Arduino or ESP8266 in there as we have seen plenty of times before, he’s put together his own custom ATTiny85 board specifically for controlling the RGB LED strips.

The board, which he calls TinyDev, is designed to be the same thickness as NeoPixel style LED strips so it can fit inside tight spaces. He solders it onto the tail end of his LED strip, adds a photoresistor so the star can tell when it’s time to light up, and then snakes the whole arrangement through a channel printed in the star itself. There’s a battery pack in the middle, but that’s about it. It really does allow for a remarkably clean LED strip implementation, and the mind can’t help but start thinking of interesting possibilities when you can tuck the controller into the same space as the lights themselves.

[Unexpected Maker] has made the TinyDev completely open source for anyone who wants to build their own, but it’s also available on Tindie if you want to get one to play with quickly. If you’re looking to light up the little one’s room with somewhat more mainstream methods, we’ve got that covered too.

Continue reading “Custom ATTiny85 Board Powers Kids’ Light Show”

ESP8266 Keeps Tabs On The Kid’s Tablets

Assuming you have a child and it’s no longer womb-bound, there’s a fairly high chance they’ve already had some experience with the glowing beauty that is the LCD display; babies of only a few months old are often given a tablet or smartphone to keep them occupied. But as the child gets to the age where they are capable of going outside or doing something more constructive, staring slack-jawed and wide-eyed at their tablet becomes a concern for many parents.

[Richard Garsthagen] is one such parent. He wanted a way to monitor and control how much time his children were using their iPad, so he came up with an automated system based on the ESP8266. Not only does it keep track of how long the tablet is being used, it even includes a reward system which allows the parent to add extra usage time for good behavior.

At the most basic level, the device is a sort of “holster” for the child’s tablet. When the tablet is placed in the slot, it presses a microswitch at the bottom of the cavity which stops the timer. When the switch is open, the LED display on the front of the device counts down, and the ESP8266 pushes notifications about remaining time to the child’s device via IFTTT.

Time can be added to the clock by way of RFID cards. The cards are given out as a reward for good behavior, completion of chores, etc. The child only needs to pass the card in front of the system to redeem its value. Once the card has been “spent”, the parent can reset it with their own special card.

It’s a very slick setup, making perfect use of the ESP8266. Reading the RFID cards, updating the timer, and using IFTTT’s API keeps the little board quite busy; [Richard] says it’s completely maxed out.

You might be wondering what happens when the clock reaches zero. Well, according to the video after the break…nothing. Once the time runs out, a notification simply pops up on the tablet telling them to put it away. Some might see this as a fault, but presumably it’s the part of the system where humans take over the parenting and give the ESP8266 a rest.

This isn’t the first time we’ve seen a microcontroller used to get the little hackers on schedule. At least (so far) none of them have gone full Black Mirror and started tracking when the kiddos are watching it.

Continue reading “ESP8266 Keeps Tabs On The Kid’s Tablets”

It’s Not Morning Until Green O’clock

[JohnathonT] has a two-year-old who can’t reliably tell time just yet. Every morning, he gets up before the rooster crows and barges into his parents’ room, ready to face the day.

In an effort to catch a few more Zs, [JohnathonT] built a simple but sanity-saving clock that tells time in a visual, kid-friendly way. Sure, this is a simple build. But if a toddler is part of your reality, who has time to make one from logic gates? The hardware is what you’d expect to see: Arduino Nano, a DS1307 RTC, plus the LEDs and resistors. We think an RGB LED would be a nice way to mix up the standard stoplight hues a bit.

At a glance, little Mr. Rise and Shine can see if it’s time to spread cheer, or if he has to stay in his room and play a bit longer. At 6:00AM, the light powers on and glows red. At 6:50, it turns yellow for 10 minutes. At the first reasonable hour of the day, 7:00AM, it finally turns green. In reading the code, we noticed that it also goes red at 8:00PM for 45 minutes, which tells us it also functions as a go-to-sleep indicator.

When his son is a little older, maybe [JohnathonT] could build him  a clock that associates colors with activities.

A Hacker’s Epic Quest To Keep His Son Entertained

Little humans have a knack for throwing a wrench in the priorities of their parents. As anyone who’s ever had children will tell you, there’s nothing you wouldn’t do for them. If you ever needed evidence to this effect, just take a gander at the nearly year-long saga that chronicles the construction of an activity board [Michael Teeuw] built for his son, Enzo.

Whether you start at the beginning or skip to the end to see the final product, the documentation [Michael] has done for this project is really something to behold. From the early days of the project where he was still deciding on the overall look and feel, to the final programming of the Raspberry Pi powered user interface, every step of the process has been meticulously detailed and photographed.

The construction methods utilized in this project run the gamut from basic woodworking tools for the outside wooden frame, to a laser cutter to create the graphical overlay on the device’s clear acrylic face. [Michael] even went as far as having a custom PCB made to connect up all the LEDs, switches, and buttons to the Arduino Nano by way of an MCP23017 I2C I/O expander.

Even if you aren’t looking to build an elaborate child’s toy that would make some adults jealous, there’s a wealth of first-hand information about turning an idea into a final physical device. It isn’t always easy, and things don’t necessarily go as planned, but as [Michael] clearly demonstrates: the final product is absolutely worth putting the effort in.

Seeing how many hackers are building mock spacecraft control panels for their children, we can’t help but wonder if any of them will adopt us.

Continue reading “A Hacker’s Epic Quest To Keep His Son Entertained”

A Jukebox For The 21st-Century Kit Blends Raspberry Pi, Sonos, QR Codes

When [Chris Campbell]’s children wanted to play an album in the background over dinner, switching the outputs on his family’s Sonos sound system was perhaps too involved for their budding mastery of technology. This got him thinking about using kid-friendly inputs so they could explore his music collection. Blending QR codes, some LEGO, and a bit of arts and crafts, a kid-friendly QR code reader media controller comes out!

Working with a Raspberry Pi 3 Model B and a cheap camera, [Campbell] whipped up some code to handle producing and reading the QR codes — though he’s running the media server on another computer to maintain fast response times. Once [Campbell] had his QR codes, he printed them out and got his kids involved in cutting and gluing the double-sided cards. Additional cards access different functions — starting a playlist queue, switching output channels, and full album playback, among others. Cue spontaneous dance-parties!

Continue reading “A Jukebox For The 21st-Century Kit Blends Raspberry Pi, Sonos, QR Codes”

ZeroBot Is As Simple As It Gets

Usually at Hackaday we like to post projects that are of interest because of their complexity. That’s especially true for robots — the more motors and sensors the better. But, occasionally we come across a project that’s beautiful because of its simplicity. That’s the case with [Max Kern]’s ZeroBot, recently posted over on Hackaday.io.

The ZeroBot breaks the essence of a robot down to just the essentials: a Raspberry Pi Zero W for the brains, a driver and two motors for movement, a battery for power, and a camera to see. The chassis is made completely of parts that are easily 3D-printable. The Zero W creates a WiFi access point that users can connect to on a computer or smart phone, and subsequently provides FPV control.

This project is reminiscent of the starter robot kits many of us began our hacking lives with, and it’s a great teaching tool for kids. Print the parts and you can have the robot built-in an afternoon, while still being fun enough to actually play with when you’re done. After the physical robot is built, the possibilities for programming and controlling it are endless.

Continue reading “ZeroBot Is As Simple As It Gets”