Small synth held in two hands

3D Printed Synth Kit Shares Product Design Insights

We’ve always been delighted with the thoughtful and detailed write-ups that accompany each of [Tommy]’s synth products, and the background of his newest instrument, the Scout, is no exception. The Scout is specifically designed to be beginner-friendly, hackable, and uses 3D printed parts and components as much as possible. But there is much more to effectively using 3D printing as a production method than simply churning out parts. Everything needed to be carefully designed and tested, including the 3D printed battery holder, which we happen to think is a great idea.
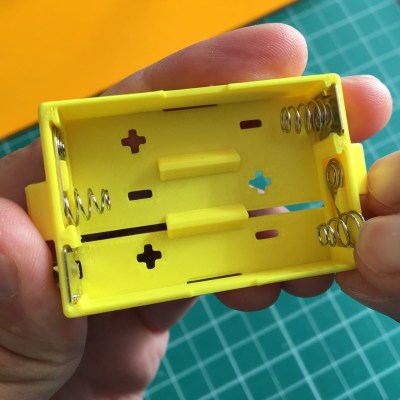
3d printed battery holder, showing inserted spring contacts
3D printed battery holder, with spring contacts inserted by hand.

[Tommy] also spends some time explaining how he decided which features and design elements to include and which to leave out, contrasting the Scout with his POLY555 synth. Since the Scout is designed to be affordable and beginner-friendly, too many features can in fact be a drawback. Component costs go up, assembly becomes less straightforward, and more complex parts means additional failure points when 3D printing.

[Tommy] opted to keep the Scout tightly focused, but since it’s entirely open-sourced with a hackable design, adding features is made as easy as can be. [Tommy] designed the PCB in KiCad and used OpenSCAD for everything else. The Scout uses the ATmega328, and can be easily modified using the Arduino IDE.

STL files can be downloaded here and all source files are on the project’s GitHub repository, which also contains detailed assembly and modification guides. Watch it in action in the video, embedded below.

Continue reading “3D Printed Synth Kit Shares Product Design Insights”

Peek Into This Synth’s Great Design (And Abandoned Features)

[Tommy]’s POLY555 is an analog, 20-note polyphonic synthesizer that makes heavy use of 3D printing and shows off some clever design. The POLY555, as well as [Tommy]’s earlier synth designs, are based around the 555 timer. But one 555 is one oscillator, which means only one note can be played at a time. To make the POLY555 polyphonic, [Tommy] took things to their logical extreme and simply added multiple 555s, expanding the capabilities while keeping the classic 555 synth heritage.

The real gem here is [Tommy]’s writeup. In it, he explains the various design choices and improvements that went into the POLY555, not just as an instrument, but as a kit intended to be produced and easy to assemble. Good DFM (Design For Manufacturability) takes time and effort, but pays off big time even for things made in relatively small quantities. Anything that reduces complexity, eliminates steps, or improves reliability is a change worth investigating.

For example, the volume wheel is not a thumbwheel pot. It is actually a 3D-printed piece attached to the same potentiometer that the 555s use for tuning; meaning one less part to keep track of in the bill of materials. It’s all a gold mine of tips for anyone looking at making more than just a handful of something, and a peek into the hard work that goes into designing something to be produced. [Tommy] even has a short section dedicated to abandoned or rejected ideas that didn’t make the cut, which is educational in itself. Want more? Good news! This isn’t the first time we’ve been delighted with [Tommy]’s prototyping and design discussions.

POLY555’s design files (OpenSCAD for enclosure and parts, and KiCad for schematic and PCB) as well as assembly guide are all available on GitHub, and STL files can be found on Thingiverse. [Tommy] sells partial and complete kits as well, so there’s something for everyone’s comfort level. Watch the POLY555 in action in the video, embedded below.

Continue reading “Peek Into This Synth’s Great Design (And Abandoned Features)”

Review: Calculator Kit Is Just A Few Hacks From Greatness

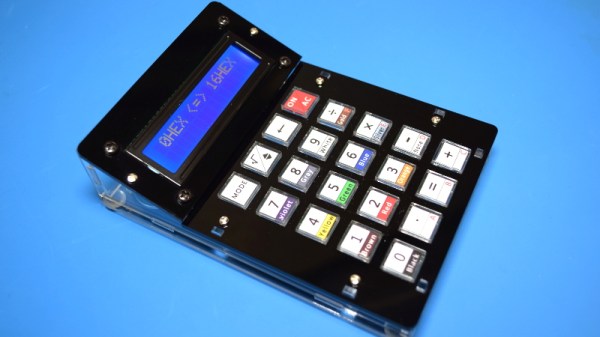
While most people are satisfied with a calculator application on their smartphone these days, there’s still something to be said for the old fashioned desk calculator. Maybe it’s the fact the batteries last long enough that you can’t remember the last time you changed them, or the feel of physical buttons under your fingers. It could even be the fact that it keeps your expensive smartphone from needing to sit out on the workbench. Whatever the reason, it’s not uncommon to see a real-life calculator (or two) wherever solder smoke tends to congregate.

Which is precisely the idea behind this DIY calculator kit. Available from the usual overseas retailers for about $15 USD, it has some hobbyist-oriented features such as the ability to decode resistor color bands, convert hexadecimal numbers, and calculate resistor values for driving LEDs. If you’re going to keep a knock-around calculator on your bench, why not build the thing yourself?

Given the dual nature of this product, a DIY electronics kit and a functional desk calculator for electronic hobbyists, it seems only appropriate to review both aspects of it individually. Which is good, since there may be more to this product than just the sum of its parts.

Continue reading “Review: Calculator Kit Is Just A Few Hacks From Greatness”

Gigatron Hack Chat

Join us on Wednesday, June 24 at noon Pacific for the Gigatron Hack Chat with Walter Belgers!

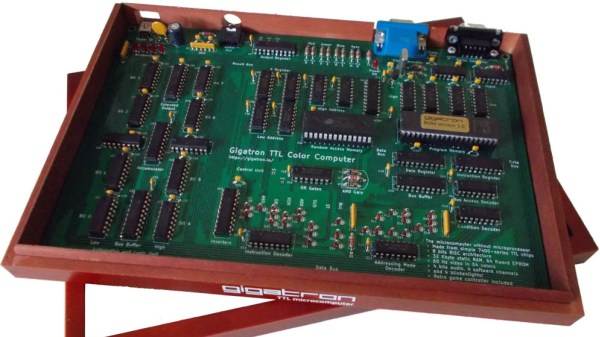
There was a time when if you wanted a computer, you had to build it. And not by ordering parts from Amazon and plugging everything together in a case — you had to buy chips, solder or wire-wrap everything, and tinker endlessly. The process was slow, painful, and expensive, but in the end, you had a completely unique machine that you knew inside out because you put every bit of it together.

In some ways, it’s good that those days are gone. Being able to throw a cheap, standardized commodity PC at a problem is incredibly powerful, but that machine will have all the charm of a rubber doorstop and no soul at all. Luckily for those looking to get back a little of the early days of the computer revolution or those that missed them entirely, there are alternatives like the Gigatron. Billed as a “minimalistic retro computer,” the Gigatron is a kit that takes the builder back even further in time than the early computer revolution since it lacks a microprocessor. All the logic of the 8-bit computer is built up from discrete 7400-series TTL chips.

The Gigatron is the brainchild of Marcel van Kervinck and Walter Belgers. Tragically, Marcel recently passed away, but Walter is carrying the Gigatron torch forward and leading a thriving community of TTL-computer aficionados as they extend and enhance what their little home-built machines can do. Walter will stop by the Hack Chat to talk all things Gigatron, and answer your questions about how this improbably popular machine came to be.

join-hack-chatOur Hack Chats are live community events in the Hackaday.io Hack Chat group messaging. This week we’ll be sitting down on Wednesday, June 24 at 12:00 PM Pacific time. If time zones have you down, we have a handy time zone converter.

Click that speech bubble to the right, and you’ll be taken directly to the Hack Chat group on Hackaday.io. You don’t have to wait until Wednesday; join whenever you want and you can see what the community is talking about.
Continue reading “Gigatron Hack Chat”

Catch The Old School BASIC Bug With This Computer Kit

Does the complexity of modern computing ever get you down? Do you find yourself longing for the old days, where you could actually understand what your desktop machine’s hardware and software was doing at any given moment? You aren’t alone, but unfortunately running a 40+ year old computer as your daily driver isn’t really a viable option.

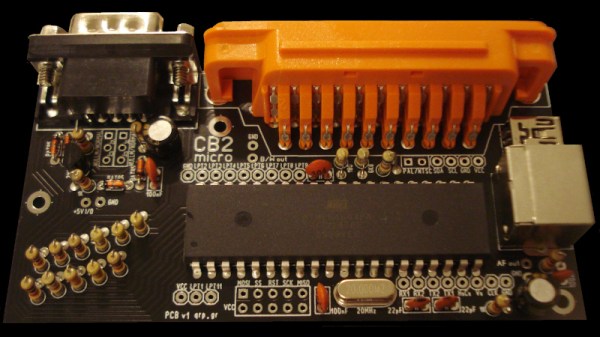
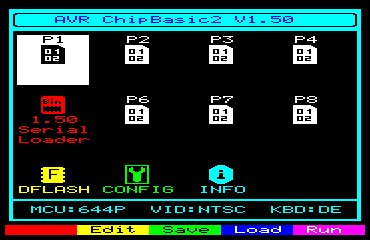
But that doesn’t mean you don’t have options. [Kostas] writes in to tell us about the “CB2 micro”: a diminutive open source retrocomputer kit that can be built in as little as 30 minutes thanks to its through-hole construction and exceptionally low parts count. When completed the miniature computer is an all-in-one BASIC development platform; just connect up a display and a PS/2 keyboard, and you’ve got everything you need to write you own programs or run games and applications developed by the community. You don’t even need a floppy, as the ATmega644P powered board has enough internal flash to store eight programs for easy access through its graphical menu system.

Main menu of the CB2 micro

For many in the audience, a cheap little board that you can assemble yourself and use as a stand-alone BASIC experimentation platform is appealing enough. But thanks to a collection of hardware add-on boards, the CB2 micro can be augmented with some interesting capabilities.

Some are fairly obvious such as adding additional flash storage or RAM, but you can also run the computer on AA or AAA batteries, or add an S-Video port. [Kostas] even explains how to assemble a special serial cable that allows you to network multiple boards together. If you take the plunge and start building your own hardware modules, the sky’s the limit.

Of course, purists may balk because the CB2 micro isn’t using a “real” computer processor. Fair enough. For those that want a more authentic retro experience, you could always pick up a kit like the RC2014, or go all out and cram a Z80 into an Altoids tin so you can carry it around with you.

Finally Your Air Drumming Has An Outlet

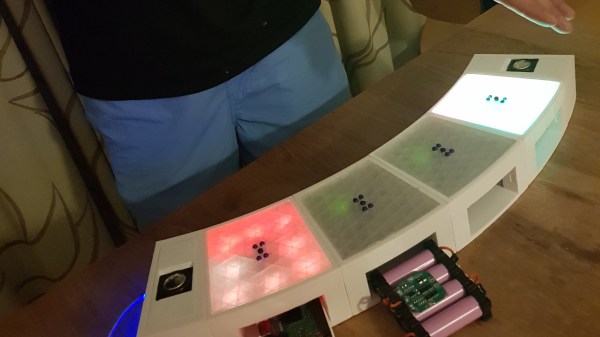
Two engineering students are hard at work on this air drum which they hope will help disabled people and people in nursing homes. Though, we think it just looks fun!

Each board is its own module consisting of the electronics and 3D printed cases. The modules each contain an arduino mini, IR sensor, and LEDs. They share power, audio, and communicate with an i2c bus. Two modules are special, one holds the power system and the other a Raspberry Pi. The units can be put together in different configurations. Finally, they are capped with speaker units.

The demo shown in the video, which you can see after the break, looks fun. The response time is pretty fast and it looks like you can measure all sorts of parameters. This can then be translated into different velocities, pitches, and instruments. It’s somewhere between a theremin and a drum kit, very cool.

Continue reading “Finally Your Air Drumming Has An Outlet”

Review: OSEPP STEM Kit 1, A Beginner’s All-in-One Board Found In The Discount Aisle

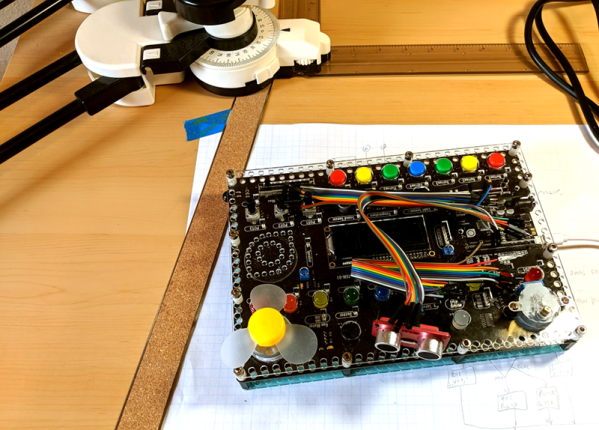
As the name implies, the OSEP STEM board is an embedded project board primarily aimed at education. You use jumper wires to connect components and a visual block coding language to make it go.

I have fond memories of kits from companies like Radio Shack that had dozens of parts on a board, with spring terminals to connect them with jumper wires. Advertised with clickbait titles like “200 in 1”, you’d get a book showing how to wire the parts to make a radio, or an alarm, or a light blinker, or whatever.

The STEM Kit 1 is sort of a modern arduino-powered version of these kits. The board hosts a stand-alone Arduino UNO clone (included with the kit) and also has a host of things you might want to hook to it. Things like the speakers and stepper motors have drivers on board so you can easily drive them from the arduino. You get a bunch of jumper wires to make the connections, too. Most things that need to be connected to something permanently (like ground) are prewired on the PCB. The other connections use a single pin. You can see this arrangement with the three rotary pots which have a single pin next to the label (“POT1”, etc.).

I’m a sucker for a sale, so when I saw a local store had OSEPP’s STEM board for about $30, I had to pick one up. The suggested price for these boards is $150, but most of the time I see them listed for about $100. At the deeply discounted price I couldn’t resist checking it out.

So does an embedded many-in-one project kit like this one live up to that legacy? I spent some time with the board. Bottom line, if you can find a deal on the price I think it’s worth it. At full price, perhaps not. Join me after the break as I walk through what the OSEPP has to offer.

Continue reading “Review: OSEPP STEM Kit 1, A Beginner’s All-in-One Board Found In The Discount Aisle”