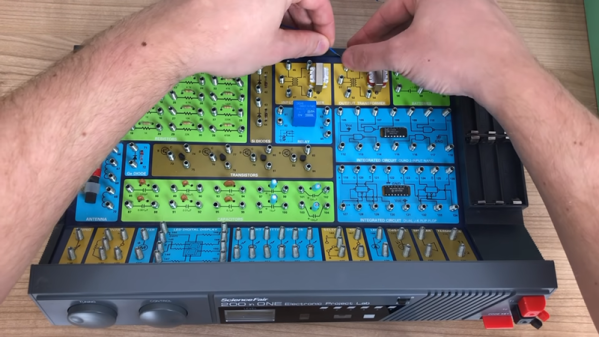
If you grew up in the latter part of the 20th century, you didn’t have the Internet we have today — or maybe not at all. What you did have, though, was Radio Shack within an hour’s drive. They sold consumer electronics, of course, but they also sold parts and kits. In addition to specific kits, they always had some versions of a universal kit where lots of components were mounted on a board and you could easily connect and disconnect them to build different things. [RetoSpector78] found a 200-in-1 kit at a thrift store that was exactly like the one he had as a kid and he shares it with us in the video below.
This was a particularly fancy model since it has a nice looking front panel with a few knobs and displays. The book shows you how to make the 200 different projects ranging from metronomes to rain detectors. The projects really fell into several categories. There were practical circuits like radio receivers, test equipment, and transmitters. Then there were games or circuits even the manual called “silly.” In addition, there were circuits to build simply to understand how they work, like flip flops or counters.
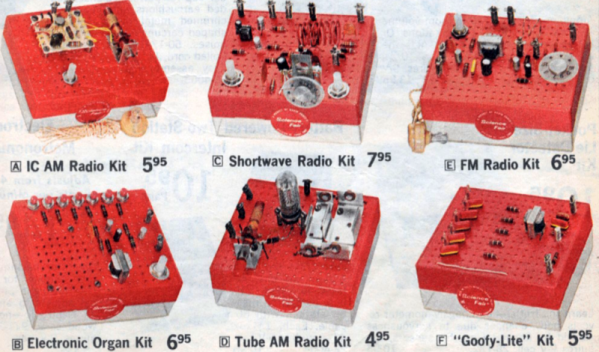
If you are under a certain age, you probably associate Radio Shack with cellphones. While Radio Shack never gave us access to the variety and economy of parts we have today, they did have one thing that I wish we could get again: P-Box kits. The obvious questions are: What’s a P-Box and why do I want one? But the kit wasn’t to make a P-Box. P-Box was the kind of box the kit came in. It was like a piece of perfboard, but made of plastic, built into a plastic box. So you bought the kit — which might be a radio or a metal detector — opened the box and then built the kit using the box as the chassis.
The perfboard was pretty coarse, too, because the components were all big discrete components. There was at least one that had an IC, but that came premounted on a PC board that you treated like a big component. One of my favorites was a three-transistor regenerative shortwave receiver. In those days, you could pick up a lot of stations on shortwave and it was one of the best ways at the time to learn more about the world.
On the left, you can see a picture of the radio from the 1975 catalog. You might think $7.95 is crazy cheap, but that was at least a tank full of gas or four movie tickets in those days, and most of us didn’t have a lot of money as kids, so you probably saved your allowance for a few weeks, did chores, or delivered papers to make $8.
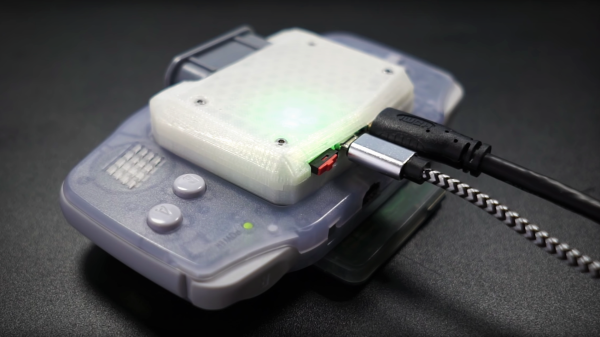
The concept of creating a gaming portable out of a home console has been around for some time, but it’s hardly seen the other way around. There have been a few devices that dared to straddle the line (i.e., Sega Nomad, Nintendo Switch, etc.), but the two worlds typically remain separate. [Stephen] looked to explore that space by attempting to turn the Game Boy Advance into a “big boy” console. The FPGA-based mod kit he created does just that, and comes complete with controller support and digital video output in 720p over a mini HDMI cable.
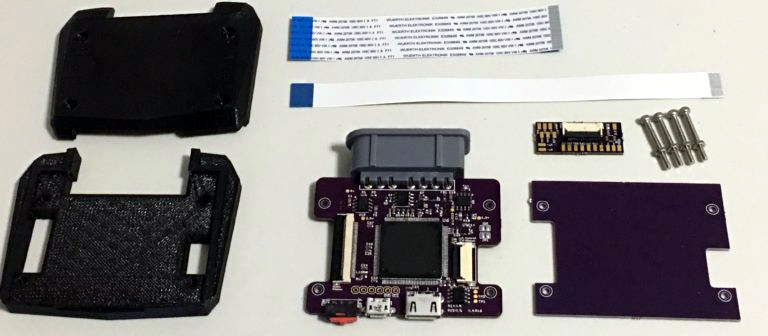
The kit itself was designed specifically for the original model GBAs containing the 40-pin LCD ribbon cable. These original models were the early run of non-backlit screens that are also denoted by a motherboard designation that can be seen by peering into the battery compartment. RGB signals are read directly from the GBA LCD socket by removing the handheld’s screen in favor of a fresh flat flex ribbon cable. This method enables a noise-free digital-to-digital solution as opposed to the digital-to-analog output of Nintendo’s own Game Boy Player add-on for the GameCube.
At an astonishing 240×160 native resolution, GBA video is scaled by the FPGA up to 5x within a 720p frame. Of course some of the image is cutoff in the process, so options for 4x and 4.5x scales were included. As a wise man once said, “Leave no pixel behind”. Since Nintendo designed the GBA clock to run at 59.7276 Hz, [Stephen] removed the oscillator crystal in order to sync the refresh rate to a more HDMI friendly 60 Hz. This means that the mod kit overclocks GBA games ever so slightly, though [Stephen] included a GBA cycle accurate mode as an option if your display can handle it.
The video below is [Stephen]’s initial test using a SNES controller. Tests must have gone well, because he decided to incorporate a SNES controller port in the final design. Now all those Super Nintendo ports on the GBA are back home once again thanks to this “consolizer” kit.
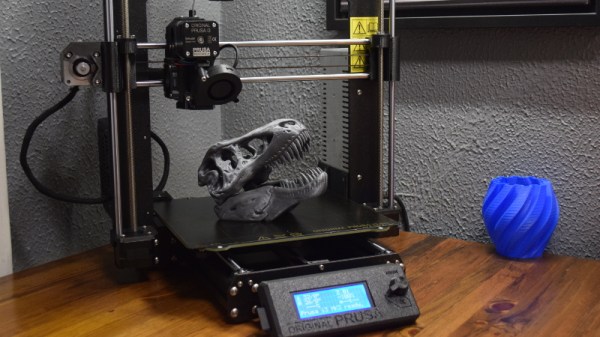
The Prusa i3 MK3 is, for lack of a better word, inescapable. Nearly every hacker or tech event that I’ve attended in 2018 has had dozens of them humming away, and you won’t get long looking up 3D printing on YouTube or discussion forums without somebody singing its praises. Demand for Prusa’s latest i3 printer is so high that there’s a literal waiting list to get one.
At the time of this writing, over a year after the printer was officially put up for sale, there’s still nearly a month lead time on the assembled version. Even longer if you want to wait on the upgraded powder coated bed, which has unfortunately turned out to be a considerable production bottleneck. But the team has finally caught up enough that the kit version of the printer (minus the powder coated bed) is currently in stock and shipping next day.
I thought this was a good a time as any to pull the trigger on the kit and see for myself what all the excitement is about. Now that I’ve had the Prusa i3 MK3 up and running for a couple of weeks, I can say with confidence that it’s not just hype. It isn’t a revolution in desktop 3D printing, but it’s absolutely an evolution, and almost certainly represents the shape of things to come for the next few years.
That said, it isn’t perfect. There’s still a few elements of the design that left me scratching my head a bit, and some parts of the assembly weren’t quite as smooth as the rest. I’ve put together some of those observations below. This isn’t meant to be a review of the Prusa i3 MK3 printer, there’s more than enough of those already, but hopefully these assorted notes may be of use to anyone thinking of jumping on the Prusa bandwagon now that production has started really ramping up.
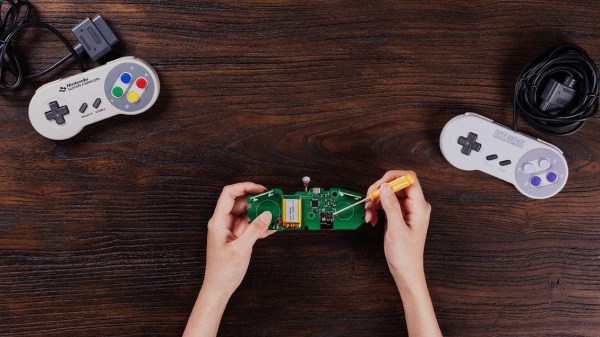
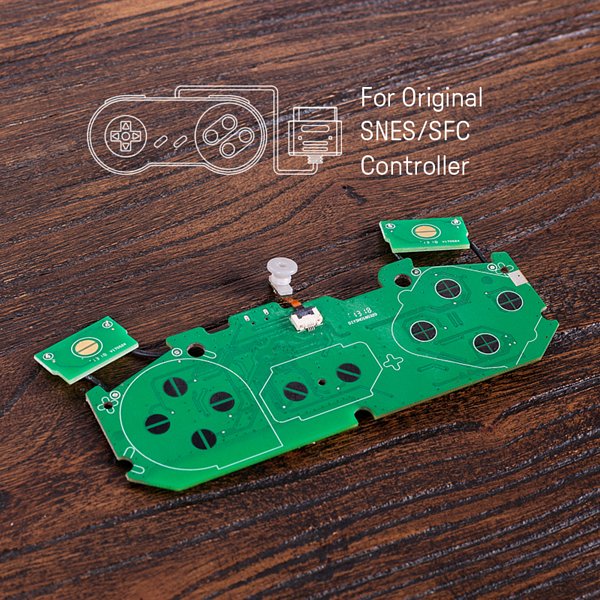
Known for their build quality and low latency, the [8bitdo] line of Bluetooth controllers are generally well liked among classic videogame devotees. They match modern conveniences like rechargeable batteries and Bluetooth connectivity with old school color schemes and the tried-and-true feel of a D-pad. All of their current offerings are modeled to invoke the same feel of console controllers of the past, however, for some there is no substitute for the original. For that type of hobbyist, the company created DIY Bluetooth mod kits in the form of drop-in replacement PCBs.
The featured mod kits are for the original NES controller, SNES controller, and 6-button Genesis Controller. They feature a 180 mAh Li-ion battery for an estimated 7.5 hours of gameplay, and a unique barrel plug type USB charging cable. The charging port fills the void left by the controller’s connection cable and also doubles a the LED status indicator. Though for the Sega Genesis mod kit, the charge port changes to a standard micro USB.
The [8bitdo] website boasts compatibility across Android, Linux, Mac, and Windows (drivers permitting) and even Nintendo Switch. With the addition of one of the company’s Retro Receivers, you are able to use the controllers on the original NES or SNES alongside their contemporary NES/SNES classic console counterparts.
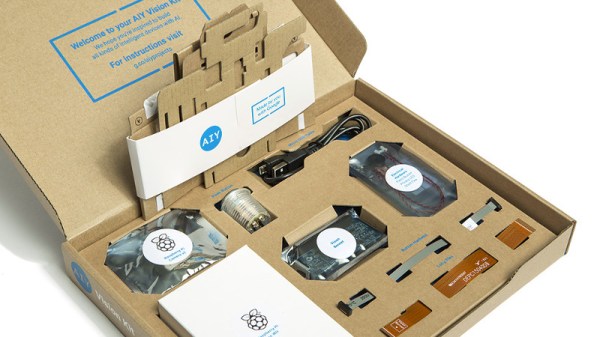
Last year, Google released an artificial intelligence kit aimed at makers, with two different flavors: Vision to recognize people and objections, and Voice to create a smart speaker. Now, Google is back with a new version to make it even easier to get started.
The main difference in this year’s (v1.1) kits is that they include some basic hardware, such as a Raspberry Pi and an SD card. While this might not be very useful to most Hackaday readers, who probably have a spare Pi (or 5) lying around, this is invaluable for novice makers or the educational market. These audiences now have access to an all-in-one solution to build projects and learn more about artificial intelligence.
We’ve previously seen toys,phones, and intercoms get upgrades with an AIY kit, but would love to see more! [Mike Rigsby] has used one in his robot dog project to detect when people are smiling. These updated kits are available at Target (Voice, Vision). If the kit is too expensive, our own [Inderpreet Singh] can show you how to build your own.
When men were men, and oscilloscopes were oscillographs.
Do you remember your first oscilloscope? Maybe we have entered the era in which younger readers think of a sleek model with an LCD screen, but for the slightly older among us the image that will come to mind is likely to be a CRT-based behemoth. Mine was a 2MHz bandwidth Cossor from the 1950s, wildly outdated by the 1980s, but it came to me at no cost. It proudly proclaims itself as a “Portable Oscillograph”, but requires its owner to be a weightlifter to move it. I still have it, as a relic and curio.
For most of us a new ‘scope is still a significant investment. Even affordable current models such as the extremely popular Rigol instruments are likely to cost several hundred dollars, but offer measurement functions undreamed of by those 1950s engineers who would have looked on the Cossor as an object of desire.
Oscilloscope buyers on a budget may not have the cash for a Rigol, a Hantek, or any of the other affordable ‘scopes. Someone starting on the road of electronic engineering can scout around for a cheap or free second-hand CRT model, but thanks to the ever advancing march of technology they also have another option. Modern microprocessors and microcontrollers have analogue-to-digital converters and processor cores that are fast enough to provide the functions of a simple oscilloscope, and to that end a variety of very cheap ‘scopes and ‘scope kits have come on the market. These invariably have a rather small LCD screen and a relatively low bandwidth, but since they can be had for almost pocket-money prices their shortcomings can be overlooked in the name of value. It’s been a matter of curiosity for some time then: are these instruments any good? For around £16 ($21) and the minor effort of an online order from China, we decided to find out.
If you look at most stockists of electronic kits these days, you are likely to find an oscilloscope kit in their range. These are volume produced in China, and the same design trends appear across different models. You can buy surface mount or through-hole, and most of them feature a bare board with maybe a piece of laser-cut Perspex standing in for a case. There are one or two models appearing that come with a case though, and it was one of these that we ordered. The JYE Tech DSO150 is a single-channel ‘scope with a 2.4″ 320×240 pixel colour LCD screen and a 200kHz bandwidth. Its specification is typical of the crop of similar kits, though its smart case sets it apart and made it an easy choice.
In the Box
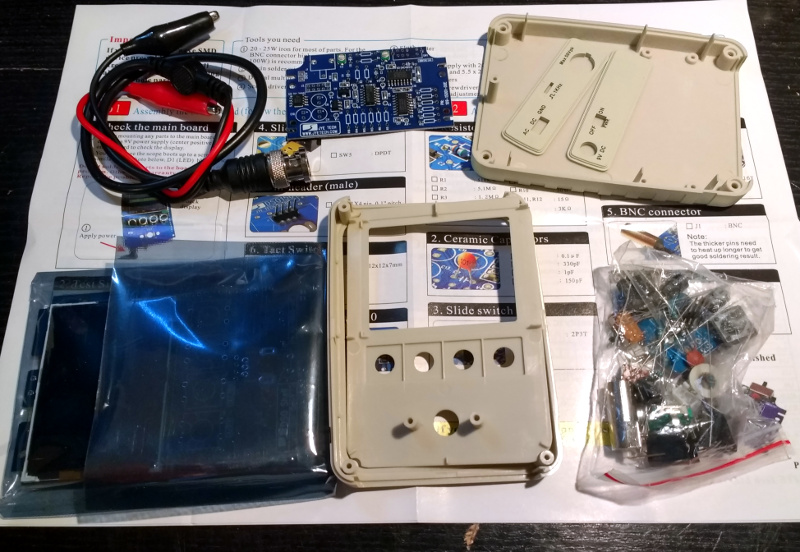
We ordered one, and when it arrived, it was packed in a small cardboard carton that had suffered some crushing in transit, but had protected the internal contents well enough that no harm had been done. A layer of foam protected the LCD, and the case parts appeared rigid enough to protect the rest of the components. There was a bag of discretes, the case parts, two PCBs, a test lead with crocodile clips, and two pages of instructions.
When looking at a kit, it’s best to start with the instructions, because no matter the quality of the kit itself it is the quality of the instructions that make or break a kit. If you can’t build it then it doesn’t matter how good it might be, it’s effectively junk.
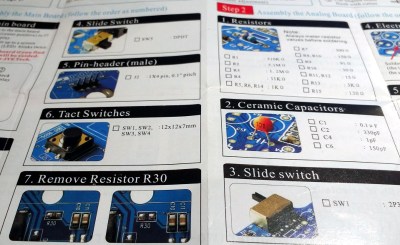
The DSO150 instructions are two sheets of high quality double-sided colour print, with the emphasis on pictures rather than words, The front page introduces the kit and gives a quick soldering guide, then the next two pages step through each stage of construction. The final page has basic instructions for use, specification, and a troubleshooting guide. Our kit had all surface-mount parts already fitted, if we’d known the kit could also be had with SMD parts to fit we’d have bought that version instead.
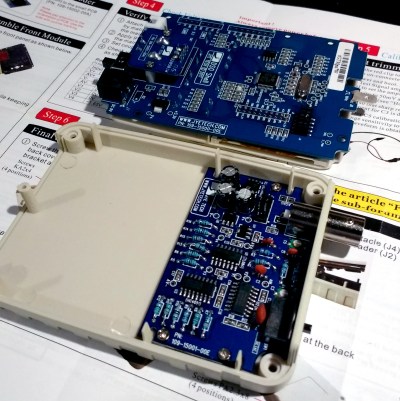
Inside the DSO100.
The instruction steps are long on images and short on text, but there are sometimes few cues as to where the component in question lies on the board. Sometimes some careful examination of board and picture is necessary to ensure correct placement. The first step though doesn’t involve any soldering, wire the main board up to a 9V supply, and watch the LCD boot into the oscilloscope software. There is support via a forum on the JYE Tech website, we presume you’d go there if it failed to boot out of the box. A 9V PSU isn’t included, you’ll need to find one with a 2.1mm centre positive plug. Fortunately a suitable candidate was in the box of wall warts here, formerly being used by a router.
The main board assembly is straightforward enough, being the assembly of larger through-hole parts such as switches and connectors. The analogue board has a brace of small through-hole resistors and ceramic capacitors to fit, of these the resistors were of the tiny variety which made distinguishing between some of their colour stripes a little difficult. Bring your multimeter to check. There is a BNC connector that requires significant heat on there too, so make sure you have a suitably beefy iron to hand. Finally there is a small board for the rotary encoder, then the front of the case can be assembled to the main board, the analogue board attached, and the ‘scope set up. Verify on-board voltages, attach the test clip to the calibration output and adjust the compensation capacitors for a square wave, and the rest of the case can be added to complete the unit.
Functionality
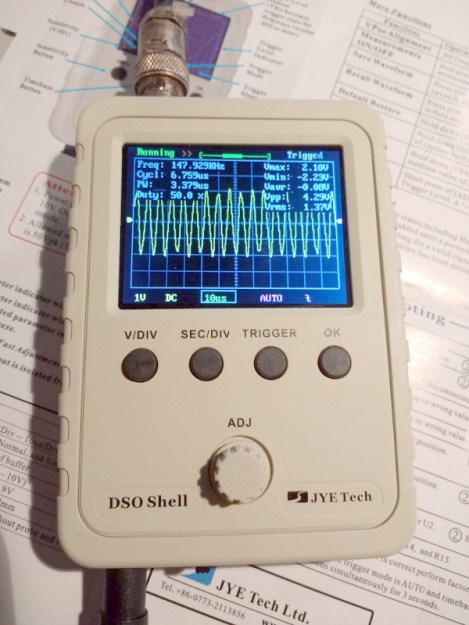
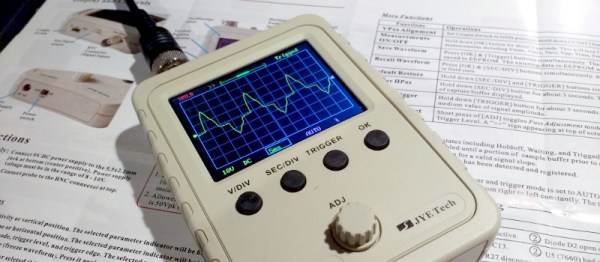
The DSO150 showing the upper end of its bandwidth.
In use, the DSO150 makes a simple and straightforward enough oscilloscope. The usual volts/division and timebase selection is easy enough, and the various trigger modes can quickly be selected. If you’ve used an oscilloscope before then you will have no problems getting started with it. But of course, the DSO150 isn’t just a simple oscilloscope, it’s a digital storage ‘scope. And with 1024 sampling points it can do the usual storage ‘scope thing of allowing the user to examine a stored waveform in great detail, scrolling back and forth through the stored points. Here the instruction sheet falls short, not mentioning that a double tap on the V/div or Sec/div buttons allows you to scroll.
Connecting the signal generator to our DSO150 allowed the exploration of its bandwidth. The claimed 200kHz is pretty spot-on, winding the signal generator far beyond that point showed a tail-off in displayed amplitude. Also the minimum 10µS per division limits the usefulness of a waveform display at these frequencies.
The DSO150 is supplied with a short test lead terminated in a pair of crocodile clips. This is somewhat less useful than the oscilloscope probes we’re used to, though happily it can also be used with a standard 1x/10x probe. Looking at the square wave on the test terminal through a standard probe reveals a sharp corner on the waveform, so there seems not to be any problems between the compensation on-board and that in the probe. It’s likely that either the DSO150 here will be used with a standard probe, or that the crocodile clip will swiftly be replaced with a probe of some kind.
Closing Thoughts
So then, the JYE Tech DSO150 oscilloscope kit. A nice little ‘scope within the limitations of the STM32F103C8 microcontroller that drives it. If you can put up with a 200kHz bandwidth and a 50V peak input voltage then it’s a useful pocket instrument. Its calibration will depend on the STM’s crystal and voltage reference, but as with the rest of its specification, when you consider its pocket-money price those become minor considerations. Add in that its software is open-source, and you have a very nice platform indeed. If we wanted to nitpick we’d ask for a battery compartment and a proper probe, but since both of those would put up the price we wouldn’t make too much noise about it. If you need a pocket ‘scope to supplement your bench scope when working on lower frequencies, or if you have a youngster in the family looking for their first ‘scope, buy one! Our review unit will definitely see some use rather than gathering dust.

 If you look at most stockists of electronic kits these days, you are likely to find an oscilloscope kit in their range. These are volume produced in China, and the same design trends appear across different models. You can buy surface mount or through-hole, and most of them feature a bare board with maybe a piece of laser-cut Perspex standing in for a case. There are one or two models appearing that come with a case though, and it was one of these that we ordered.