If you watch the movies, there isn’t much to a wind tunnel. Just a fan and a tunnel, right? The truth is there’s a lot more to it than that, and [ejs13] shows you how you can make a small tunnel with some basic supplies. One of the requirements for a useful tunnel is to have laminar flow — that is, flow in uniform layers with little, if any, mixing. This tunnel achieves laminar flow using an array of soda straws to direct the flow. In fact, there are 150 straws in total. You can see a short clip of the wind tunnel in action below.
The rest of the parts are easy, too. A computer fan provides wind, and there’s a little bit of wood and acrylic. You’ll notice in the video that you can easily see the airflow. That’s thanks to a light source, some water, and a bit of dry ice.
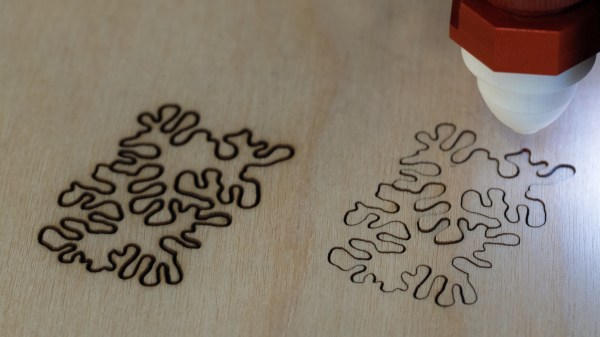
[Jesse]’s modification doesn’t affect the laser beam itself; it is an improvement on the air assist, which is the name for a constant stream of air that blows away smoke and debris as the laser burns and vaporizes material. An efficient air assist is one of the keys to getting nice clean laser cuts, but [Jesse] points out that a good quality air assist isn’t just about how hard the air blows, it’s also about how smoothly it does so. A turbulent air assist can make scorch marks worse, not better.
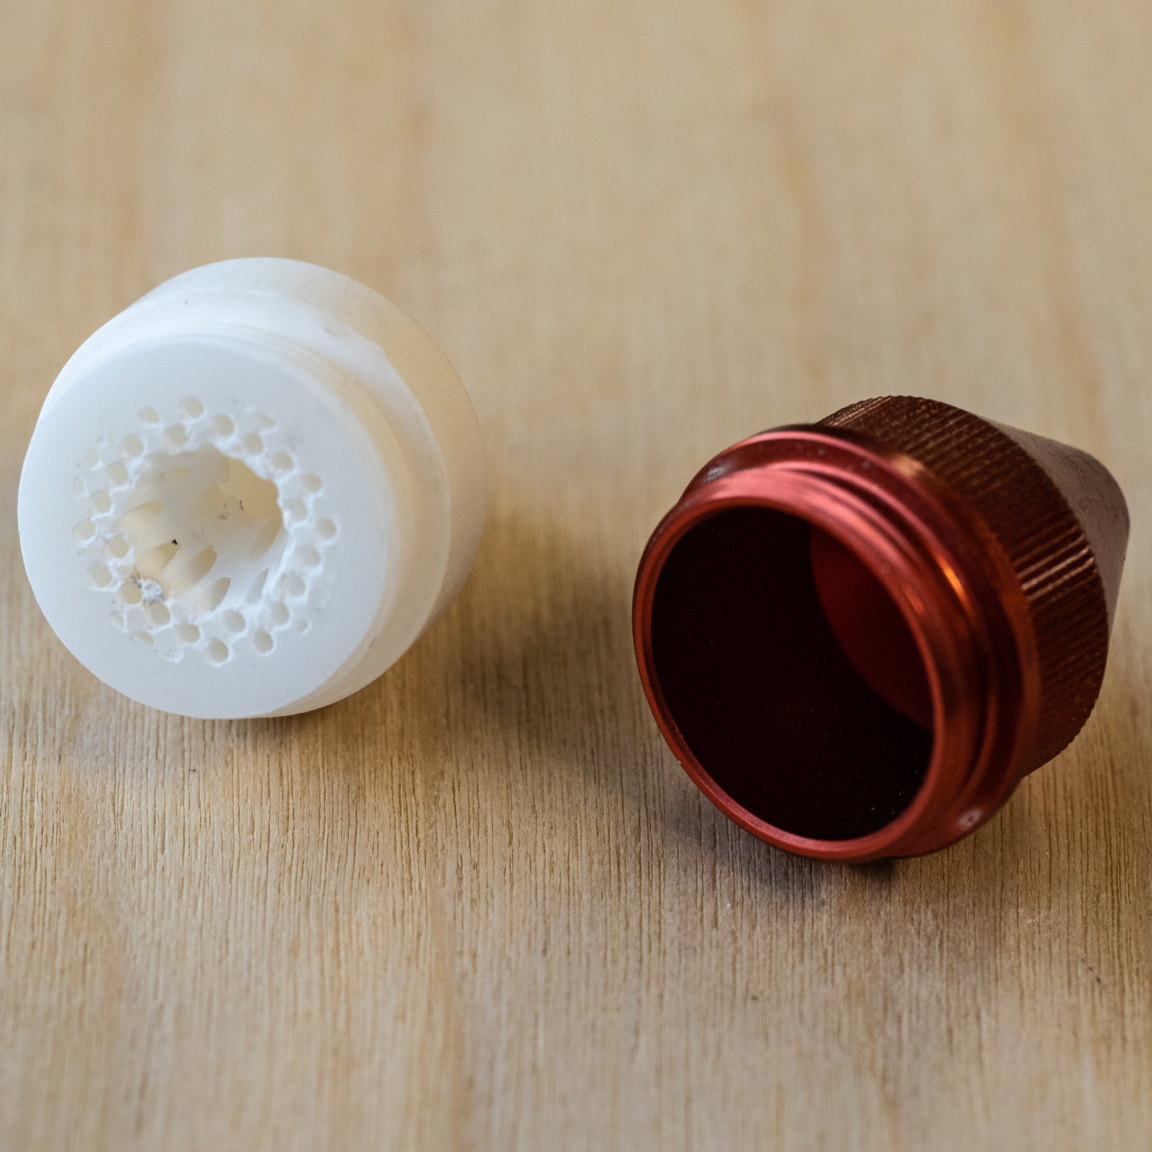
3D-printed nozzle to promote laminar air flow on the left, stock nozzle on the right.
As an experiment to improve the quality of the air flowing out the laser nozzle, [Jesse] researched ways to avoid turbulence by creating laminar flow. Laminar flow is the quality of a liquid having layers flowing past one another with little or no mixing. One way to do this is to force liquid through individual, parallel channels as it progresses towards a sharply-defined exit nozzle. While [Jesse] found no reference designs of laminar flow nozzles for air assists, there were definitely resources on making laminar flow nozzles for water. It turns out that interest in such a nozzle exists mainly as a means of modifying Lonnie Johnson’s brilliant invention, the Super Soaker.
Working from such a design, [Jesse] created a custom nozzle to help promote laminar flow. Sadly, a laser cutter head carries design constraints that make some compromises unavoidable; one is limited space, and another is the need to keep the laser’s path unobstructed. Still, after 3D printing it in rigid heat-resistant resin, [Jesse] found a dramatic improvement in the feel of the air exiting the nozzle. Some test cuts confirmed a difference in performance, which results in a noticeably cleaner kerf without scorching around the edges.
One of the things [Nervous System] does is make their own custom puzzles, so any improvement to laser cutting helps reliability and quality. When production is involved, just about everything matters; a lesson [Nervous System] shared when they discussed making the best plywood for creating their puzzles.
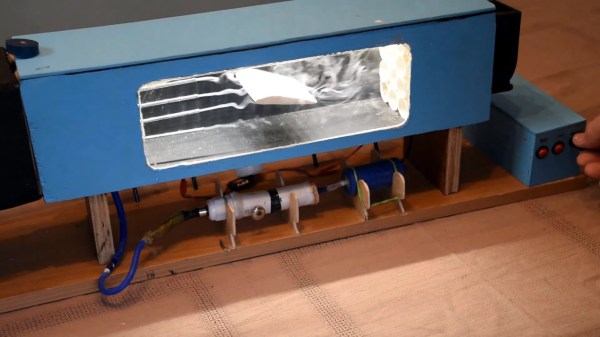
Computer simulation is indispensable in validating design and used in every aspect of engineering from finite element analysis to traffic simulation to fluid dynamics. Simulations do an amazing job and at a fraction of the time and expense of building and testing a scale model. But those visceral ah-ha moments, and some real-world gremlins, can be easier to uncover by the real thing. Now you don’t need a university research or megacorp lab to run aerodynamic study IRL, you can just build a functional desktop wind tunnel for a pittance.
[Mark Waller] shows off this tidy little design that takes up only about two feet of desk space, and includes the core features that make a wind tunnel useful. Air is pulled through the tunnel using a fan mounted at the exhaust side of the tunnel. The intake is the horn-like scoop, and he’s stacked up a matrix of drinking straws there to help ensure laminar flow of the air as it enters the tunnel. (The straw trick is frequently used with laminar flow water fountains). It also passes through a matrix of tubes about the diameter of a finger at the exhaust to prevent the spin of the fan from introducing a vortex into the flow.
For analysis, five tubes pipe in smoke from an vape pen, driven into the chamber by an aquarium pump. There’s a strip of LEDs along the roof of the tunnel, with a baffle to prevent the light shining on the black rear wall of the chamber for the best possible contrast. The slow-motion video after the break shows the effectiveness of the setup.
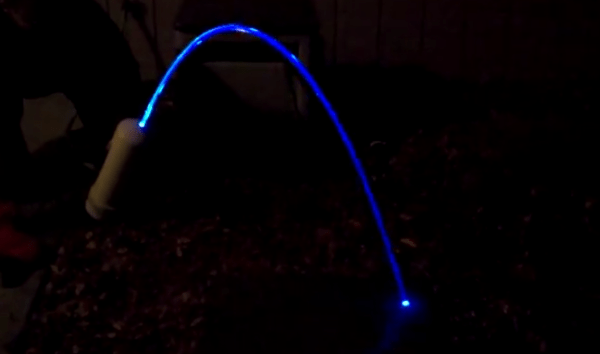
A few years ago Hackaday featured a laminar project which recently inspired [Kurt] to create his own. His goal is to create a computer controlled night time light show synchronized with music.
The laminar nozzle shown in the picture above is built with 800 drinking straws all placed in parallel inside a 4″ PVC pipe. The water input is a 3/4″ garden hose adapter, perpendicular to the flow of the output nozzle. The built therefore consists of cleaning sponges placed near the water inlet, followed by the straws and an inch gap to the exit nozzle. To get a nice flow, the edge of the exit nozzle must be as sharp as possible. [Kurt] purchased a brass pipe end cap, drilled a hole in it and sanded it to create a sharp inner edge. For the lights, he used 2 high power LEDs mounted with 3mm fiber optic cables, driven at around 5 Watts.
The link to the article that inspired Kurt can be found here.
[ApexLogic] had some PMMA core acrylic rod rod left over from a project and decided to use it as the lighting element in a laminar flow water jet.
The typical water jet consists of a bunch of sponges and drinking straws sandwiched together to slow a rough water stream and then a finely cut nozzle to provide a smooth ripple-free strand of clear water. If light is applied to this stream of water it tends to act similarly to fiber optics. [ApexLogic], however, uses a combination of shaved PVC filings, Brillo, and what appears to be most of the plumbing aisle of a local hardware store to get the same laminar flow. To top it off the polished acrylic rod is much less fragile than its glass-fiber counterpart and can have a high power light glued to the end for a nice water tight seal.
The system currently runs off of garden hose pressure, and would probably need some kind of a boost before it went into that front yard mega fountain that [Caleb] is still waiting for somebody to make. If you still need some clarity on laminar water jets check out these videos on a few
This wire-frame cube appears to be floating in mid-air because it actually is. This is a project which [Tom] calls a Laminar Flow Fog Screen. He built a device that puts out a faint amount of fog, which the intense light from a projector is able to illuminate. The real trick here is to get a uniformed fog wall, which is where the laminar part comes in. Laminar Flow is a phenomenon where fluids flow in a perfectly parallel stream, not allowing errant portions to introduce turbulence. This is a favorite trick with water.
[Tom’s] fog screen starts off with a PC fan to move the air. This airflow is smoothed and guided by a combination of a sponge, and multiple drinking straws. This apparatus is responsible for establishing the laminar flow, as the air picks up fog from an ultrasonic fogger along the way.
The only real problem here is that you want the projector shooting off into infinity. Otherwise, the projection goes right through the fog and displays on the wall, ruining the effect. Outdoor applications are great for this, as long as there’s no air movement to mess with your carefully established fog screen.
You can find a short test clip embedded after the break but there are other videos at the link above.